Monthly Archives: March 2015

Blueberry Blast Smoothie

blueberry blast smoothie

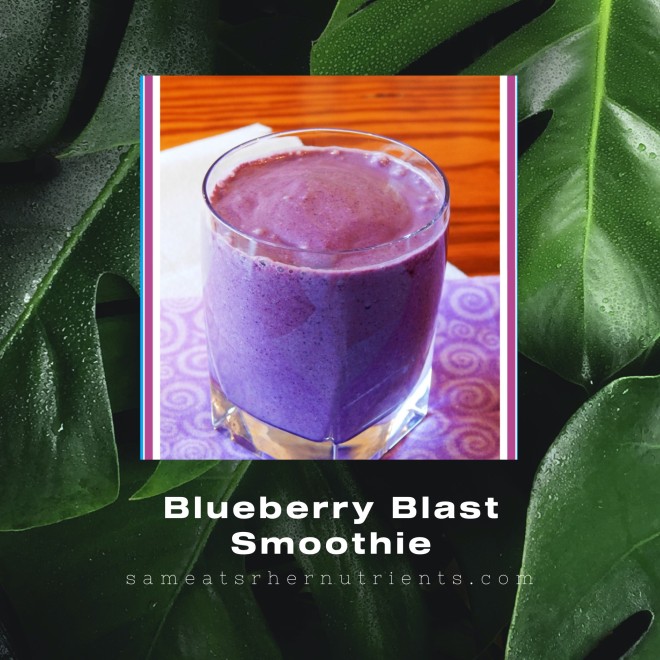
Are you a fan of healthy smoothies like me? I love all the blended nutrition you can get in a smoothie, and how they are so easy to digest. I am especially a fan of really cold ones. The coolness of the smoothie gives me a sense of well being. A warm beverage can do the same thing depending on the season, time of day, if I just worked out or was romping around the yard with Ming and the girls. My favorite smoothies are ones that get their sweetness from whole fruit and no added sugar like this Blueberry Blast Nut Smoothie. It is simple to make and can be enjoyed any time you get a craving. This delicious smoothie takes only minutes to whip together, and contains good fat from Coconut Milk and a Nut Butter of your choice, as well as Blueberries and Melon for Vitamin C, Antioxidants and Phytonutrients. There is the option for add ins for more health benefits!

For more health and wellness tips, you can go to my new Sandra Shields, Certified Health Coach Facebook page here and like it to follow me. I post new content there throughout the week! Thank you to all my followers for your support! I love you guys!

Blueberry Blast Smoothie

Ingredients:

1 Banana

1 Cup Wild Blueberries

1 Cup Honeydew Melon, Chopped

1/2 Cup Coconut or Almond Milk

1 Tablespoon of Nut Butter (Almond, Walnut, Cashew)

1 Cup Crushed Ice

Blend in a blender on high until smooth.

Serves 1 – 2

Optional add ins: Bee Pollen, 2 Tablespoons of Grass Fed Gelatin, 1 Tablespoon Ground Flax

Eat Your Nutrients!

Eat Your Nutrients!

Spiralized Golden Beet Salad

Spiralized Golden Beet Salad

I am in love with spiralized vegetables! It changes the texture and whole experience of eating them. The noodles or spirals coming out of the spiralizer as you turn the handle are gorgeous and abundant! Recently, I spiralized golden beets and then wondered, what should I do different with these gorgeous spun gold noodles? I decided to lightly steam them and serve them as a chilled beet salad.  I wanted crunch, flavor and eye appeal. I also wanted to keep the ingredients simple. The results were a salad with almonds for crunch, scallions and avocado oil.

I tend to spiralize several things at once and then store them in the refrigerator until I want to use them, so I only have to clean up the spiralizer once. These beets were ready a day in advance, and the actual preparation time the day of was about 20 minutes.

Spiralized Golden Beet Salad

Ingredients:

2 Medium Golden Beets, washed, peeled and spiralized

1/2 Cup Scallions, sliced, green parts only for Low FodMap

1/3 Cup Slivered Almonds

3 Tablespoons Avocado Oil

2 Teaspoons White Wine Vinegar

1/2 Teaspoon of Himalayan Pink Salt or Sea Salt (to Taste)

1/4 Teaspoon of Black Pepper or to Taste

Spiralized Golden Beet Salad 2

Directions: Place a few inches of water in the bottom of a pan with a steamer insert and bring to a boil.  Add the beets and steam five minutes, just till tender…think al dente. Remove from the steamer and run under very cold water to cool quickly and prevent further cooking. Drain the beets well. Add to a bowl and toss with the remaining salad ingredients. Serve, or refrigerate to chill more and let the flavors meld.

Everything contained in this salad is not only delicious, but offers health benefits. Beets are rich in nutrients, fiber, detoxify and contain phytonutrients.  Scallions are great for immune system health and contain Vitamin K for bones and Vitamin A for the eyes. Almonds contain fiber, protein and good fat as well as the good fat in the avocado oil, which is delicious!

Eat Your Nutrients!

Eat Your Nutrients!


Strawberry Lemonade Ice Cream

strawberry lemonade ice cream 3 with text

I have a Spring “ice cream” recipe for you today that is tart, creamy and dairy free! It uses a pound of fresh strawberries, lemon juice, lemon zest (for the zing), coconut milk, honey and a pinch of salt. It is beneficial to use whole fruit in treats whenever possible to get in the fiber and nutrients the way they were meant to be consumed. It also slows down the absorption of sugars, as opposed to just using a juice with the fiber and fruit extracted. This Strawberry Lemonade Ice Cream is a Low FodMap recipe as well with just a quarter cup of honey in the batch, and it serves six! This would be delicious as an Easter treat or served at a Spring cookout. I really love the color of this ice cream, it is a beautiful shade of pink, all natural, and just a few ingredients. All you need is a blender…..no cooking…..and an ice cream maker. The one I use is the Cuisinart hereI have had it for years and it keeps going strong!

strawberry lemonade ice cream 4 with text


Strawberry Lemonade Ice Cream

Ingredients:

1 Pound Fresh Strawberries

1 Can Full Fat Coconut Milk, No Additives

6 Tablespoons of Fresh Squeezed Lemon Juice

Zest of Two Organic Lemons

1/4 Cup Clear Honey

Pinch of Himalayan Pink Salt or Sea Salt

Directions:

Clean and hull the fresh strawberries and place in the blender with the can of coconut milk. Zest the lemons and put the zest in the blender. Then, squeeze the juice of the lemons and add to the blender. Add the honey and salt. Blend on high for one minute, or until smooth.

Place in a sealed container in the refrigerator and chill for four hours and up to 24 hours. When chilled, churn your ice cream and serve. If you have any leftover, you can freeze it in a air tight container. When eating any leftover ice cream, make sure it sits at room temperature about 10 minutes to allow the ice cream to soften again.

Serves 6

Eat Your Nutrients!

Eat Your Nutrients!

Lemon Herb Juicy Roasted Chicken

Lemon Herb Juicy Chicken

I don’t know about you, but I like my chicken juicy! I also like it to taste like chicken…..good chicken, not chicken injected with something to make it more tender.

that wasn't chicken

The chicken I ate as a child was good pastured chicken with firm, juicy, unadulterated meat. Try this recipe at home for a juicy roasted chicken using the best quality chicken you can afford. I used an organic 4 1/2 pound chicken. Preparing the chicken ahead with the seasonings and refrigerating it for an hour and up to 24 hours will make it even more flavorful!

Lemon Herb Juicy Roasted Chicken

Directions: Preheat your oven to 425º degrees.

Ingredients:

1 – 4 1/2 Lb. Good Quality Chicken

2 Tablespoon Grassfed Ghee

1 Organic Lemon

1 Teaspoon Himalayan Pink Salt or Sea Salt, Plus extra for inside the bird

1 Teaspoon of Black Pepper, Plus extra for inside the bird

2 Teaspoons of Dried Parsley

1/2 Teaspoon Dried Tarragon

Directions: Rinse and pat your chicken dry. Place in a roasting pan with a rack. Sprinkle the inside of the chicken with salt an pepper to season the cavity. Rub the outside of the chicken with 2 tablespoons of Ghee. Zest the lemon and mix the lemon zest with 1 teaspoon of salt, 1 teaspoon of pepper, 2 teaspoons of parsley and 1/2 teaspoon of tarragon. Sprinkle the herb blend evenly all over the chicken. Quarter the zested lemon and stuff inside the chicken.

At this point you may refrigerate the chicken covered for up to 24 hours or bake it right away.

Prepped Oven Roasted Chicken Ready for the Oven

Prepped Oven Roasted Chicken Ready for the Oven

Bake the chicken in the preheated 425º oven for one hour or until the meaty part of the thigh registers 165º degrees. Remove from the oven and let rest 10 to 15 minutes to retain the juices before slicing.

Yummy!

Eat Your Nutrients!

Eat Your Nutrients!


A new way to celebrate St. Patty’s Day!

What better way to Celebrate St. Patrick’s Day than with nutrient dense green real food!

foodasmedicinethemovie

For me, St. Patrick’s Day was always about parades of kilted men blasting “Amazing Grace” on bagpipes, green beer, and McDonald’s Shamrock Shakes.  I have a proposal for a new way for us to observe the 17th of March in a celebration of something else that is green – vegetables!

veggie_shamrock

We can all agree that eating more vegetables is beneficial.  In this article I posted on our Facebook page earlier this week, Dr. Mark Hyman states, “With the greater emphasis on vegetables we’re more apt to actually meet our nutritional needs and prevent illness and inflammation.”  For most people, adding more vegetables to their diet is a big drag.  But, it doesn’t have to be.  If you make it creative and a celebration, it can be fun!

This year for St. Patty’s Day, I’ve planned a menu for the entire day of entirely green fare.  From breakfast to dinner’s dessert, everything will be green!

View original post 148 more words

Orange Currant Muffins

This new muffin recipe uses whole peeled oranges in it, which adds a lot of flavor! There are many benefits in eating food in it’s whole form the way nature made it, so I was very excited to come up with this recipe! There is no added sugar. They are sweet and flavorful from the banana, and oranges with an added benefit of carrots in the recipe. This is an ultra moist muffin and is egg free.

Orange Currant Muffins

Orange Currant Muffins

Directions:

Preheat your oven 350º degrees and line muffin pans with 16 natural liners.

Ingredients:

2 Flax Eggs (combine 2 Tablespoons of Ground Flax Seed and 6 tablespoons water, whisk and refrigerate 15 minutes)

1 Cup Very Ripe Banana (sliced and packed) this took 3 medium bananas, but measure

1/2 Cup Coconut Flour

1/2 Cup Superfine Almond Flour

2 Cups Orange Segments (no seeds, peeled)

2 Cups Peeled and Sliced Raw Carrots

1 Tablespoon Ground Cinnamon

2 Teaspoons Baking Soda

1 1/2 Teaspoons Pure Vanilla Extract

1 Teaspoon Apple Cider Vinegar

1/2 Teaspoon Himalayan Pink Salt or Sea Salt

1/4 Cup Dried Currants for the Tops

Orange Currant Muffins Ready to Go Into the Oven

Orange Currant Muffins Ready to Go Into the Oven

To Make the Muffins: Place all the ingredients except the dried currants in a food processor with a blade attachment. Pulse to start incorporating and chopping larger ingredients, then turn on and process for two minutes until completely blended. Fill each muffin cup almost to the top with a muffin scoop, refer to photo, (you should have 16 muffins) and sprinkle with dried currants, dividing evenly.

The muffins are sweet and moist! It is hard to believe they have no added sugars and are made completely with whole nutritious fruit!

Bake in the oven for 35 minutes. Enjoy!

Eat Your Nutrients!

Eat Your Nutrients!


Mango Banana Blender Ice Cream

This creamy blender ice cream is a guaranteed way to satisfy a sweet tooth and a craving, and it only takes seconds in the blender! Three ingredients is all you need, and you will have a nutritious, figure friendly ice cream without the guilt! All you need is Bananas, Mango and Vanilla Extract. I always keep frozen bananas on hand, because they are so creamy when blended into smoothies.

Mango Banana Ice Cream sam eats her nutrients logo

Most everyone knows that bananas are a good source of potassium, but did you also know they are a source of vitamin B6 which our body does not store and is used to make antibodies to fight infection? Bananas are also a source of vitamin C and have 3 grams of fiber each.  The Mango packs a punch of vitamin C  (96% in an average sized mango) as well as vitamin A, fiber and some calcium.

Mango Banana Blender Ice Cream

Ingredients:

2 Frozen Ripe Bananas, cut into chunks

1 Cup of Frozen Mango cubes, the riper the better

1/2 Teaspoon alcohol free for AIP Paleo or  Pure Vanilla Extract, No Additives,

Directions:

Place the ingredients in a high speed blender that comes with a plunger, and blend on high pushing the fruit down with your plunger until it is creamy and blended. Serve immediately.

1 – 2 Servings

Eat Your Nutrients!

Eat Your Nutrients!

4 Ways to Build Muscle No Matter Your Age

Maintain Your Muscle

Build Muscle No Matter Your Age

A must read informational article by Dr. Frank Lipman about maintaining and building your muscle mass. It includes some good nutritional advice and well as the formula for calculating how much protein you should include in your diet daily for your body weight. Muscle mass is one thing we do not want to lose! Maintaining our muscle  is linked to longevity, it keeps our immune systems strong and allows us to live our lives to the fullest. A strong body is a healthy body!

Check it out!

4 Ways to Build Muscle No Matter Your Age.

Yours in health!

Sam

Eat Your Nutrients!

Eat Your Nutrients!


Simple Oven Roasted Butternut Squash

I was at the grocery store last week buying butternut squash, and the checkout clerk held up my squash, squished up her nose in curiosity and asked, “What do you do with these? I see people buying them, but how do you eat them?”  I asked her if she had ever had butternut squash? She said, no she was Italian and was familiar with zucchini, but not butternut squash. I was so excited to share with her my favorite way to prepare it…..oven roasted. Simple is often extraordinary! It is delicious, caramelized, sweet and nutty when oven roasted. I so wanted to invite her into my kitchen and give her a demonstration so she could taste it for herself! So, that has motivated me to do a series of simple vegetable dishes that are delicious and nourishing.

Butternut squash, referred to sometimes as Butternut Pumpkin in Australia and New Zealand, is full of health benefits including a good amount of beta-carotene which our bodies convert to Vitamin A, Potassium for our bone health, Vitamin C, Calcium, Magnesium, Vitamin B6, Fiber and some good Carbohydrates (5% in a cup) in addition to Carotenoids, which are naturally occurring pigments thought to be preventative against cancer and macular degeneration.

oven roasted butternut squash with type

Here is a simple and delicious way to prepare it!

Simple Oven Roasted Butternut Squash

Ingredients:

1 Medium Butternut Squash

2 Tablespoons Coconut Oil

2 Teaspoons Himalayan Pink Salt or Sea Salt

1/2 Teaspoon Black Pepper

Directions:

Preheat your oven to 400º degrees. Line a rimmed baking sheet with parchment paper.

Wash and peel the squash. I use a vegetable peeler. It works beautifully! Slice the squash in half lengthwise and remove the seeds. It will look like this:

Peeled and Seeded Butternut Squash

Peeled and Seeded Butternut Squash

Cube the Squash into 2 inch cubes and place on your rimmed baking sheet. Sprinkle it with the salt and pepper.

butternut cubed

Cubed Butternut Squash

Melt the coconut oil, and pour it over the cubed squash. Toss with your hands until well coated. Spread the squash out in a single layer on the cookie sheet, and place it in the oven. Roast a total of 50 minutes to an hour until it is starting to caramelize, tossing with a spatula every twenty minutes. There you have it! Utterly delicious, and you are Eating Your Nutrients in a very yummy fashion!

*If you are eating Low FodMap a serving is 1/4 Cup at a time.

Eat Your Nutrients!

Eat Your Nutrients!

%d bloggers like this: