Monthly Archives: June 2019

Strawberry Lemon Pepper Chicken Salad

Strawberry Lemon Pepper Chicken Salad on Blue Tray

This chicken salad is my current Summer obsession! It has all the bright flavors of Summertime with it’s bright lemon and strawberry flavors with the bite of black pepper! Perfection!

Strawberry Lemon Pepper Chicken Salad 1

I do hope you give it a go, because I think you will really love it!

One of the keys to a really good chicken salad with white breast meat is roasting the chicken breasts to absolute perfection. It is handy to have a instant read thermometer for this. Another tip when roasting boneless, skinless breasts is to rub them with olive oil. It locks in the juices!

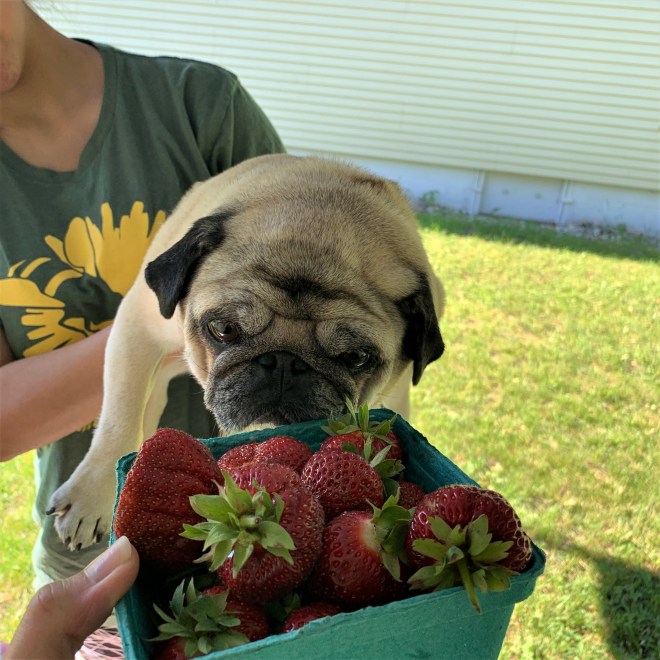
Ming loves Strawberry season! We got freshly picked ones from the Farmer’s Market!

Ming Smelling the Strawberries.jpg

I use a loose mayonnaise based dressing in this chicken salad that has plenty of fresh lemon juice for a lovely zing!

Also incorporated into this salad is crunchy toasted pecans, two kinds of onions (scallions and yellow) and fresh diced strawberries!

Strawberry Lemon Pepper Chicken Salad

Ingredients for the Chicken:

3 pounds of good quality boneless skinless chicken breasts (4 to 5)

1 Tablespoon of Olive Oil

Zest of one Large Lemon

1/2 Teaspoon of Black Pepper

1/2 Teaspoon of Sea Salt

Preheat your oven to 400° degrees F. Lay out the chicken breasts on a rimmed baking sheet. Whisk together the olive oil, lemon zest, salt and pepper. Brush all over both sides of the breasts evenly. Roast in your preheated oven for about 20 minutes. Keep a close eye on them and do not take the breasts over 165° to ensure your chicken is juicy and tender. Check it at 20 minutes, remove any smaller breasts that may cook faster, then keep roasting if necessary in three minute increments until the chicken is done at 165° F. I can’t stand a dry breast!

When the chicken is done, remove it from the baking sheet onto a plate, then cover it with another plate to cool.

Assembling the Salad:

Ingredients:

2 Cups of Fresh Ripe Strawberries, diced

1/2 Cup of Finely Diced Yellow Onion

1/2 Cup of Green Scallions, sliced

1/2 Cup of Toasted Pecans (Toast at 350° degrees F. for 8 minutes) cooled and chopped

1/4 Teaspoon of Black Pepper

1/4 Teaspoon of Sea Salt

1/4 Cup of Fresh Squeezed Lemon Juice (from the lemon you zested for the chicken)

1/2 Cup plus 2 Tablespoons of Good Mayo (I use this kind)

1 Tablespoon of Really Good Honey (Local is Lovely)

Directions to finish the Chicken Salad:

Cube your cooled chicken breasts into 1 inch cubes. Place in a large bowl. Add the diced yellow onion, scallions, and toasted chopped pecans. In a blender, blend together the chicken salad dressing ingredients until creamy and smooth: (the mayonnaise, lemon juice, honey, sea salt, black pepper). Pour the dressing over the chicken salad (saving the strawberries for last as they are tender) Toss the chicken salad until the ingredients are evenly disbursed and coated with the dressing. Now, fold in the diced strawberries. Chill and serve.

I hope you enjoy this delicious warm weather chicken salad full of the bright flavors of Summertime!

Strawberry Lemon Pepper Chicken Salad for Summer..jpg

*This post has affiliate links in it. I receive a very small commission if you purchase through my links. The small commission helps cover the cost of maintaining this blog. Thanks! 🙂

Farm Market Local Strawberries


Tuscan Herb Spreadable Bean Dip

Tuscan Herb Spreadable Dip

Spreadable dips are perfect for all those Summer vegetables coming to market!

This dip is great year round on carrots, celery, cucumbers and healthy crackers. It is also terrific in a wrap. I have been particularly enjoying this on endive and with tender asparagus spears, and I’ve also been folding tender spring lettuces around it. It’s sooo good and versatile.

Tuscan Herb Spreadable Dip Healthy and Versatile. Vegetarian, Gluten and Dairy Free

Prep Time

10 minutes

Prep Notes

n/a

Cooking Time

n/a

Yields

10 servings

Ingredients

1 15. oz can of White Kidney Beans (aka Cannellini Beans) I use Eden Organic BPA Free

2 Tablespoons of Rice Vinegar

2 Tablespoons of Garlic Infused Olive Oil (or two cloves of minced garlic and EVOO)

2 Tablespoons of Minced Green Onion

1 1/2 Tablespoons of Minced Fresh Parsley

1/2 Tablespoon of Nutritional Yeast

1/2 Teaspoon of Sea Salt

1/4 Teaspoon of Black Pepper

Directions

  1. Combine the can of drained and rinsed beans, vinegar, garlic infused oil, nutritional yeast, sea salt and black pepper in a food processor.
  2. Process until smooth and creamy, scraping the sides of the bowl a couple of times. 
  3. Transfer to a bowl.
  4. Add green onions and parsley, and mix with a spoon.
  5. Taste and adjust seasonings as necessary.
  6. Serve with cut up veggies or chips.

Creamy Garlic and Herb Bean Dip Gluten and Dairy Free

Beans are a versatile protein rich source of fiber and vitamins, and they make a terrific spread! I hope you enjoy making and using this.

Please send me photos of how you are using this. I love to hear from you!

Tuscan Herb Spreadable Bean Dip. A delicious creamy, protein rich vegetarian accompaniment. Gluten Free & Dairy Free

Nutty Chocolate Peanut Butter Crispies

Calling all Chocolate and Peanut Butter Lovers! There is no need to sweat or slave in the kitchen with these no bake bars. You can be in and out in just under 20 minutes without starting your oven.

Nutty Chocolate Crispy Bars

These delicious bars are sweetened with pure Maple Syrup and have natural peanut butter in them along with whole grain brown rice crispies! They also have half the sugar of a traditional crispy treat!

Nutty Chocolate Crispy Bars, Dairy and Gluten Free

In fact, even with the chocolate chips they still contain just about half the amount of sugars that those famous marshmallow treats do. Chocolate and peanut butter are a classic pair, and the nut butter bumps up the nutrition of this bar with protein, plus there are whole grains from the brown rice cereal.

Peanut butter is the bomb in these, but feel free to exchange it for other nut butters if you desire.

Nutty Chocolate Peanut Butter Crispies

Prep Time

5 minutes

Cooking Time

10 minutes

Yields

12 servings

Ingredients

1 Cup of Natural Peanut Butter with just salt added no sugar

1/2 Cup of Pure Maple Syrup

1/2 Cup of Enjoy Life Dark Chocolate Chips or dark chocolate chips of your choice

2 Tablespoons of Coconut Oil, Butter or Ghee

3 Cups of Brown Rice Crispies Cereal (I use Erewhon Brown Rice Cereal)

1/2 Teaspoon of Vanilla Extract

Directions

  1. Grease a square baking dish with a neutral flavored oil (or butter if preferred).
  2. Add the syrup, coconut oil, vanilla and peanut butter to a medium saucepan.
  3. Heat over low heat until creamy and smooth.
  4. Stir in the chocolate chips until they melt.
  5. Remove from heat and stir in rice crispies.
  6. Gently press into your prepared baking dish and allow mixture to set until firm and cool. (about 30 minutes).
  7. Cut into squares and enjoy!

You may have noticed that I am now writing recipes outside of the Paleo template, but you will still see plenty of Paleo friendly recipes. I personally still eat Paleo 80% of the time, but I have developed sensitivities to some of the major Paleo foods used in baking……coconut and almonds. So, I have experimented, had a new food sensitivity lab test, and have found I am doing well with a broader range of healthy choices. All my recipes will continue to be Gluten Free.

Life is a journey, and I hope it is a journey for all who are seeking to better health and happiness!

Food should be a part of the celebration of life, and is meant to be enjoyed. It should help us thrive however, and not hinder our ability to have energy and vitality, as well as longevity. There is a time to celebrate and let go a little, because there is a danger in becoming too rigid beyond what is necessary. However, I have myself been really sick and helped myself greatly through food. Our bio-individuality makes us all unique.

Now go make some delicious, better for you, Nutty Chocolate Peanut Butter Crispies and share them with your friends, kids and family!

XOXO

Sandra

Nutty Chocolate Peanut Butter Crispies! Gluten Free and a Dairy Free Option with Half the Sugar


Make Your Own Blueberry Pineapple Fruit Roll Ups!

Blueberry Pineapple Fruit Roll Ups Gluten Free Refined Sugar Free

Blueberry Pineapple Fruit Roll Ups! Does that sound tempting? These fruit roll ups have concentrated blueberry and pineapple flavor with  just real, whole fruit and a little pure maple syrup! Why would you want to make your own fruit roll ups? Here’s a few reasons. Feel free to comment with more.

~ If you like to pick your own fruit flavors

~ You just want a few simple ingredients that taste great and are real.

~ They are a sweet whole fruit snack.

~ There are no added sugars, juices or oils.

~ No added color, just the real deal.

~ You are a DIY’er

~ You like to see the smile on faces when they see you made some.

~ You think, what’s the big deal?….blend it, pour it and forget it ’til they are done, and they are delicious!

~ You show your love through making special treats.

~ You are looking for healthier snack alternatives without processed sugar.

Blueberry Pineapple Fruit Roll Ups

Here’s how you make them. It is simple and direct. The biggest part is cutting them into strips and rolling them up at the end.

Blueberry Pineapple Fruit Roll Ups No Refined Sugar

You will need a food dehydrator for this recipe. The hands on time is fairly short. They dehydrate for 18 hours, and you need do nothing while that is happening!

DIY Blueberry Pineapple Fruit Roll Ups

Cooking Time

20 Minutes to prep them, then hands off time…….Dehydrate approximately 18 hours at 135 degrees F.

Yields

25 to 30 Roll Ups

Ingredients

2 Pints of Fresh Blueberries

2 Cups of Fresh Pineapple

2 Tablespoons of Pure Maple Syrup

1 Tablespoon of Fresh Squeezed Lemon Juice

1 Tablespoon of Quality Gelatin

2 Tablespoons of Hot Water

Directions

Clean the blueberries with a fresh cool water rinse and place them in a high speed blender. Chop the fresh pineapple into chunks, and add it to the blender with the blueberries. Add the maple syrup and lemon juice. Blend until pureed. Now you will add the gelatin. Heat 2 tablespoons of water in your microwave until very hot. Whisk the gelatin into the hot water until it is foamy. Pour this into the blender with the blueberry pineapple mixture, and blend until smooth and incorporated.

Set out six dehydrator trays (my dehydrator is an Excalibur) and line them with non-stick drying sheets that go with your brand of dehydrator). Pour the fruit roll up mixture evenly onto six sheets. Pick up the sheets and swirl by tipping them to spread then out into 8″ circles.

Dehydrate at 135° degrees for approximately 18 hours, or until they are no longer tacky in the center but not crispy. They should still be pliable.

Remove the fruit roll ups from the dehydrator and cool. After they are cool, using kitchen scissors or a sharp knife, slice each roll up into strips. Cut parchment the same width as the fruit strips and roll them up with the parchment. Tie with a string. Place them in a sealed container and store at room temperature.

Blueberry Pineapple Fruit Roll Ups that you can make yourself with Whole Fruit, No Added Colors and No Refined Sugar

Creamy Cannellini Bean Salad for your next Backyard BBQ

Cannellini Bean Salad for a Creamy Side or Burger and Sandwich Topper

Cannellini Beans, which are white kidney beans, have to be one of the creamiest beans I have ever had.

The fact that they are white makes them very eye appealing when cooking them with other bright colors like red onion and herbs.

Cannellini Bean Salad Keeping It Real

This Cannellini Bean Salad is reminiscent of a good potato salad. The texture and flavor reminds me of it.

I started making this recipe several months ago, and my kids have been requesting it, so I finally decided it was time to blog it.

Cannellini Bean Salad for your Backyard BBQ's

I always buy my canned beans from Eden Organics, because when beans are not properly prepared, they can be difficult to digest, and I like the way Eden prepares them. I personally don’t react to them. Eden Organics prepares all their beans by first washing and soaking them overnight before pressure cooking them, which thoroughly inactivates the lectins that can cause gas, bloating and difficulties with digestion. They also use BPA Free cans, and their beans contain no additives.

Creamy Cannellini Bean Salad

You can go crazy with this salad by adding it on top of burgers and in sandwiches or just eat it as it was originally intended, as a side. But if you’re like me, you push the boundaries.

I have a new dip I will share soon using Cannellini Beans that is super good too! You gotta love these creamy beans and their versatility!

Beans are healthy when prepared properly and contain plant based protein and fiber along with vitamins, minerals, folic acid, potassium, and zinc. Their complex carbs also provide crash free energy.

Creamy Cannellini Bean Salad

1 Can of Eden Organics Cannellini Beans, drained and rinsed

1/3 Cup of Diced Red Onion

1/3 Cup of Diced Celery

1/4 Cup of Good Mayo (I use this brand)

1 Tablespoon of Apple Cider Vinegar

1 Tablespoon of Yellow Mustard

1 Tablespoon of Fresh Lemon Juice

1/4 Teaspoon of Dried Dill

1/4 Teaspoon of Dried Parsley

1/4 Teaspoon of Sea Salt

1/4 Teaspoon of Black Pepper

Directions:

Place Cannellini Beans into a medium bowl and very roughly mash them with a fork. You only want them to be partially mashed. But you can play with this to make them to your liking. Add the diced onion and celery and toss.

In a separate bowl whisk together the remaining ingredients for the dressing. Fold the dressing into the beans, onion and celery. Refrigerate for one hour. This salad will last three days in the refrigerator.

Creamy Cannellini Bean Salad for your next Backyard BBQ - Keeping It Real. This recipe is Dairy Free and is Naturally Gluten Free and Vegetarian

*This post has affiliate links in it. I receive a very small commission if you purchase through my links. The small commission helps cover the cost of maintaining this blog. Thanks! 🙂