Chicken

Buffalo Chicken Tostadas, Gluten and Grain Free

Buffalo Chicken Tostadas, Gluten and Grain Free

Buffalo Chicken dishes are a huge fan favorite, and I can say I crave buffalo chicken! When I recently had a company I was unaware of offer to send me samples of their gluten and grain free Rise & Puff Tortillas with only 5 clean ingredients (cassava flour, tapioca flour, pure avocado oil, honey and sea salt) and no preservatives, I said yes, and started brainstorming a delicious recipe to make with them. These are the Rise & Puff Award Winning Tortillas with no added gums and quality ingredients that tasted delicious.

The sky is the limit with these tortillas, and I am so excited to find one on the market that toasted up nicely and remains flexible for folding, or you can toast it longer and it becomes crispy!

Let’s go! This Buffalo Chicken Tostada recipe has shaved purple cabbage and yellow onion for crunch, and Greek yogurt, a healthier alternative to sour cream, and creamy delicious avocado! I always feel like I’ve hit the jackpot when an avocado is perfectly ripe! You are going to love the homemade buffalo sauce that is bursting with flavor, and I used boneless chicken thighs, which are very tender and don’t dry out.

Buffalo Chicken Tostadas, Gluten and Grain Free

The buffalo chicken is made in a skillet on the stovetop, then you simply toast the tostadas in a pan and assemble them. I love that you can make the buffalo chicken in advance and reheat it when you want to make them. I am all about time saving and ease! It’s a crazy busy world, and this makes it easier to make them quickly with low stress when you have hungry people to feed, including yours truly. Nothing worse than a hangry cook! These are also great to have on hand in the fridge for breakfast tostadas with eggs, taco night, and quesadillas. There are a lot of recipe ideas on their website as well if you’d like more inspiration.

Buffalo Chicken Tostadas, Gluten and Grain Free

This recipe makes 6 to 8 tostadas.

Ingredients:

To Cook the Chicken:

2 Pounds of Boneless, Skinless Chicken Thighs

1 1/2 Tablespoons of Olive Oil

1 Teaspoon of Sea Salt

1/4 Teaspoon of Black Pepper

In a large skillet add 1 1/2 tablespoons of olive oil, and brown the chicken thighs on each side sprinkling with the salt and pepper. They do not need to be cooked in the center. They will cook as the sauce simmers.

For the Buffalo Sauce:

In a medium bowl, whisk together:

1/3 Cup of Franks Hot Sauce

1/4 Cup of Pure Honey

1/4 Cup of Ghee

2 Tablespoons of Coconut Aminos

1 Tablespoon of Garlic Infused Olive Oil or 1/2 Teaspoon of Garlic Powder

1/2 Teaspoon of Salt

1/2 Teaspoon of Black Pepper

To assemble you will need:

1 Package of Rise & Puff Tortillas

Thinly Shaved Red Cabbage

Thinly Sliced Yellow Onion

1 Ripe Avocado, Sliced

Plain Greek Yogurt

Directions:

After you have browned the chicken on both sides and whisked together the sauce ingredients in a bowl, pour the sauce over the chicken in the skillet. Bring the chicken and sauce to a boil, then reduce the heat and simmer with the lid 3/4 on, so the steam escapes, for 20 minutes, or until the chicken is fork tender. Remove the lid and continue to cook on medium heat until the sauce has evaporated a good bit and is thick. Remove the chicken from the sauce onto a cutting board, and shred or chop. Add the chicken back to the skillet. Now you are ready to toast your tostadas and assemble. In a hot skillet with a little bit of olive oil (I used a coated cast iron skillet) toast the tortillas for 15 second per side, or until they have bubbled and browned. (see the photo)

Remove them from the skilled and assemble the tortillas by adding buffalo chicken to the bottom, following by shaved red cabbage, onion, avocado and Greek yogurt. Sprinkle with additional salt and pepper if desired. Enjoy!

I always love to hear from you! Leave a comment for me.

Buffalo Chicken and Ranch Oven Hashbrowns

The official days of Fall are almost here, and it is September, even though it has been pretty darn hot and humid, even up here in Northern Michigan! But that hasn’t stopped me from decorating my home for fall and dreaming up some new recipes for the crisp days coming when the football games start, kids are back to school, it gets more hectic, and we start craving hearty foods and always lots of flavor!

I don’t know about you, but I love a good hashbrown. But, they take so long to make and can be tricky on the stovetop, and by tricky, I mean, you can’t walk away from them. Buffalo chicken, potatoes and ranch all are crave worthy ingredients, and I thought, why not make a recipe using all these delicious foods that I can make quickly. Let’s face it, we are almost all juggling so much nowadays. Some days I feel like my whole day is a race, yet I am responsible for feeding an equally busy, hungry family, and I still want them to tell me how yummy it is. I have never been a “Grab it and Growl person”. My husband had that a lot growing up, and no disrespect to any loving mom. We all want good things for our children. I’m just an overachiever in that department and always have been having been trained by a mom who did mostly scratch cooking.

This recipe uses real food ingredients, and I added a shortcut! You can use a store bought quality rotisserie chicken as an option. (Make sure it’s gluten free if you are eating g/f.) They are very easy to find anymore, and it makes this recipe super quick. Also, if you have an Instant Pot, you can cook a whole seasoned yourself chicken in there during the day and have it ready and warm at dinner and just need to take it off the bone. Or…… cook the chicken the day before, debone and shred it for making this recipe the next day. Didn’t I tell you I have options for ya? I get it! Some days are crazy. I’m right there with you. But, there is nothing better on a crazy day than to make this feel good recipe! I even had leftovers for lunch the next day.

Let’s make Buffalo Chicken and Ranch Oven Hashbrowns!!

Buffalo Chicken and Ranch Oven Hashbrowns

Ingredients:

1 Whole Roasted Chicken, deboned and shredded (however you like to make it. Mine was in the Instant Pot seasoned with salt and pepper)

2 Pounds of Frozen Hashbrowns (I use Cascadian Farms 1 lb bags. I order from Thrive Market here.)

1 Medium Chopped Yellow Onion (omit if Low FodMap and substitute 1 Tablespoon of Garlic Olive Oil for 1 Tablespoon of Ghee)

4 ounces of Romano Cheese, shredded finely

4 Ounces of Asiago Cheese, shredded finely

3 Tablespoons of Butter or Ghee

1/2 Teaspoon of Onion Powder (omit if Low FodMap)

1/2 Teaspoon of Sea Salt

1/2 Teaspoon of Black Pepper

For the Sauce:

1/4 Cup of Frank’s Hot Sauce

4 Tablespoons of Butter or Ghee

1 Tablespoon of Apple Cider Vinegar

4 Tablespoons of Honey

I use my recipe for Won’t Miss a Think Ranch here. Make this or use your favorite clean ranch dressing.

Fresh minced parsley and basil for the top (optional) plus more hot sauce to drizzle on top if you like extra heat.

Directions:

Shred your chicken. Melt the buffalo sauce ingredients in a saucepan, and pour over the chicken and toss to coat it evenly. Set aside.

Preheat your oven to 400 degrees F. Let’s make the easy, crispy and absolutely delicious sheet pan hashbrowns in the oven. I’m getting excited now! 😉 In a large bowl, break up the frozen hash browns with your hands. If they are really frozen, you can use a meat pounder. Isn’t it convenient these are made from frozen and you don’t have to thaw them first? I love that for convenience. Add 3 Tablespoons of melted butter to the hashbrowns along with a medium chopped onion, the onion powder, Romano and Asiago cheeses, salt and pepper. Toss to coat thoroughly. Lay out a large rimmed baking sheet, grease it lightly and then lay a piece of parchment paper on top. Pour your hashbrowns onto the sheet pan and press them firmly down in one even layer. Bake the hashbrowns on the top shelf of your oven for 40 minutes until golden brown with crispy edges. Make sure to check them after 35 minutes as every oven is slightly different. You can make just the hashbrowns too!

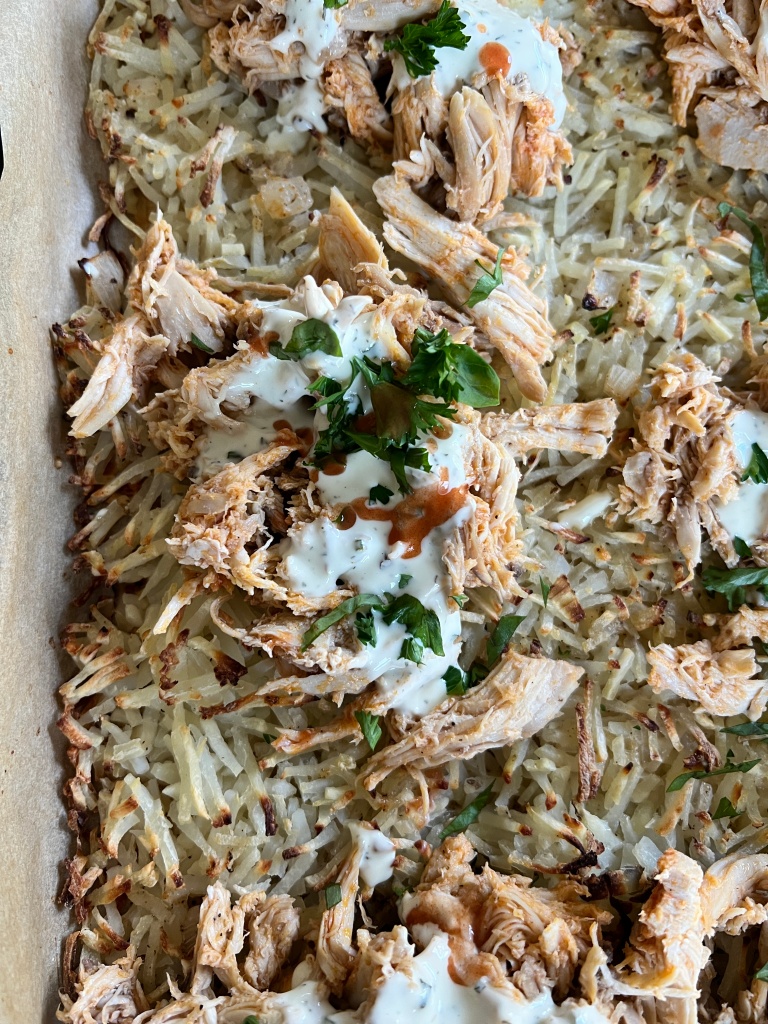
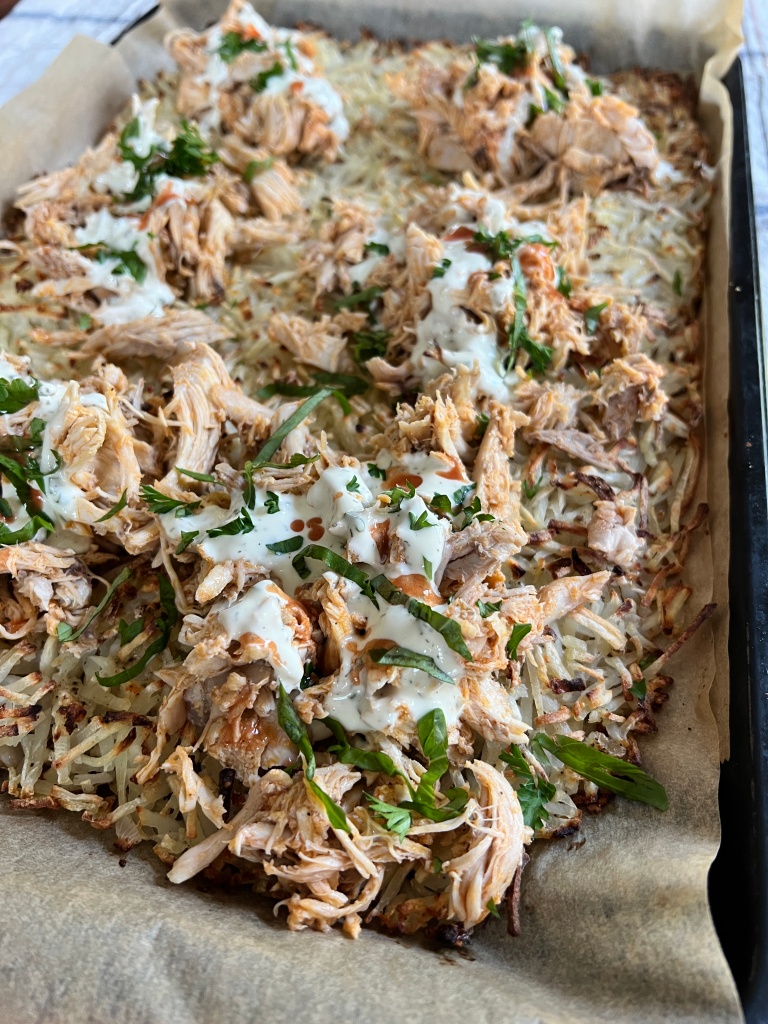
When the hashbrowns are golden brown and crispy, pull them out of the oven. Make sure your buffalo chicken is still warm. If not, reheat it in the microwave. Now, dollop the shredded buffalo chicken on top the the hashbrowns as shown, drizzle with ranch and sprinkle with fresh minced parsley and basil and extra hot sauce if desired.

Take it to the table and serve it cut into squares with a large spatula! Can I say yum? It’s so good. I like to serve it with more veggies on the side and a leafy green salad.

Chicken Enchilada Casserole (Grain Free, Healthy, Low Carb & Delicious) Benefits of Houseplants in your Home, and Non Toxic Living

We are well into January, and I have to say I like the thought that the days are getting longer now! In fact, I find I have been using some of my Summer mugs, because they feel so bright and cheerful.

I am a lover of enchiladas and eating healthy. I think it is great to focus on foods that feed your body, mind and soul that are good for you and taste incredible, keeping in mind that if you have been eating a lot of processed and fast foods, taste buds need time to adjust to less salt and sugar. This is also a low carb recipe, so if you have been fighting belly fat, this is a wonderful casserole that tastes even better the next day.

Chicken Enchilada Casserole (Grain Free, Healthy and Delicious)
Delicious Grain Free Chicken Enchilada Casserole

Chicken Enchilada Casserole (Grain Free, Healthy and Low Carb)

Ingredients:

3 lbs. of Boneless Skinless Chicken Thighs

Two Large Bunches of Swiss Chard, stems stripped, washed and roughly chopped and dried

5 oz. of Spinach

2 1/2 Cups of Carrots (peeled, chopped and steamed. You can also use baby carrots and skip the peeling)

1 Cup of Good Salsa (I used Green Mountain Gringo. You choose the heat based on your preference)

1 Cup of Plain Greek Yogurt

1 Cup of Aged Cheddar Cheese, shredded (about 4 ounces)

1/4 Cup of Chicken or Bone Broth

1 Tablespoon of Garlic Olive Oil (I like and use this brand)

1 Teaspoon of Salt, Divided plus some for sprinkling

1/2 Teaspoon of Black Pepper, Divided plus some for sprinkling

Directions:

Preheat your oven to 400 degrees F.

Lay the chicken thighs onto a baking sheet and brush lightly with olive oil. Then, sprinkle with salt and pepper, and roast in the oven for 35 minutes. Set aside to cool.

Meanwhile, steam your carrots either on the stovetop or following the directions of your instant pot. Once the carrots are steamed, set them aside to cool slightly before pureeing. Once the carrots have cooled so they are not steaming hot, place them in a food processor along with 1/2 cup of salsa, 1 Tablespoon of garlic olive oil, 1/4 cup of broth, 1/4 teaspoon of salt and 1/4 teaspoon of pepper.

Sautee the spinach with a drizzle of olive oil and a sprinkle of salt and pepper. Chop the spinach.

Chop your chicken into small bite sized pieces and place it in a large mixing bowl. Add 1/2 cup of salsa to the bowl with the chicken along with 1 cup of Greek yogurt, 1/2 cup of shredded cheddar cheese, the chopped, cooked spinach, 3/4 teaspoon of salt and 1/4 teaspoon of pepper.

Grease a large 15 by 10 inch casserole with olive oil. Now the easy and magical assembly. I was impressed with how well Swiss chard bakes in a casserole. Layer half the chopped Swiss chard evenly in the bottom of the casserole. Add your prepared chicken filling. Top with the remaining chopped Swiss chard. Now spread your carrot mixture evenly onto the top of the Swiss chard, covering it as evenly as possible. Sprinkle on the remaining 1/2 cup of shredded cheddar cheese. Sprinkle on a little extra black pepper.

Bake uncovered in your 400 degree F. oven for 35 minutes until the cheese is browned and the casserole is bubbly!

Yummy!!!

Today is National Houseplant Appreciate Day! Houseplants are a wonderful way to bring nature and it’s health benefits indoors. We spend so much time indoors, me too, even thought I love to exercise outdoors, garden and be outdoors, we still as humans spend the majority of time indoors. With all the inanimate objects in our homes like furniture, electronics, etc. it can feel good and benefit us to incorporate living plants in our rooms. They create a restorative atmosphere, are always changing and growing and can decrease stress and increase happiness. There are some beautiful plants out there, and some that are low maintenance and good if you have a black thumb.

The Benefits of Houseplants

Houseplants can improve air quality in your space, increase a sense of wellbeing, and give your eyes a much needed break from screens and help you relax and improve mental fatigue. They also can be a great addition to add beauty. It is important if you have small children or pets that you do your research and choose plants that are safe for them and also it is important to know if you have allergies or asthma, choose allergen friendly plants like cactus and succulents. Overwatering can cause mold growth, so read and make sure you know the water needs of your plants. I like to choose ones that need water once a week maximum. I also like to wipe my leaves with a damp cloth to keep them clean.

Houseplants in your home can add serenity and beauty

I am always striving for having the cleanest non-toxic living habits as possible. I want my home to be toxin free, my lawn and my skincare. That’s why I love Beautycounter so much. They are leading us to cleaner, safer beauty for all, and it doesn’t hurt that their skincare and makeup is high performing and really works. Here’s a few facts about them. I used them for a good five years before becoming a consultant, because I loved their mission and the changes they were making with beauty laws, not to mention being in love with their skin care products. They have an in house team of scientists and toxicologists, and they test for trace contaminants throughout the manufacturing process! Did you know lipsticks commonly contain lead? Yikes! The skincare regimens are fantastic, and I am obsessed with their Vitamin C Serum!

Beautycounter Clean Fact. They have in house scientists and toxicologists and are changing beauty products for the better.
Beautycounter Clean Fact. The products are obsessively tested for trace contaminants you don’t want on your body or in your bloodstream.

Drop me a line. I love to hear from you! I hope you have a great day!

Chicken Enchilada Casserole, Gluten Free, Grain Free, Low Carb

My first introduction to chicken enchilada casserole was in high school when I went over to my friend Kristy’s house, and her mom made it for dinner. I was also taught how to properly eat a whole artichoke at that time. Amazing! The casserole was absolutely delicious, and I took the recipe home with me and gave it to my mom to make (who was an excellent cook) as well.

At that time I didn’t have a clue what gluten, gluten sensitivity or celiac was. We tried to eat healthy, and also had our share of Oreos and Nutter Butters in the cookie drawer, and it being the 70’s, I was envious of the kids who got to eat tv dinners. Ha! I completely didn’t know how lucky I was to have a mom who cooked most everything from scratch and fed us plenty of garden vegetables that my dad (Pop) grew with his very capable hands, lovingly adding compost, leaves and other garden amenities every year to make the soil fertile and very black.

But I digress, this is about Chicken Enchilada Casserole that is something to brag about and be appreciated by those who partake of it. This casserole is a healthy version of a casserole I loved that also happens to be gluten and grain free. A little secret…cashew based sauces are a creamy alternative to cream cheese.
Chicken Enchilada Casserole

Ingredients:

8 cups of chopped, cooked bone in chicken thighs

1 Cup of Gluten Free Enchilada Sauce (I used this brand)

2 Tablespoons of Chopped Green Chilies (I used a gluten free brand from the grocery store)

1 Tablespoon of Taco Seasoning (I used this brand which is gluten free and no fillers and delicious)

1 Cup of Shredded Sharp Cheddar Cheese (for the top)

1 Cup of Plain Greek Yogurt

Salt and Pepper for the Chicken to Taste

My Recipe for Dairy “Cheese” Sauce here:

Dairy Free Cheese Sauce:

1 Cup of Raw Cashews soaked in 4 cups of water for 4 hours, then rinsed and drained)

1 Red Bell Pepper, seeded

1/4 Cup of Fresh Squeezed Lemon Juice

1 Tablespoon of Nutritional Yeast

1 Teaspoon of Ground Tumeric

1/2 Teaspoon of Onion Powder

1/4 Teaspoon of Salt

Directions:

Soak your cashews. You can also do this in the refrigerator overnight.

Preheat your oven to 400 degrees F. Lay out your bone in skin on chicken thighs in a single layer. Sprinkle with salt and pepper, and roast in the oven for 40 minutes. Remove the chicken from the oven and set aside to cool.

Reduce the oven temperature to 350 degrees F.

While the chicken cools a little, drain and rinse your soaked cashews. Blend up your sauce using the soaked cashews (we soak them to soften them and get them really, really creamy).

In a high speed blender, add the cashews and all the Cheese Sauce ingredients, and using your plunger blend it on high until it is completely combined and very creamy.

Remove the bones from the thighs, and chop them into bite sized pieces. Put them in a big mixing bowl, and add in your cashew cheese sauce you just blended and the rest of the ingredients except the shredded sharp cheddar cheese, and combine using a rubber spatula. Grease a large casserole dish, and put your chicken enchilada mixture in to the dish. Spread evenly.

Sprinkle the shredded sharp cheddar cheese on top, and bake for 30 minutes until the sides are bubbly. If you’d like, you can refrigerate it to bake later, just increase the baking time to 45 minutes.

Enjoy!

Gluten Free Shredded Chicken Bowls Board!

Gluten Free Shredded Chicken Bowls Board

Everyone loves a bowl! This is a chicken board you can make for dinner and set out bowls for everyone to grab and assemble as they like.

Meal Board with Shredded Chicken for Dinner

When I serve up shredded chicken with a mixture of crunchy, salty, chewy, crusty, creamy, savory and spicy ingredients, toppings and sauces, it is always a hit. People like to create their own versions based on their preferences and it pleases everyone.

This shredded chicken bowls board is a complete meal. Just hand everyone a bowl and tell them to dig in and pile high. I included a sweet, spicy, delectable house hot sauce from American Spoon Foods that is made with apricots, habanero chilies, ginger and lime. Choose ones your family and guests like. This one is delectable, and a great discovery. The other sauce is Chili Crisp which is very spicy, and trendy and has a lot more heat.

One of the fast things about this recipe is you will use an instant pot (or you can use a store bought rotisserie chicken and shred it to save time.) To cook the chicken in the instant pot, add one cup of water to the pot, place the whole chicken on a wire rack insert and sprinkle with Greek Gyro seasoning or another blend you like. This one is a very versatile one I always have in my pantry. Put the lid on the instant pot and seal. Set the manual timer for 25 minutes on high pressure. After it is done, let it sit and release slowly for 20 minutes. I’ve made this many times and some days I let the chicken set on warm until I am ready to shred it and it holds for a few hours which is very convenient. Let’s go!

Gluten Free Shredded Chicken Bowls

Ingredients:

1 Whole Cooked Chicken, shredded

1 Cup of Quinoa (I use a rice cooker!)

A loaf of good gluten free artisan bread (shown here is Challah from Gluten Free Artisan Bread in Five Minutes a Day. I highly recommend it if you want to take your gluten free bread baking to the next level.)

Shredded, Aged Cheddar Cheese

Cannellini or White Kidney Beans (I use Eden Organic)

Chopped Avocado

Chopped Tomato

Chopped Onion

Bacon, Cooked and Chopped

Marinated Asparagus (I used this one from Thrive Market)

Pitted Kalamata Olives

Hot Sauce

Chili Crisp Sauce

Gluten Free Homemade Challah Bread with Everything Bagel Topping

Directions: Prepare the quinoa as directed, or in the rice cooker, my favorite way. Rinse 1 cup of quinoa, then place it in the rice cooker with two cups of water and a half teaspoon of salt. Turn it on. Shred the Cooked Chicken, and Place it in a big bowl. Chop your avocado, tomatoes and onion. Rinse the beans and warm them in a bowl.

Place all the ingredients and toppings on a big board on your counter for serving. Place some pretty bowls beside it and let everyone make their own!

Everyone Loves a Meal in a Bowl

Mediterranean Chicken Salad

Mediterranean Chicken Salad

There are so many varieties to chicken salad, and I love a good chicken salad recipe! It seems like every time I make one it is gobbled up to the point people are fighting over the last of it. Maybe I don’t make it often enough.

If you ask me, “Do we need another chicken salad recipe?”, it is a resounding “yes!”. Variety is important, and this Chicken Salad is very colorful! After all, we eat with our eyes first! The wonderful thing about this chicken salad is it is Mediterranean! Mmmm! So much flavor, and one of the healthiest ways to eat in the world. It has sundried tomato bruschetta, fresh basil (my favorite fresh herb), delicious roasted red peppers, black olives and the tang of red wine vinegar. It also has the crunch from fresh celery, and two kinds of onion flavor…..green onions and chives! You will need a whole roasted chicken, and I am totally all for a good store bought rotisserie chicken if you are tight on time. There are so many good ones, and many of them are gluten free. If you are making the chicken at home, you can oven roast it or use an instant pot to cook it. Another good trick of mine is to roast two chickens at once. One is for dinner that night, and I make the other one into chicken salad. It’s a time saver and smart cooking!

Chicken salad is such a great lunch option in my opinion. You can heap it over a salad, one of my favorite ways to eat it, make a sandwich, or serve it alongside something else. For dinner, I like to pull it out of the refrigerator after having made it earlier in the day, and then make some sides to go with it. It makes an easy dinner night that everyone here really loves. Did I mention Make Your Own Wrap night? That’s another winner. Just put out the wraps, the chicken salad and some toppings and sauces. People can make it their own. Another great thing about this recipe is, it is just as delicious, if not better, the next day with all the flavors melding. I do hope you will try this recipe, Let me know what you think!

Mediterranean Chicken Salad

Ingredients:

1 Whole Cooked Chicken, deboned, skin off and chopped

3/4 Cup of Sliced Black Olives

1/2 Cup of Sundried Tomato Bruschetta

1/2 cup of Fresh Basil, torn

1/2 cup of Sliced Green Onion (aka scallions)

1/3 Cup of Mediterranean Organic Roasted Red Peppers, diced

2 Stalks of Fresh Celery, diced and you can include the leaves too

1/3 Cup of Chopped Pecans or you can use Pine Nuts

1/4 Teaspoon of Salt

1/2 Teaspoon of Black Pepper

1 Tablespoon of Chives (fresh or dried)

1/2 Teaspoon of Dried Oregano

1/3 Cup of Olive Oil

2 Tablespoons of Red Wine Vinegar

Directions: Whisk together the olive oil, red wine vinegar, salt, pepper, chives and oregano to make your dressing. Place all the other ingredients into a large bowl after chopping and prepping them as directed above, and then pour over the dressing and toss thoroughly. Store in the refrigerator until ready to serve.

I hope you love this recipe as much as I do! I’d love to hear from you.

Sheet Pan Salsa Chicken

Sheet Pan Salsa Chicken

Two words…chicken and salsa! They just go together in a palate pleasing way, and sheet pan meals are some of my favorite weeknight ways to cook for the family!

When I am roasting boneless chicken, thighs are my go to, because they never disappoint! I do love a juicy chicken breast, but honestly you need to be right on top of it to get the chicken out right when it reaches 165 degrees F. and not a minute after to get a really juicy breast, and the best flavor for chicken breasts is bone in. I had seven chicken thighs, but this will vary depending on the size.

Back to this utterly delicious Salsa Chicken recipe! It’s on my rotation menu based on all the Mmmm’s I am getting from the kids and hubby. Choose your favorite salsa for this. I used Fody Foods Low FodMap Salsa in this recipe which was surprisingly delicious since it didn’t have the traditional onion and garlic in it. But use your favorite, and your favorite heat level! The salsa is a vessel for the fresh tangy lime juice and green onion. Another spring favorite addition to meals. Greens onions are lovely sprinkled on savory dishes in general. They are exceptional on salads too. If you are eating Low FodMap, Fody Foods is a great choice. You will also need a can of black beans. My favorite canned beans brand is Eden which is headquartered in my home state of Michigan. They are non-gmo, soaked (very important for digestion), organic, and in BPA free cans. I always rinse my beans under cold running water before using them.

Low FodMap Salsa

I have never in my recent memory been so glad for Spring to be here. The winter seemed longer than usual, and I love the promises of Spring with renewal all around us and new growth! When I saw this blue sheet pan I’m using at my local Marshall’s I had to grab it. The color was so gorgeous! It is so good to go outside for a walk and hear so many birds singing, and best of all, wearing tennis shoes instead of boots. There is a feeling of freedom not being bundled up against the cold. I am not one to stay inside all winter, I need to be outdoors because the fresh air just feels good, and it boosts my mood. I’m just starting to get out into my gardens and do some clean up! I see the deer are out and about too. They are very hungry, even eating out of my bird feeder, so I forgive them for digging up a couple of my tulip bulbs.

Mexican Seasoned Chicken for Sheet Pan Salsa Chicken

In this chicken recipe I have two colors of peppers. Did you know peppers are higher in Vitamin C than oranges? They are a perfect addition to this salsa chicken. Feel free to substitute any colored peppers you have on hand. Green would be good too.

I mixed up a Low FodMap Mexican Spice blend to coat the chicken that is delectable. Cumin gives the chicken a smoky flavor, and it is not hot, so it won’t blow your socks off! If you are into that, you can use a hot salsa and your favorite hot sauce at the table like my son, Jeff. 🙂

I’d like to add that if you are having digestive problems, a gut health and microbiome test can be very helpful, and balancing your gut can be a huge help in overcoming FodMap intolerance. FodMaps are very beneficial to feeding the good bacteria in your gut, which you want. Low FodMap eating can help alleviate symptoms, but it is always good to get to the root cause. I highly recommend this Gut Health Test from Thorne which is surprisingly reasonable, I just took it myself, you can do it at home and the report is extensive and very helpful with recommendations based on your results and a deep dive into your gut.

To make this dish very Low FodMap, omit the black beans which are a moderate fodmap. Beans do have a lot of health benefits, and soaked beans are easier to digest.

Sheet Pan Salsa Chicken

Ingredients:

3 pounds of boneless chicken thighs

1 16 oz. jar of salsa

2 large bell peppers, one yellow one red

1 can of Black Beans, drained and rinsed under water (I always use Eden in my recipes)

3 green onions, sliced (green parts only for Low FodMap)

Juice of 1 Lime (A juicy one. Limes can be finnicky)

Garlic Infused Olive Oil

Mexican Spice Blend:

1 Tablespoon of Cumin

2 Teaspoons of Chili Powder

1/2 Teaspoon of Oregano

1/2 Teaspoon of Salt

1/2 Teaspoon of Black Pepper

Directions: Preheat your oven to 400 degrees F. Lightly grease a large sheet pan. I used Avocado Oil spray. Put your chicken thighs in a medium bowl. Add a tablespoon of garlic olive and toss to coat the chicken.

Mix together the Mexican Spice Blend. Sprinkle it over your chicken, and toss again until the chicken is evenly coated. Place the chicken thighs evenly spaced on your large sheet pan. Put the chicken in the preheated oven and roast for 20 minutes.

While the chicken is roasting. Put your salsa in a bowl. Add the can of drained and rinsed beans, sliced green onion, and the juice of a lime. Stir it together. Mmm. It’s looking good!

Wash, seed and slice your peppers into long strips. In a bowl, toss the peppers with an additional Tablespoon of Garlic Olive Oil and sprinkle with salt and pepper to taste.

When the 20 minutes are up for the chicken roasting in the oven, pull it out and nestle the peppers around the chicken thighs, not on top of them. That’s for the salsa. Now, mound the black bean salsa mixture over each of the thighs evenly. Place the sheet pan back in the oven and continue roasting for 20 more minutes until the peppers are tender and the chicken is cooked through. Your house is going to smell amazing by the way.

It is ready to serve. You can serve this over cauliflower rice or a rice of your choice. It is absolutely delicious. Don’t forget the pan juices. Spoon them up too. If you love Mexican food, you and your family will love this meal. It is a wonderful, healthy and delicious sheet pan chicken meal! Leftovers are not a problem either, unless you don’t have any. Guess what I’m having for lunch today? 😉 Please leave any comments below. I love to hear from you. Are you enjoying Spring? What is blooming in your area, and what is your favorite Spring meal lately? Have a wonderful day!

Chicken Wet Burrito Skillet Gluten Free with Low FodMap Option

There is something about a cast iron pan that browns food beautifully! Skillet dinners are handy one dish meals that are fun family pleasers. Wet burritos used to be me and my roommates Friday night takeout dinner while I was going to college in Grand Rapids, Michigan where they actually originated! It was a little hole in the wall that made the Best Wet Burritos! Not gluten free, but I wasn’t g/f back then. This skillet is reminiscent of those burritos, but it IS gluten free and has a low fodmap option!

This is a skillet recipe that is easily made low fodmap, like I mentioned, by simply omitting the black beans. Jasmine rice is an easily digested rice that works well for many people with digestive difficulties, and it is a great binder and delicious in this recipe. It only takes one cup of cooked rice. I make it in larger quantities in my rice cooker and reheat it in the microwave as needed. You can also make it while you are preparing this dinner. It cooks in 25 minutes with no attending. If you don’t have a rice cooker yet, I highly recommend them! I use this one that also has a steamer on top, so you can steam vegetables at the same time as the rice is cooking. This one is medium sized and my favorite.

I used boneless chicken thighs because they are the juiciest part of the chicken. If you are craving wet burritos, this skillet dish is a healthy and delicious way to satisfy your yearning. It takes about 45 minutes to make start to finish, and also makes great leftovers.

If you are making this to be compliant with the SIBO Specific Diet, omit the white rice. I do well white Jasmine rice, so I added it to this recipe, but it is delicious without it. Your filling will be slightly looser.

Chicken Wet Burrito Skillet

Ingredients:

6 Boneless, Skinless Chicken Thighs (about 2 lbs.)

1 Cup of Tomato Puree

1 Green Pepper, diced and seeded

1 Cup of Jasmine Rice (hot)

1 Cup of Black Beans, rinsed (omit for low fodmap. I use this brand) The kombu seaweed makes them easier to digest and you don’t even know it’s in there.

1 Cup of Shredded, Aged Cheddar

1 Cup of Shredded Iceburg Lettuce, for topping

1 Cup of Diced Fresh Tomato, for topping

2 Tablespoons of Apple Cider Vinegar

2 Tablespoons of Garlic Infused Olive Oil

1 Bunch of Green Scallions, sliced (green parts only)

1 Teaspoon of Cumin

1 Teaspoon of Smoked Paprika

1 Teaspoon of Chili Powder

1 1/2 Teaspoons of Salt

3/4 Teaspoon of Black Pepper

Directions:

Add Two Tablespoons of garlic infused olive oil to a large cast iron skillet. Warm over medium high heat. Then add the diced chicken thighs, 1 teaspoon of salt and 1/4 teaspoon of black pepper. They should sizzle when they hit the pan. Spread the chicken in an even layer, and brown for six minutes, stirring every two minutes. When the chicken is browned and cooked through, remove it to a plate and set aside. In the same pan, add the diced green peppers and the cumin, smoked paprika, and chili powder. Brown for one minute. Add in the two tablespoons of apple cider vinegar to deglaze the brown chicken goodness from the bottom of the pan. Now add 1 cup of tomato puree, half of the sliced scallions, and the other 1/2 teaspoon of salt and 1/4 teaspoon of black pepper. Cook, stirring for two minutes. Turn the burner down to low, and add in the cup of rinsed black beans and hot rice. Stir to evenly distribute all the ingredients. Smooth the burrito filling out flat, and top with the cooked chicken thighs.

Turn your oven to broil. Now, sprinkle the top of the chicken thighs you just put on top of the filling with 1 cup of shredded, aged cheddar. Place the cast iron pan under your broiler for one to two minutes until it is bubbly and melted. Remove the pan from the oven, and top the chicken burrito skillet with shredded lettuce, diced tomatoes and the remaining sliced scallions. It is ready to serve!

Chicken Taco Salad with Creamy Italian Dressing

There was this place we went in the Winter where we got a really good workout and had fun at the same time.

I was dating my then to be husband, and a Northern Michigan Winter could be long. I never knew any different, and I didn’t think to complain about the cold. It was how I was born, raised and lived my entire childhood and early adulthood.

Michigander’s were tough, resilient, and we knew how to have fun despite the weather.

Taco Salad 13

Although there were plenty of outdoor activities, the raquetball club was one of our favorite Friday night spots. You could work up a great sweat, and the court was smaller than a tennis court, hitting the ball more frequently in fast succession was very satisfying. The loud popping echo of the ball hitting the walls was loud and invigorating. I really worked up an appetite, and it was tradition to stop afterwards and eat at our favorite Mexican restaurant. They had the BEST Chicken Taco Salad and Margaritas! The salad was really big, and you were full when you were done. It was not a light salad at all, but there were plenty of great ingredients in it.

Taco Salad 12

Later, when we moved East and no longer played raquetball……after we were married and had two kids…….we recreated our own version at home and made it once a week religiously. It was very close, but I used a commercial dressing that I wouldn’t choose today. So,  I’ve come up with my own dressing, without the soybean oil but all the great flavor!

Currently, I hadn’t made the salad in years, but lately I’ve really missed it.

So, I have recreated it here with grain free chips, grass fed cheese and my own homemade creamy Italian dressing. It is darn good! My husband, Doug, said it was spot on, just like he remembered. I think you will love it too.

This is a BIG bowl. The leftovers are good, even though the chips won’t be as crunchy as when it is freshly made, and you can half it if you desire! Now all you have to do is:

Build It! Here’s the recipe:

Taco Salad Build It

Chicken Taco Salad with Creamy Italian Dressing

Ingredients:

4 Boneless Chicken Breasts

8 Cups of Iceberg Lettuce, torn into bite sized pieces

8 oz. of Grass Fed Cheddar Cheese, shredded

1 Can of Sliced Black Olives (I used this 3.8 oz. can of Field Day)

1/4 Cup of Sliced Scallions

2 Medium Sized Ripe Tomatoes, Chopped

1 Large Green Pepper, Diced

Cilantro (optional) Chopped, a handful

1 Bag of Siete Sea Salt Chips (5 oz) Crushed with your hands

Directions:

Make the Creamy Italian Dressing below and refrigerate.

Bring a large pot of water up to a boil. Add the boneless, skinless chicken breasts and cook for 18 minutes or until they are 165° in the center. Remove them from the water, and place them on a plate. Cover the chicken with another plate while they cool and you prepare the rest of the salad ingredients. The chicken is supposed to be still warm when you add it to the salad later.

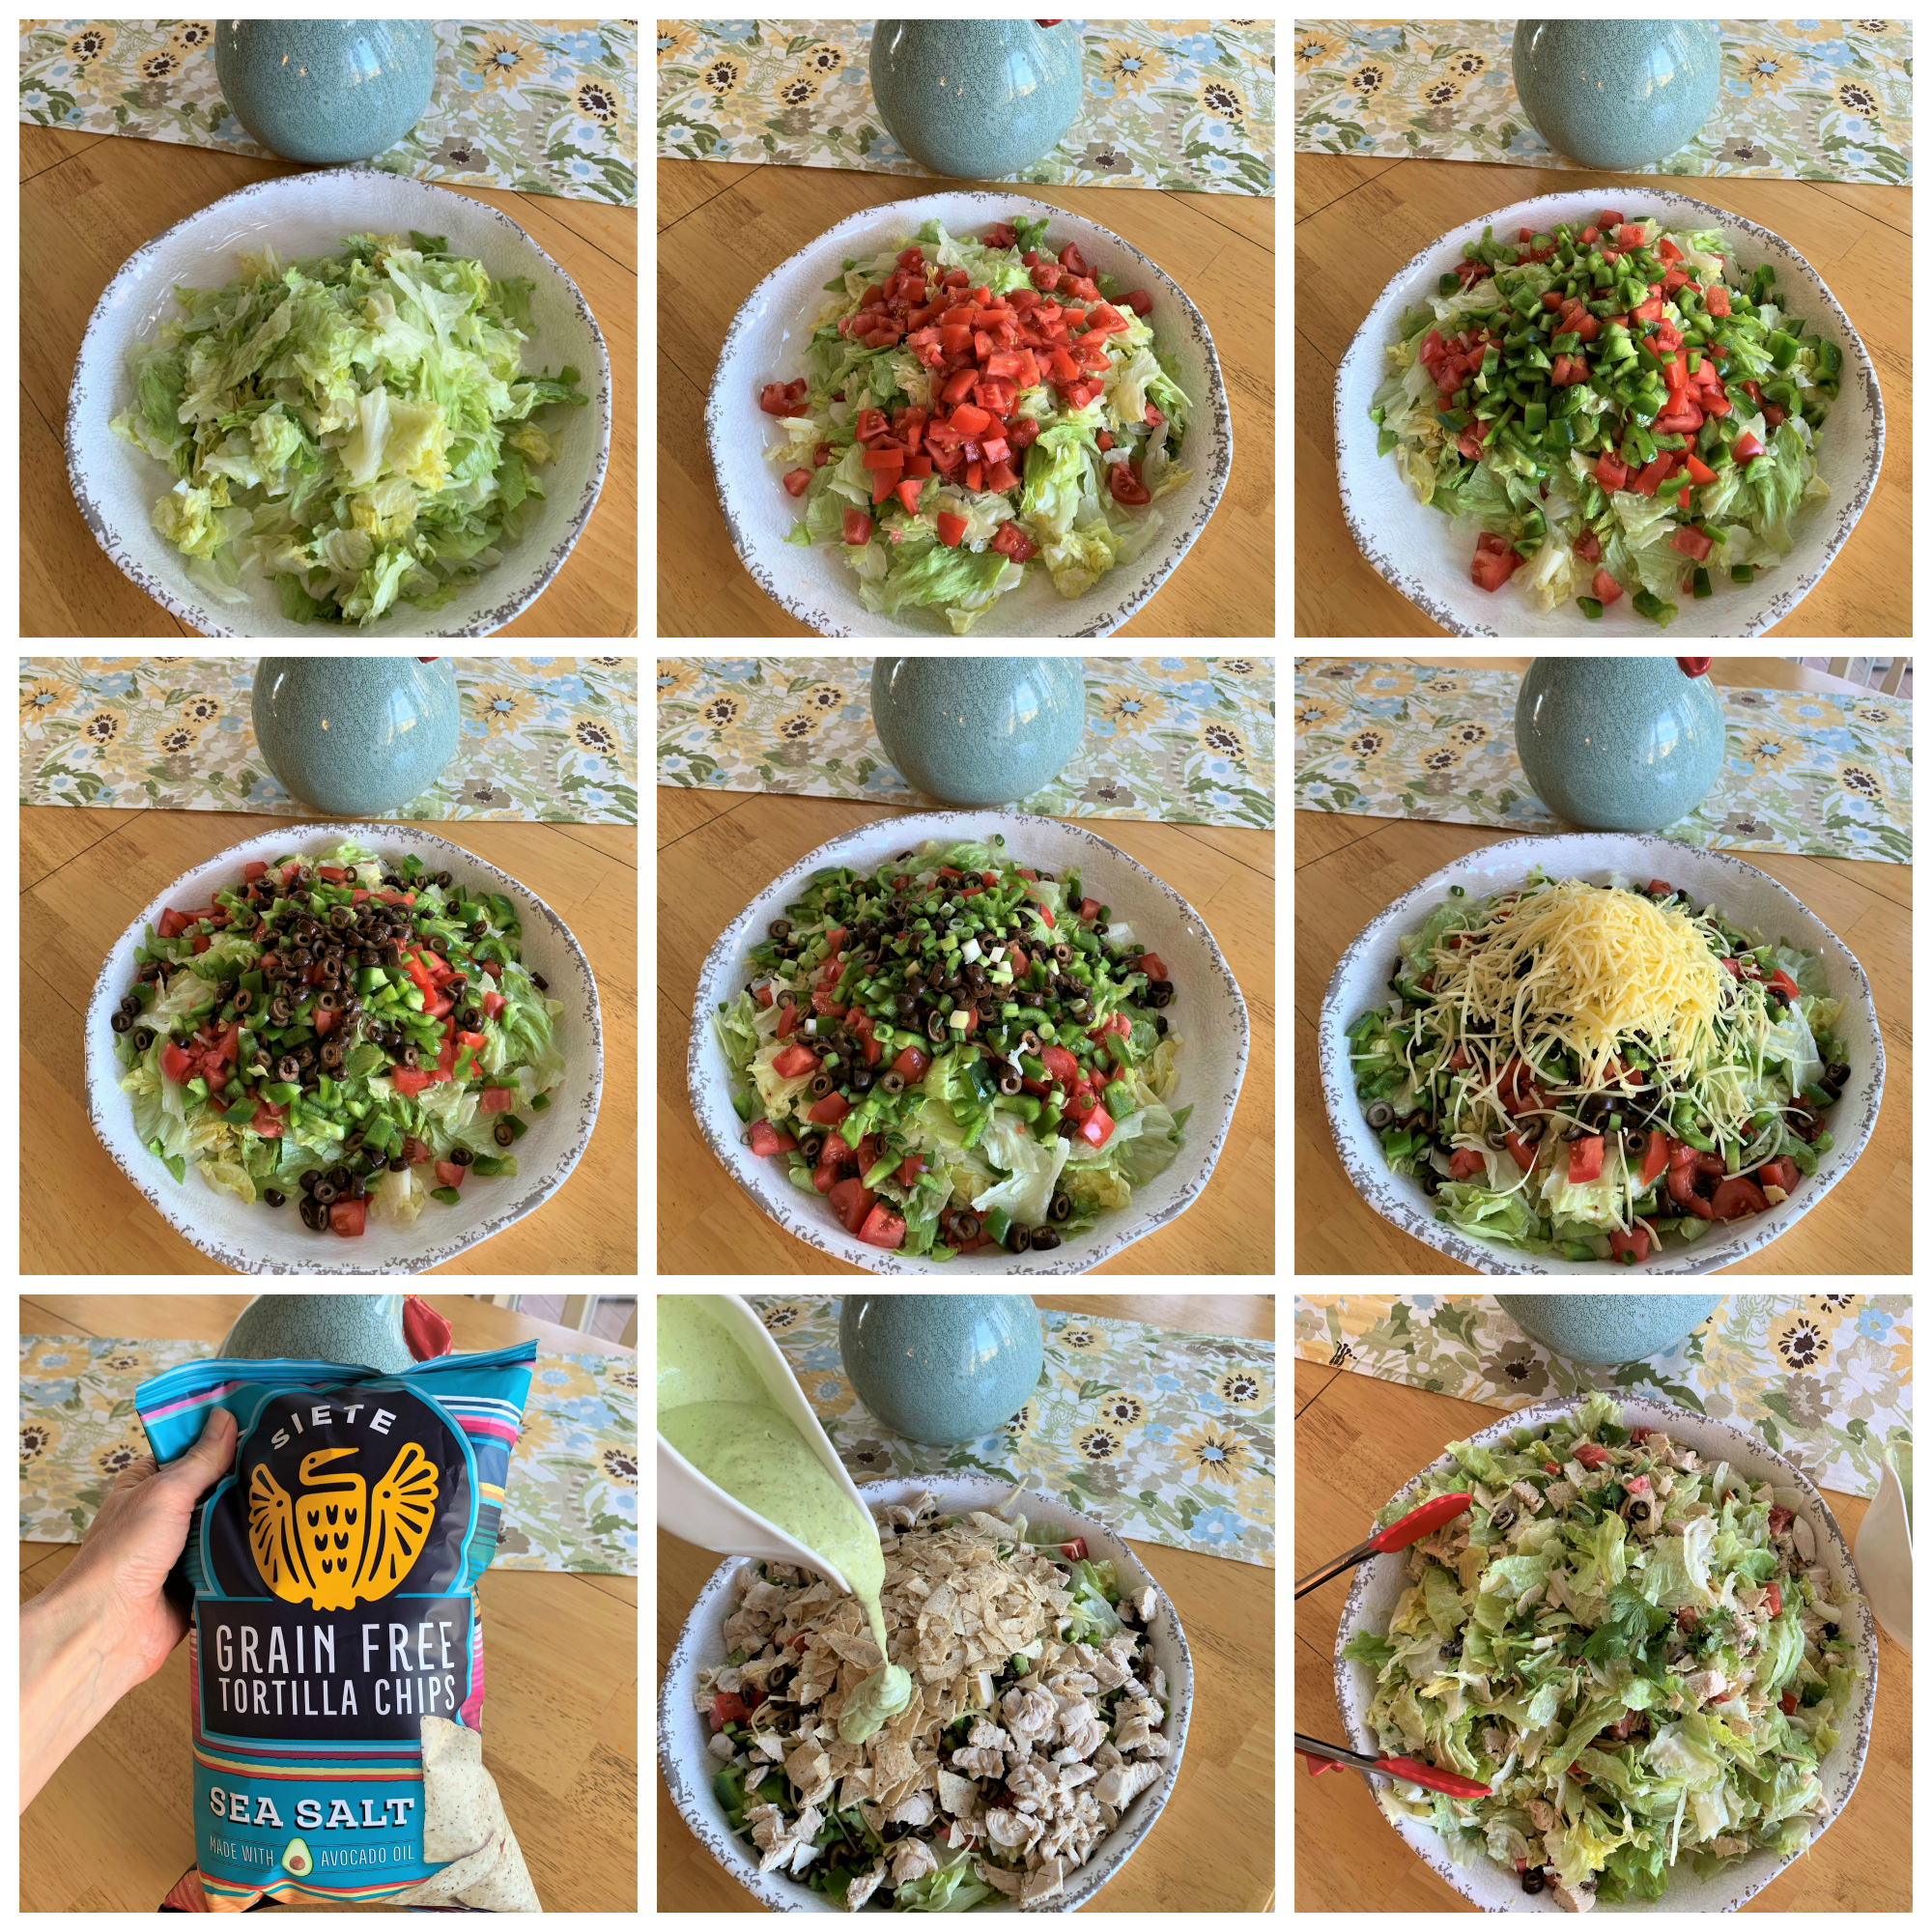
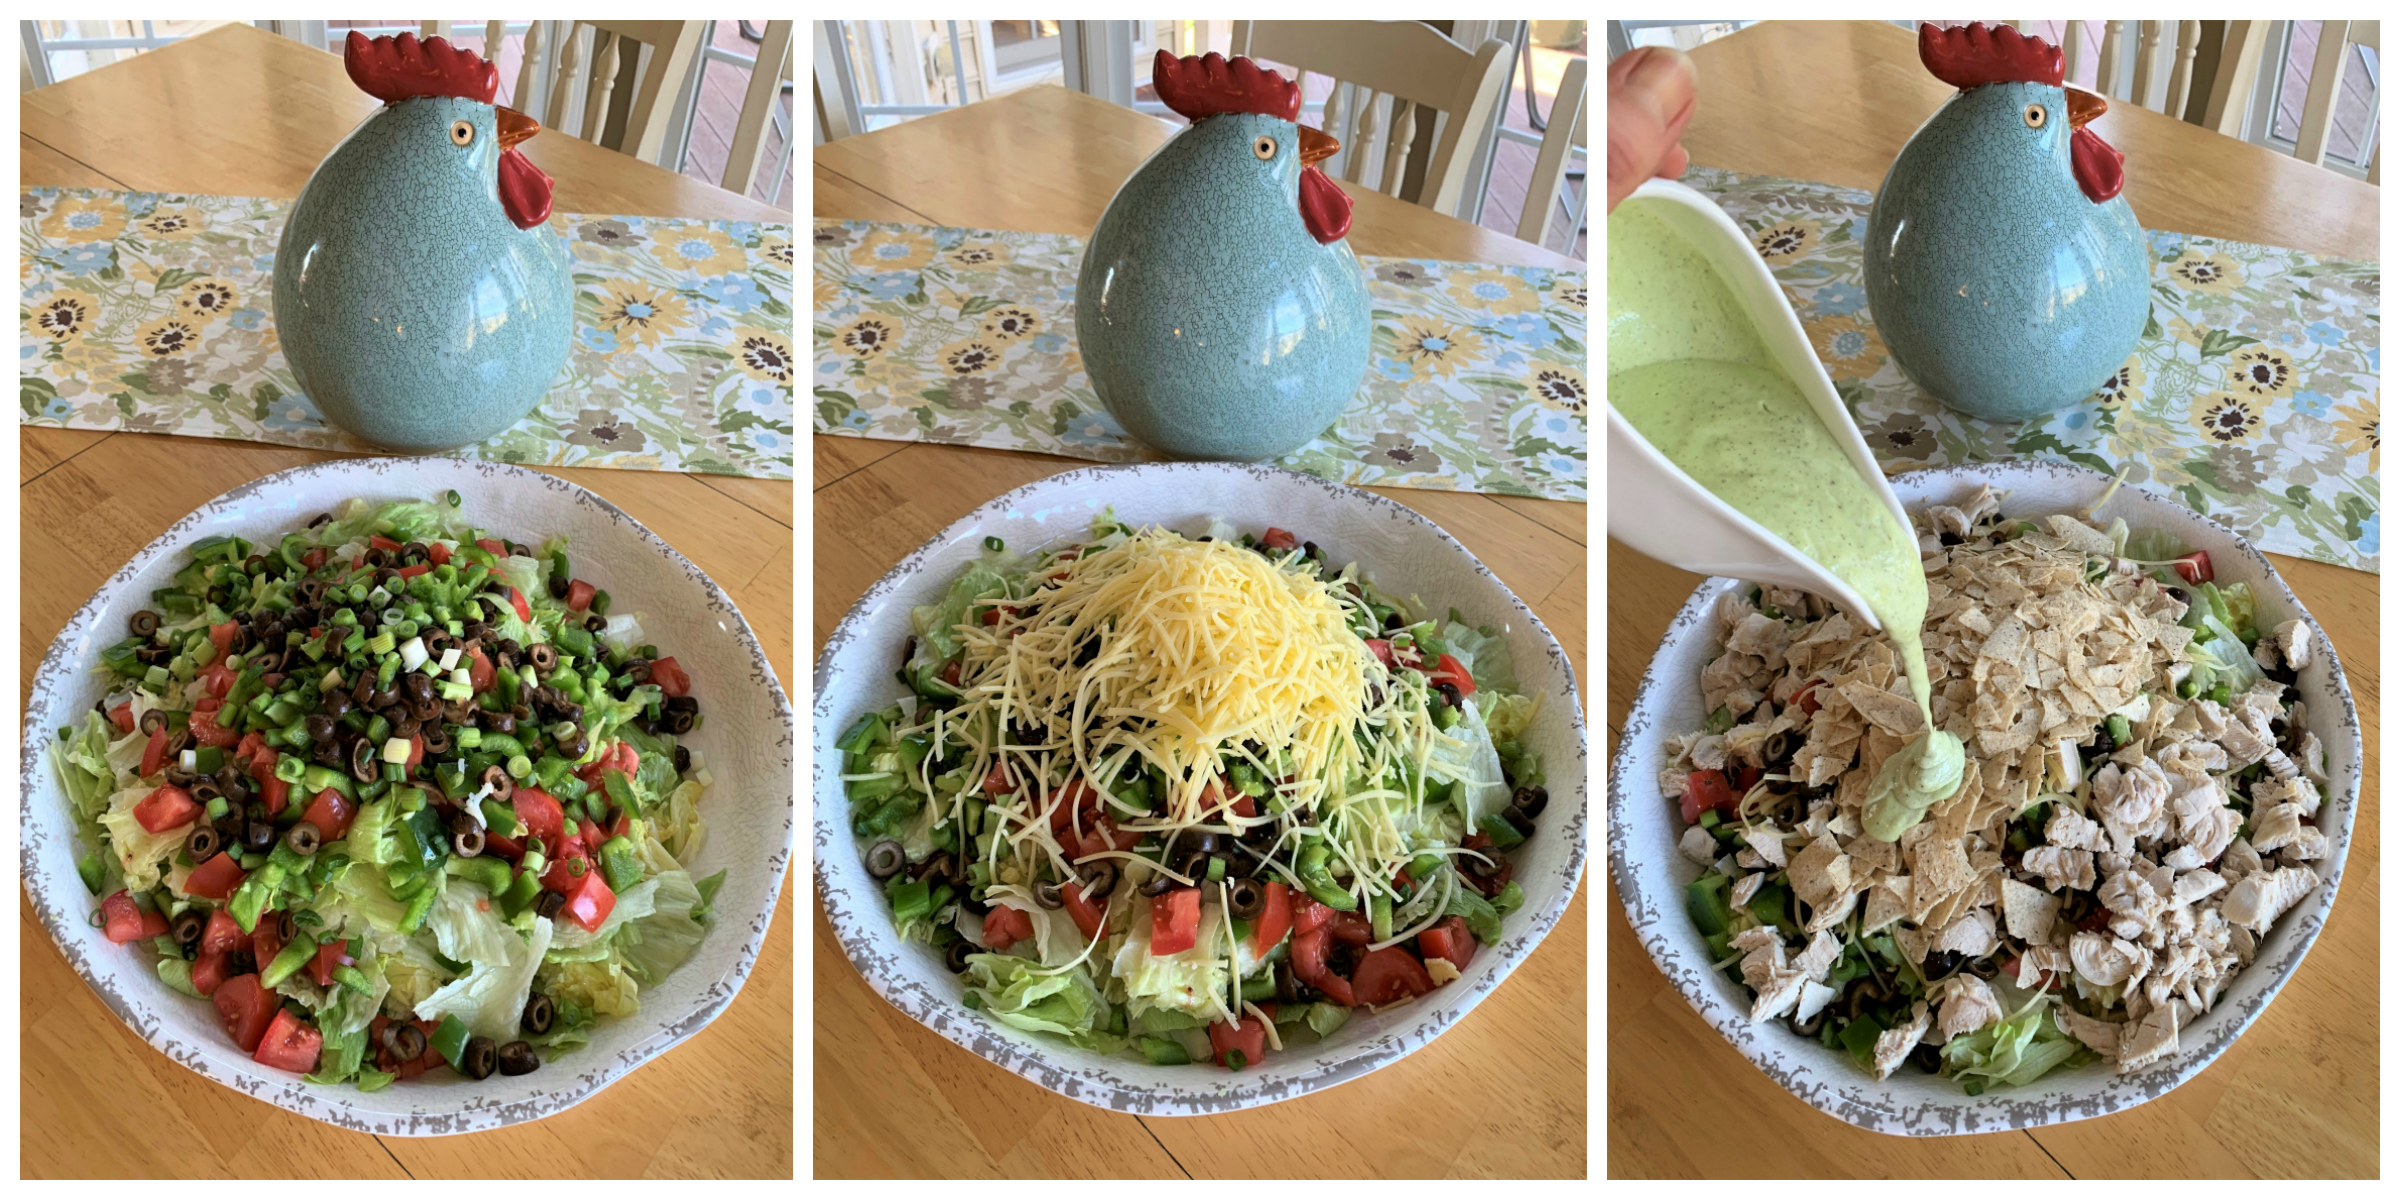
In a Large salad bowl, place ingredients in this order (see photos).

Lettuce, Tomatoes, Olives, Scallions, Peppers, Shredded Cheese, Crushed Chips, Chicken (Dice it when you are ready to add it. It will still be warm. I don’t like to chop it before hand, because it will dry out and be less juicy.) and Crushed Chips (Crush them right over the salad as you take them out of the bag.) Pour all the dressing over the salad, and toss it really well, coating everything.

Serve!

To Make the Creamy Italian Dressing:

Ingredients:

1 Cup of Mayo (I use Primal Kitchen)

1/4 Cup of Scallions

2 Tablespoons of White Vinegar

1 Tablespoon of Honey

1 Tablespoon of Garlic Infused Olive Oil

1/2 Teaspoon of Sea Salt

1/4 Teaspoon of Black Pepper

1/4 Teaspoon of Dried Parsley

1/8 Teaspoon each of dried:

Marjoram

Oregano

Basil

Rosemary

Directions: Puree the dressing ingredients in a blender until smooth. Refrigerate.


Chicken Taco Salad Trio

Chicken Taco Salad Grain Free Gluten Free


Orange Ginger Marinated Chicken Thighs

I have a lovely recipe for marinated chicken thighs that I’ve been making the last few months that is definitely a keeper. It is SIBO friendly, Low FodMap and makes twelve chicken thighs. That may seem like a lot, but for a family of five, I can tell you that they do not last long enough.

Orange Ginger Marinated Chicken Thighs 2

The thighs are wonderful to use leftover and sliced on top of a salad for lunch the next day. Marinating them infuses them all the way through with a delicious orange ginger flavor. If you are looking for more leftover inspiration, cut the leftover chicken off the bone into bite size pieces, and make a fresh pot of hot Jasmine Rice (I use my mini rice cooker frequently for the purpose of having fresh hot rice in small quantities.) If you’ve never tried one, they are inexpensive and cook rice perfect every time without having to watch it or worry about it overcooking, and it keeps it hot until you are ready to eat it. I will never be without one again. To make the chicken fried rice, warm the chicken in garlic infused olive oil on the stove top in a skillet. Then, stir in the hot, fresh cooked rice, drizzle it with sesame oil and a pinch of white pepper, then stir in a few sliced scallions.  Push aside the chicken and rice mixture to one side of the pan. Add a little more garlic olive oil to the empty side, and add in two whisked and seasoned eggs, and scramble them over medium heat. Now, incorporate the egg into the chicken and rice mixture for an easy chicken fried rice. Yummmm!

Orange Ginger Marinated Chicken Thighs 3

The chicken should marinate at least 8 hours and preferably overnight for the most robust flavor infusion.

Orange Ginger Marinated Chicken Thighs 1

Orange Ginger Marinated Chicken Thighs

1/4 Cup of Fresh Squeezed Orange Juice

8 Sliced Scallions (green parts only for low fodmap)

2 Tablespoons of Fresh Minced Ginger

2 Tablespoons of Garlic Infused Olive Oil (my favorite brand)

2 Tablespoons of Coconut Aminos (this is not on the SCD Legal list, but many do well with it, so listen to your body. It is an excellent substitute for Soy Sauce. Here is a discussion about it on Danielle Walker’s Facebook page.)

2 Tablespoons of Sesame Oil

Zest of One Orange

1 Tablespoon of Ume Plum Vinegar (SCD Safe according to wellbees.com)

1 Tablespoon of Honey or Maple Syrup

1/2 Teaspoon of Sea Salt or more to taste

1/2 Teaspoon of Black Pepper

Directions: Whisk together the marinade ingredients in a medium bowl. Lay out 12 bone in chicken thighs in a large, deep baking pan. Pour the marinade over the thighs, then flip them to coat all the surfaces evenly. Cover with wrap, and refrigerate for 8 hours or up to 24 hours.

To bake the thighs, preheat the oven to 400° degrees F. Lay out a cookie sheet covered with parchment, if you want an easy to clean pan. 🙂 Remove the chicken thighs from the marinade allowing the scallions, ginger and orange zest to remain on the thighs, and lay them out in one layer onto the large sheet pan. Bake in the middle of the oven for 40 minutes. The skin will be crispy and brown. Enjoy!

Chicken Marinade


Orange Ginger Marinated Chicken Thighs, Paleo, Low FodMap


1 2 4