Monthly Archives: February 2017

Egg, Parsnip and Celeriac Root Hash Brown Skillet

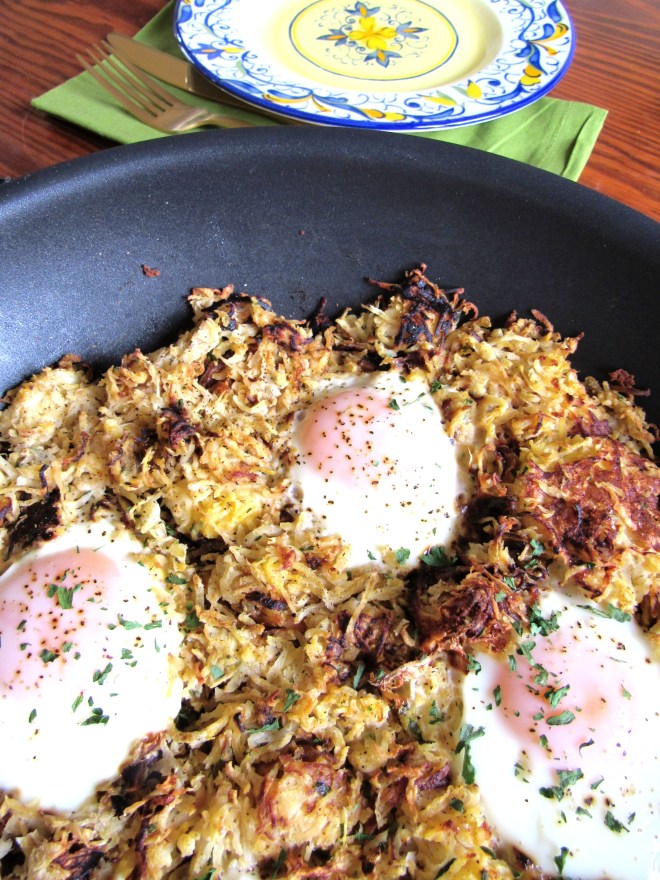
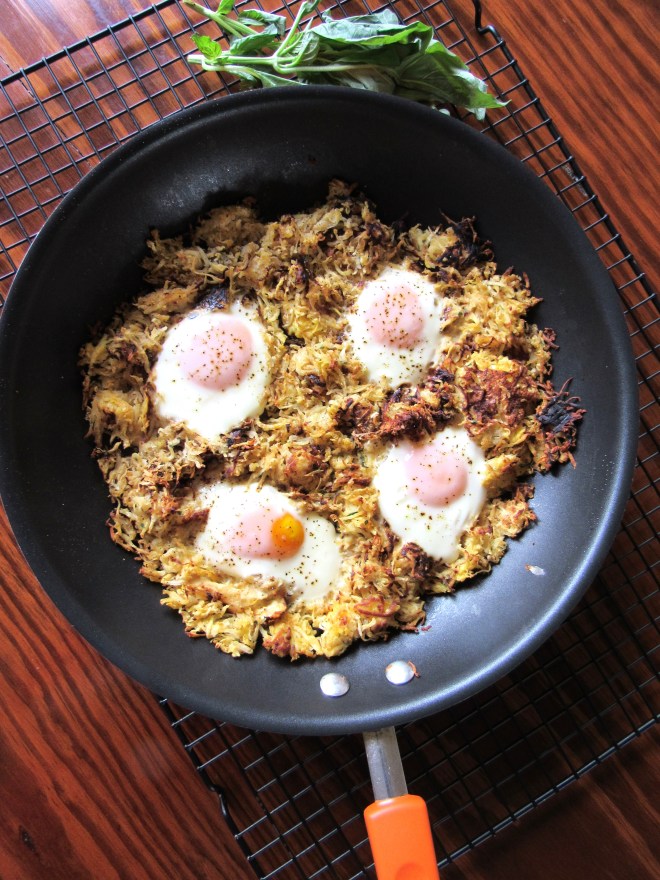
Eggs and Hash Browns are an American classic. I did a remix of the humble, time honored, hash brown by using parsnip and celeriac root vegetables for the hash and made it all in one skillet instead of forming individual hash browns. I received my inspiration for this dish from the Waffled Hash Browns recipe in Cooking Light Magazines March 2017 issue. Skillet meals are trending, and I can see why. The clean-up is easy, it’s all in one pan, and making one big hash is quicker than making individual patties! You can see in the photo how the eggs are nestled into the crispy hash ready to be devoured. This hash is full of nutrition too!


Parsnip Celeriac Hash and Egg Skillet

Egg, Parsnip and Celeriac Root Hash Brown Skillet

The global, cream colored celeriac root and parsnip are both a good source of Vitamin C, B-6, Magnesium, Potassium, and Fiber. Eggs are a good source of protein, and don’t you love it that the yolks are now said to be good for us? I never understood why only part of a complete and natural egg was said to be only half good for us. Yolks are a wonderful source of Omega 3, Vitamins A, D, E, B-12 and K, lutein (for eye health) and more. Here’s the recipe!

Skillet Egg and Parsnip Celeriac Hash Browns

Egg, Parsnip and Celeriac Hash Brown Skillet


Egg, Parsnip and Celeriac Hash Brown Skillet

Ingredients:

2 Cups of Parsnips (peeled and grated)

2 Cups of Celeriac Root (peeled and grated)

5 Eggs

3 Tablespoons of Olive Oil

1 Teaspoon of Sea Salt

1 Teaspoon of Dried Parsley

1/4 Teaspoon of Black Pepper

1/4 Teaspoon of Onion Powder

1/4 Teaspoon of Garlic Powder

Fresh Basil (optional)

Directions: Preheat the oven to 325º degrees. In a large bowl, mix together the grated parsnip and celeriac root (I used a food processor to grate it for speed, but it can also be hand grated), 1 egg (beaten), sea salt, parsley, pepper, onion powder and garlic powder. Mix thoroughly.

In a large non-stick skillet (I used a 14 inch) pour in 3 tablespoons of olive oil. Heat over medium-high. Add the hash mixture and pat it down into one even layer to brown one side. Let this cook for five minutes, or until the bottom has browned. With a rubber spatula, turn over the hash brown to the other side to brown. It will not turn in one piece, which is fine. Flip it in sections. Brown for a few minutes on this side. After the hash browns are brown on both sides and tender, make four egg sized nests in your pan (refer to the photo). Crack the eggs in the nests, and sprinkle with a little additional sea salt and pepper. Pop the pan in the oven, and bake the eggs for 8 to 12 minutes until the whites are set and the yolks are cooked to your liking. Remove the pan from the oven. Chop some fresh basil and sprinkle it on the top before serving.

Eat Your Nutrients!

Eat Your Nutrients!


Free Thyroid Documentary – The Thyroid Secret

the-thyroid-secret

Thyroid disease is, unfortunately, very common in women today. However, there is a lot you can do about it to heal your thyroid using natural means and lifestyle changes. There is a sign up link below for you to get this free three part documentary delivered straight to your email. It starts March 1st. Some of the symptoms of thyroid disease are:

Fatigue

Hair Loss

Weight Problems

Joint Pain

Sensitivity to Cold or Heat

Anxiety

Brain Fog

Skin Issues

Here’s the link to sign up. It is hosted by Dr. Izabella Wentz, PharmD who herself has personal experience with thyroid disease. She interviews top health and wellness experts in this documentary to help others take back their health! Here’s the link.

http://urltag.net/BnGs8

Have a Beautiful Day!

Sandra Shields, Health Coach

Coconut Flour Orange Quick Bread or Muffins

I am enjoying the Chocolate Chip Banana Muffins I shared so much that I decided to make an Orange Muffin version that can also be made into a loaf, because I like choices!  These healthy muffins are fantastic because the texture is fine and moist and without the grains and refined carbs. When baking with coconut flour, recipes require more liquid, because coconut flour is highly absorbent. So eggs are perfect, because they give the muffins protein and healthy fat from the yolks. Eggs in baking are great for leavening and texture as well.

Coconut Flour Orange Muffins

Coconut Flour Orange Muffins

The orange zest really bumps up the orange flavor, and fresh squeezed orange juice is used to enhance the texture, flavor and brightness of the muffin. I find muffins so cheery when I sit down to relax and read about something exciting like travel or planning a new garden! Hmmmmmm, not sure why, but it puts me in my happy place! 🙂 So here is a photo of the loaf, and keep scrolling for another muffin picture and the recipe!

Coconut Flour Orange Quick Bread

Coconut Flour Orange Quick Bread


Coconut Flour Orange Muffins

Coconut Flour Orange Muffins


Coconut Flour Orange Quick Bread or Muffins

Preheat the oven to 325º degrees F. Set out a 12 cup muffin pan, or medium loaf pan if making the bread. Line the muffin pan with muffin papers, and if making the loaf, grease the pan and line it with parchment paper.

Ingredients:

6 Eggs

2 Bananas (ripe with some black spots)

1/2 Cup of Coconut Flour

1/3 Cup of Olive Oil (or Coconut Oil)

1/4 Cup of Collagen (optional but great for hair, skin, nails and digestion)

1/4 Cup of Fresh Squeezed Orange Juice

2 Tablespoons of Honey

1 Tablespoon of Orange Zest (make sure you have a fantastic peel for the most flavor)

1/2 Teaspoon of Vanilla Extract

1/2 Teaspoon of Baking Soda

1/4 Teaspoon of Sea Salt

If making the loaf – Thin Orange Slices including the peel, halved.

Directions: In a food processor, blend the bananas and eggs until no chunks remain and you have a creamy yellow mixture. Add the remaining ingredients, and process for two minutes. Scraping the sides of the processor once. Let the batter sit for 5 minutes. Scoop the batter into 12 muffin cups, or pour into your prepared loaf pan. If making the loaf, add the orange slices on the top decoratively. (See photo)

Bake in your preheated oven for 35 minutes if you are making the muffins, or until the tops spring back when lightly touched with your finger. For the loaf, bake for 65 to 70 minutes until a toothpick inserted in the center comes out clean. Remove from the oven and cool five minutes before removing the muffins or loaf from their pans to cool completely. Well, you can eat a warm muffin, but please cool the loaf completely…..it’s the baker in me. Add some decorative zested orange to the tops of your muffins if desired.

Happy Muffining! I know that’s not a word, but I like it!

Eat Your Nutrients!

Eat Your Nutrients!


Smooth and Peachy Coconut Milk Ice Cream

When Spring is getting close and the days are lengthening, I start craving fresh fruity flavors. The beauty of freeze dried fruit is the flavor is intensified, because it is concentrated. So, it is easy to make a fruit forward ice cream or cookie off season. I really like Karen’s Naturals freeze dried fruit. They are organic and contain just fruit, no additives or preservatives. This is a pretty straight forward recipe using just a few quality ingredients to make a smooth and peachy, dairy free, ice cream that tastes fresh, even when peaches are not in season!

Smooth and Peachy Coconut Milk Ice Cream, Dairy Free, Paleo and AIP

Smooth and Peachy Coconut Milk Ice Cream

Smooth and Peachy Coconut Milk Ice Cream

This recipe makes enough for four generous servings of ice cream. It is dairy free, gluten free and honey sweetened. The squeeze of fresh lemon juice brightens the ice cream and gives it the perfect tang.


Serving Up Smooth and Peachy Coconut Milk Ice Cream

Serving Up Smooth and Peachy Coconut Milk Ice Cream


Smooth and Peachy Coconut Milk Ice Cream

Ingredients:

2 Cups of Full Fat Coconut Milk

1 Bag of Just Organic Freeze Dried Peaches (here)

1/2 Cup of Quality Honey (I use local)

2 Tablespoons of Pure Vanilla Extract (use 1/2 teaspoon of  vanilla powder for AIP)

1 Tablespoon of Fresh Squeezed Lemon Juice

1/8 Teaspoon of Sea Salt

Directions: In a high speed blender, puree all the ingredients. Chill in the refrigerator for 4 hours. Churn in an ice cream maker. I use this one.

Enjoy! You can store leftover ice cream in the freezer. It is easy to scoop straight from the freezer because of the higher vanilla content. Have a blast of peach before peach season to celebrate the coming of Spring!

If you want to make a fresh peach ice cream that is dairy free in peach season, check out my recipe for fresh and simple peach ice cream here!

Eat Your Nutrients!

Eat Your Nutrients!


Chocolate Chip Banana Muffins (Dairy and Gluten Free)

I have been joking lately that I have a house full of chimps. I have had a difficult time getting a few black spotted bananas to bake with because my family is eating them so fast. I am not sure what has caused this sudden rise in banana consumption, but I am not going to complain too loudly when bananas are being chosen. I simply have learned to hide some so they get a chance to reach that black spotted stage that makes them perfect for baking!

Grain Free Chocolate Chip Banana Muffins

Coconut Flour Chocolate Chip Banana Muffins

I have been craving a chocolate chip banana muffin, and this one fits the bill perfectly. They are simple to whip up in a food processor, have protein from six eggs, healthy fat from olive oil (they make muffins very moist!) are mostly sweetened with bananas and just a touch of honey, and sprinkled with some dairy free chocolate chips. Heavenly! Scroll down for the recipe which makes an even dozen.

Coconut Flour Chocolate Chip Banana Muffins

Chocolate Chip Banana Muffins – Dairy Free

Chocolate Chip Banana Muffins (Dairy and Grain Free)

Preheat your oven to 350º degrees F. Line 12 muffin cups with non-stick muffin papers and set aside.

Ingredients:

6 Pastured Eggs

1/2 Cup of Coconut Flour (here)

2 Black Spotted Bananas

1/4 Cup of Olive Oil

2 Tablespoons of Honey

1 Teaspoon of Vanilla Extract

1 Teaspoon of Lemon Juice

1/2 Teaspoon of Baking Soda

1/2 Cup of Mini Chocolate Chips plus more for sprinkling (I use these dairy and gluten free ones)

Directions: In a food processor with a blade attachment, blend the eggs and banana until the banana is smooth. Add in the rest of the ingredients except the chocolate chips and blend for two minutes. Add in 1/2 cup of mini chocolate chips and pulse six times just until the chocolate chips are incorporated but not broken up. Scoop the batter into the prepared muffin cups and sprinkle with some extra chocolate chips. Bake for 20 to 25 minutes in your preheated oven until the tops spring back. Remove from the oven, and cool for five minutes before removing from the pan and cooling on a wire rack.

These keep at room temperature for three days. I only know this because I hid one, otherwise my son would have eaten them all. 🙂

Enjoy your day!

Eat Your Nutrients!

Eat Your Nutrients!


Moist and Grain Free Chocolate Chip Banana Muffins

Moist and Grain Free Chocolate Chip Banana Muffins

Start Your Day with Positive Thoughts!

Happy Monday! Stay positive this week and see what happens!

positive-thought-quote

Each time a negative thought comes in your mind, replace it with something you are grateful for. For instance replace “I am so tired, I can’t believe it is Monday” with “I am so grateful I have this whole day to live on this beautiful planet”. Jot down a daily note of what you did each day when you started down the negative thoughts road, and put a positive spin on your day. Then, look back on the week and note the difference it made!
Enjoy your week!
Sandra Shields, Health Coach

Hot Spinach Artichoke Dip

Here’s a delish and dairy free Hot Spinach Artichoke Dip recipe just in time for Super Bowl Sunday! It is dairy free, creamy and “cheesy”. Take it to your next shindig. It is the best ever! Serve it with crudites like carrots, red peppers, and healthy chips for dipping. I made my own baked chips using almond flour grain free tortillas cut into wedges and baked in the oven to crisp them up. Brown rice wraps work well also. Use your favorite or what works for you. You will need to soak some cashews for 2 hours before assembling the dip. This makes it very creamy!

Hot Spinach Artichoke Dip - Dairy and Gluten Free

Hot Spinach Artichoke Dip – Dairy and Gluten Free

Hot Spinach Artichoke Dip

Preheat your oven to 350º degrees F. Grease a 1.25 quart baking dish lightly with olive oil.

Ingredients:

1 – 11 oz. container of Fresh Spinach

1 – 14 oz. can of quartered Artichoke Hearts, drained (I used Native Forest)

1 Cup of Raw Cashews, soaked 2 hours in water at room temperature

1/2 Cup of Quality Mayonnaise (I like Avocado Oil Mayo)

2 Tablespoons of Nutritional Yeast (this makes it cheesy and is a good source of B vitamins too. Read more about the benefits here.

2 Tablespoons of Fresh Squeezed Lemon Juice

2 Tablespoons of Garlic Olive Oil or 2 cloves of minced garlic and olive oil)

2 Teaspoons of Honey

1/2 Teaspoon of Sea Salt

1/2 Teaspoon of Onion Powder

Directions: In a skillet, cook your spinach with the olive oil and a large pinch of sea salt. Set aside. In a food processor with a blade attachment, add the cashews, artichoke hearts, lemon juice, onion powder, sea salt, nutritional yeast, honey, and mayonnaise. Blend until the cashews are very smooth. Add in the cooked spinach and pulse just until it is broken up but not completely mixed in. It takes five or six pulses. You should still see the creamy dip and the spinach should stand out. Think marbled effect.

Spoon the mixture into your prepared baking dish, and bake in the oven for 25 minutes.

Remove from the oven, and serve with your accompaniments of choice!

Assemble this ahead of time, then just bake on game day!

Happy Eating!


Hot Spinach Artichoke Dip - Dairy Free

Hot Spinach Artichoke Dip – Dairy Free


Hot Spinach Artichoke Dip - Gluten Free, Dairy Free

Hot Spinach Artichoke Dip – Gluten Free, Dairy Free

This Hot Spinach and Artichoke Dip is as delicious as the classic, but it is without the dairy. Paleo, Gluten Free and Dairy Free. Perfect for a party!


Strawberry Pecan Pie – Grain Free, Dairy Free

You know what I love about February besides having three of my daughter’s birthdays in this month and Valentine’s Day? I start seeing good strawberries in the store again! I also find people are starved for color, and February is full of red and pink and hearts. This Strawberry Granola Dessert is just right!

Strawberry Pecan Granola Tart

Strawberry Pecan Pie

The crust for the pie is a coconut pecan crust that is grain free. It rolls really well and blind bakes beautifully. The pecans and coconut in the recipe with a touch of honey makes it very tasty!

There is a jammy berry bursting filling that has berries cooked down to intensify the strawberry flavor naturally, and fresh strawberries stirred in afterwards, along with some coconut butter to add creaminess.

The granola on the top of this pie adds a crunchiness that is fun to eat and delicious with the creamy filling. It is crunchy and airy with the freeze dried strawberries, toasted coconut flakes and crunchy chopped pecans. The granola topping stands alone in my opinion, so make extra to snack on!

Strawberry Pecan Granola Tart with Coconut Pecan Crust

Strawberry Pecan Pie with Coconut Pecan Crust


Strawberry Pecan Granola Tarts

Strawberry Pecan Pie


Strawberry Pecan Pie (makes two smaller or one full pie sized)

Coconut Pecan Crust

For the crust: Preheat your oven to 350º degrees F.

In a food processor with a blade attachment add the following ingredients:

1/4 Cup of Coconut Flour

1/3 Cup of Pecan Halves

1/4 Cup of Coconut Butter (I could eat this brand right out of the jar)

1/4 Cup of Coconut Flakes (unsweetened, shredded)

1 Egg

2 Tablespoons of Honey

1/8 Teaspoon of Sea Salt

Pulse all the ingredients in the food processor until it forms a ball. Grease your pan of choice. This is either a full sized pie pan, or like the ones I used which hold 2 Cups each.

Roll out the crust between two pieces of parchment paper or plastic wrap with a rolling pin. If you have two pans, divide the crust in half, one for each pan. Take off the top layer of parchment after rolling the crust out, and carefully transfer it to the pans. It will probably need some patching, so use your fingers to form the crust to your liking. Don’t panic. 🙂

Bake for ten minutes, or until the crust is golden brown on the edges. Remove it from the oven and cool. Now let’s make the filling!

Coconut Pecan Pie Crust

Coconut Pecan Pie Crust

Filling

1 Lb. of Fresh Strawberries for making the jam filling

1 Cup of Fresh Strawberries for stirring in

1/4 Cup of Coconut Butter

3 Tablespoons of Honey

1 Tablespoon of Fresh Squeezed Lemon Juice

a Pinch of Sea Salt

In a heavy medium saucepan over medium high heat, cook the ingredients. When the jammy filling comes to a simmer, mash the berries using a potato masher to break up the berries. Continue cooking for five to ten minutes at a high simmer until the mixture thickens,stirring occasionally. Remove from the heat and fold in one cup of fresh diced strawberries. Set aside to cool.

Strawberry Granola Topping

This is an easy peasy granola, and you are going to love it!

1/4 Cup of Pecan Halves

1/4 Cup of Freeze Dried Strawberries (my favorite here)

1/4 Cup of Dang Lightly Salted, Toasted Coconut Flakes (they are amazing straight out of the bag…here. Easy to find in grocery stores too)

Directions: Break up the strawberries and coconut flakes with your hands or a knife. Coarsely chop the pecans. Mix them all together in a bowl.

Simple Strawberry Granola Ingredients

Simple Strawberry Granola Ingredients

Assemble!

Pour the Jammy Strawberry filling into the cooled pie crust, and spread it evenly. Sprinkle the delicious, crunchy Strawberry Granola Topping on top. Be artistic! Refrigerate for four hours before serving.

Happy February!

Dishing it Up! Strawberry Pecan Granola Tart

Dishing it Up! Strawberry Pecan Pie (smaller version)

strawberry pecan pie - grain free, dairy free

Eat Your Nutrients!

Eat Your Nutrients!


%d bloggers like this: