Monthly Archives: October 2014

Spicy Zucchini Sticks

Sides are some people’s favorite part of the meal. I like to have a lot of veggie sides for dinner so I can load up on my vegetables and get a variety of nutrients. As an added bonus, there are lots of leftover vegetables for breakfast and lunch, so I am cooking vegetables once a day, but eating them at every meal.

These Spicy Zucchini Sticks are a perfect side for burger or taco night. They are fast and have just the right amount of heat. I am serving them tonight with Messy Jessie’s.

Spicy Zucchini Sticks

Spicy Zucchini Sticks

SPICY ZUCCHINI STICKS

Ingredients:

4 Medium Zucchini

3/4 Cup Superfine Almond Flour

2 Tablespoons Garlic Olive Oil

1 Teaspoon Black Pepper

1/2 Teaspoon Himalayan Pink Salt

1 Teaspoon Smoked Paprika

1/2 Teaspoon Chipotle Powder (No Garlic Added)

1/2 Teaspoon Turmeric

Directions:

Preheat oven 350º degrees. Wash the zucchini and slice into quarters lengthwise. Lay in a single layer on a parchment lined baking sheet, and brush with garlic olive oil. Set aside. In a small bowl mix together the superfine almond flour, black pepper, Himalayan pink salt, smoked paprika, chipotle powder and turmeric. Coat the zucchini sticks with the almond flour mixture by sprinkling over the zucchini and tossing a bit with your hands. Making sure they are in a single layer, bake in your preheated over 35 to 40 minutes until golden brown. They are delicious with SCD Low FodMap BBQ Sauce.

Eat Your Nutrients!

Eat Your Nutrients!

Asian Shrimp Egg Custard w/ Scallion Oil Drizzle

Do you like Chinese Steamed Egg Custard?  When we were in China to adopt our beautiful daughters, we had the best savory egg custards! Our girls were babies, and they loved this delicate silky food. The nannies gave it to the children regularly as part of their daily meals, and I learned how to make it at home, so they could continue to enjoy it.  I changed up this recipe of traditional Chinese Egg Custard by baking them and incorporating Coconut Milk and Macadamia Nut Oil, although there are so many variations depending on the province you are visiting.  This recipe is one the family asks for regularly, and it is easy and kid friendly, but looks and tastes fancy enough to serve as an appetizer at a dinner party or festive occasion. Adults love it too! It is nutritious with two eggs per serving, shrimp and good fat.

Asian Inspired Shrimp Egg Custard with Scallion Oil Drizzle

Asian Shrimp Egg Custard with Scallion Oil Drizzle

Asian Shrimp Egg Custard with Scallion Oil Drizzle

Ingredients:

8 Eggs

32 shelled and deveined small shrimp, steamed

1 1/2 Cups Bone Broth or Chicken Stock

1/2 Cup Coconut Milk, Full Fat SCD Legal no Additives

3/4 Teaspoon Himalayan Pink Salt

Pinch of White Pepper

Duck Fat for Greasing the Ramekins

For the Scallion Oil:

2 fresh scallions green parts only, sliced

1/2 Cup Macadamia Nut Oil or Olive Oil

1/2 teaspoon Himalayan Pink Salt

Directions:

Preheat Oven 350º degrees. Grease 4 Ramekins with Duck Fat, set aside. To make your Scallion Oil, place sliced scallions, macadamia oil and 1/2 teaspoon Himalayan Pink Salt in a small food processor and blend until emulsified with a few bits of green scallion flecks, set aside.

In a large bowl whisk together your 8 eggs, bone broth, coconut milk, Himalayan Pink Salt and a pinch of white pepper.  Stir in 3 Tablespoons of scallion oil and whisk again. Pour evenly into the four ramekins. Place 5 shrimp in the center part of each ramekin. They will sink, that is good! Place ramekins in a roasting pan or a pan with sides, and pour boiling water into the pan so it comes halfway up the sides of the ramekins. Bake 350º degrees for 25 to 30 minutes, just until set but still slightly jiggly in the middle. Remove from oven and top with three shrimp artfully arranged and drizzle each with 2 teaspoons of scallion oil. They should cool for about 5 to 10 minutes before serving so you don’t burn your tongue.

Served 4

Asian Shrimp Egg Custard with Scallion Oil Drizzle is a perfect addition to your Chinese menu or party! Delicious starter or for lunch or breakfast! Paleo, Gluten Free, Dairy Free.

Eat Your Nutrients!

Eat Your Nutrients!


Weeknight Tacos SCD, Low FodMap, Paleo

You don’t have to give up tacos when eating SCD Low FodMap.  Here is a delicious taco that uses butter lettuce “shells”. It is an easy weeknight meal!

SCD Low FodMap Tacos

Weeknight Tacos SCD, Low FodMap, Paleo

Weeknight Tacos, SCD Low FodMap Paleo

Ingredients:

1 Pound of Ground Grassfed Beef

1 Pound of Ground Pork

1 Large Green Bell Pepper

1/2 Cup Green Onion, sliced (green parts only)

2 Tablespoons Garlic Infused Olive Oil

1 Cup Tomato Puree, SCD Legal

1/3 of a Fresh Serrano Chili Pepper, Minced

1 Teaspoon Himalayan Pink Salt

1/2 Teaspoon Black Pepper

1 Tablespoon Ground Cumin

2 Teaspoons Smoked Paprika

1 Teaspoon Ground Ancho Chili Pepper

1 Teaspoon Ground Oregano

1 Teaspoon Ground Chipotle Powder

1/8 Teaspoon Cayanne Pepper

1 Head of washed Butter Lettuce, Cleaned and Separated

Directions:

Finely chop the Green Pepper, slice your green onion tops thinly and mince your Serrano Chili Pepper. Mix the rest of your spices together in a small bowl and set aside. Add 2 Tablespoons of Garlic Olive Oil to a large sautee pan. Turn your burner to medium high, when olive oil is warmed, add your pork and grass fed beef to the pan and sprinkle with the Himalayan Pink Salt and Pepper. Brown for about ten minutes, breaking up the meat, then add both your peppers and the green onion. Continue to cook for another 5 minutes or until tender. Add the seasoning you mixed and set aside to your meat mixture and cook for one minute stirring to coat evenly. Then, add your tomato puree, bring up to a boil.  When it is boiling, reduce heat to low and simmer until reduced and thick.  This takes about 5 minutes. Serve with butter lettuce shells.

Eat Your Nutrients!

Eat Your Nutrients!


Chai Love You! – Individual Chai Spice Creamer

Chai Love You Beverage Drop Ins

Chai Love You –  Individual Chai Spice Creamer

If you think the smell of  Chai is a warming, comforting aroma like I do,  these individual frozen creamers are just what you need for your cup!  I am really loving the convenience of these individual creamers that are frozen to stay fresh! Right now I have Pumpkin Spice and Chai in my freezer so I can have whatever flavor I am in the mood for in my coffee and tea.  I have even popped them in my morning smoothies with great results! Chai is like a warm, loving hug! I have been reading the book The Power of Intention by Wayne Dryer, and one really important insight I like in the book is choosing to see the good in others and letting go of the negative thoughts that surface in your mind, replacing them with something you see positive about people.  It really has been broadening my view and opening me up more positive intention throughout the day.

Chai Love You – Individual Chai Spice Creamers

Ingredients:

1/2 Cup Coconut Oil

1/4 Cup Clear Honey

1 1/2 Cups Full Fat Coconut Milk (no additives, I like this kind)

1 Tablespoon Pure Vanilla Extract

1 Tablespoon Cinnamon

1 1/2 Teaspoons Ground Cardamom

3/4 Teaspoon Cloves

Directions:  Line a twelve cup muffin pan with natural or foil muffin cup liners.  Melt the coconut oil in a medium bowl in the microwave or on the stovetop.  Whisk in the remaining ingredients until thoroughly blended and divide evenly between the muffin cups. Place the muffin pan in the freezer and freeze solid. After about four hours you can remove the Chai Spice Creamers from the pan and store in an airtight container in the freezer.  To use, add to your favorite hot beverage and whisk.

Eat Your Nutrients!

Eat Your Nutrients!

Pumpkin Dog Treats (Ming Loves Pumpkin, But She Doesn’t Want to Be One)

I thought Ming would be cute in a pumpkin costume when the Trick or Treaters came to the door this year, but she really, really doesn’t like clothes of any kind, especially on her head, can you tell?

Ming Loves Pumpkin, But She Doesn't Want To Be One

Ming Loves Pumpkin, But She Doesn’t Want To Be One

So, to apologize to her for compromising her dignity, I made her some Pumpkin Pup Treats.  She adores them, and gets a little crazy when she hears the bag rattling. Your pup will enjoy these healthy homemade dog treats too, whether they like to dress up or not! If your dog loves to wear costumes or doesn’t, I would enjoy seeing pictures of your pets! E-mail me your pet photos at: sameatshernutrients@gmail.com so I can meet the pets you love!

Pumpkin Pup Treats

Pumpkin Pup Treats

Pumpkin Pug Treats

Preheat Oven 350º degrees.

Ingredients:

1 Cup Organic Pumpkin Puree

2 Pastured Eggs

1/2 Cup Natural No Sugar Peanut Butter

1/2 Cup Coconut Flour

1/4 Cup Gelatin (I used this)

1 Teaspoon Dried Parsley Flakes

1/2 Teaspoon Himalayan Pink Salt

Mix all the ingredients with an electric hand mixer. Scoop with a tablespoon cookie scoop onto parchment lined cookie sheets. Bake 15 minutes. Cool and package.

Makes 24 treats.  Freeze them in small batches so you can pull them out of the freezer a little at a time for your pet.

Eat Your Nutrients!

Eat Your Nutrients!

Shepherd’s Pie, SCD, Low FodMap, Gluten Free

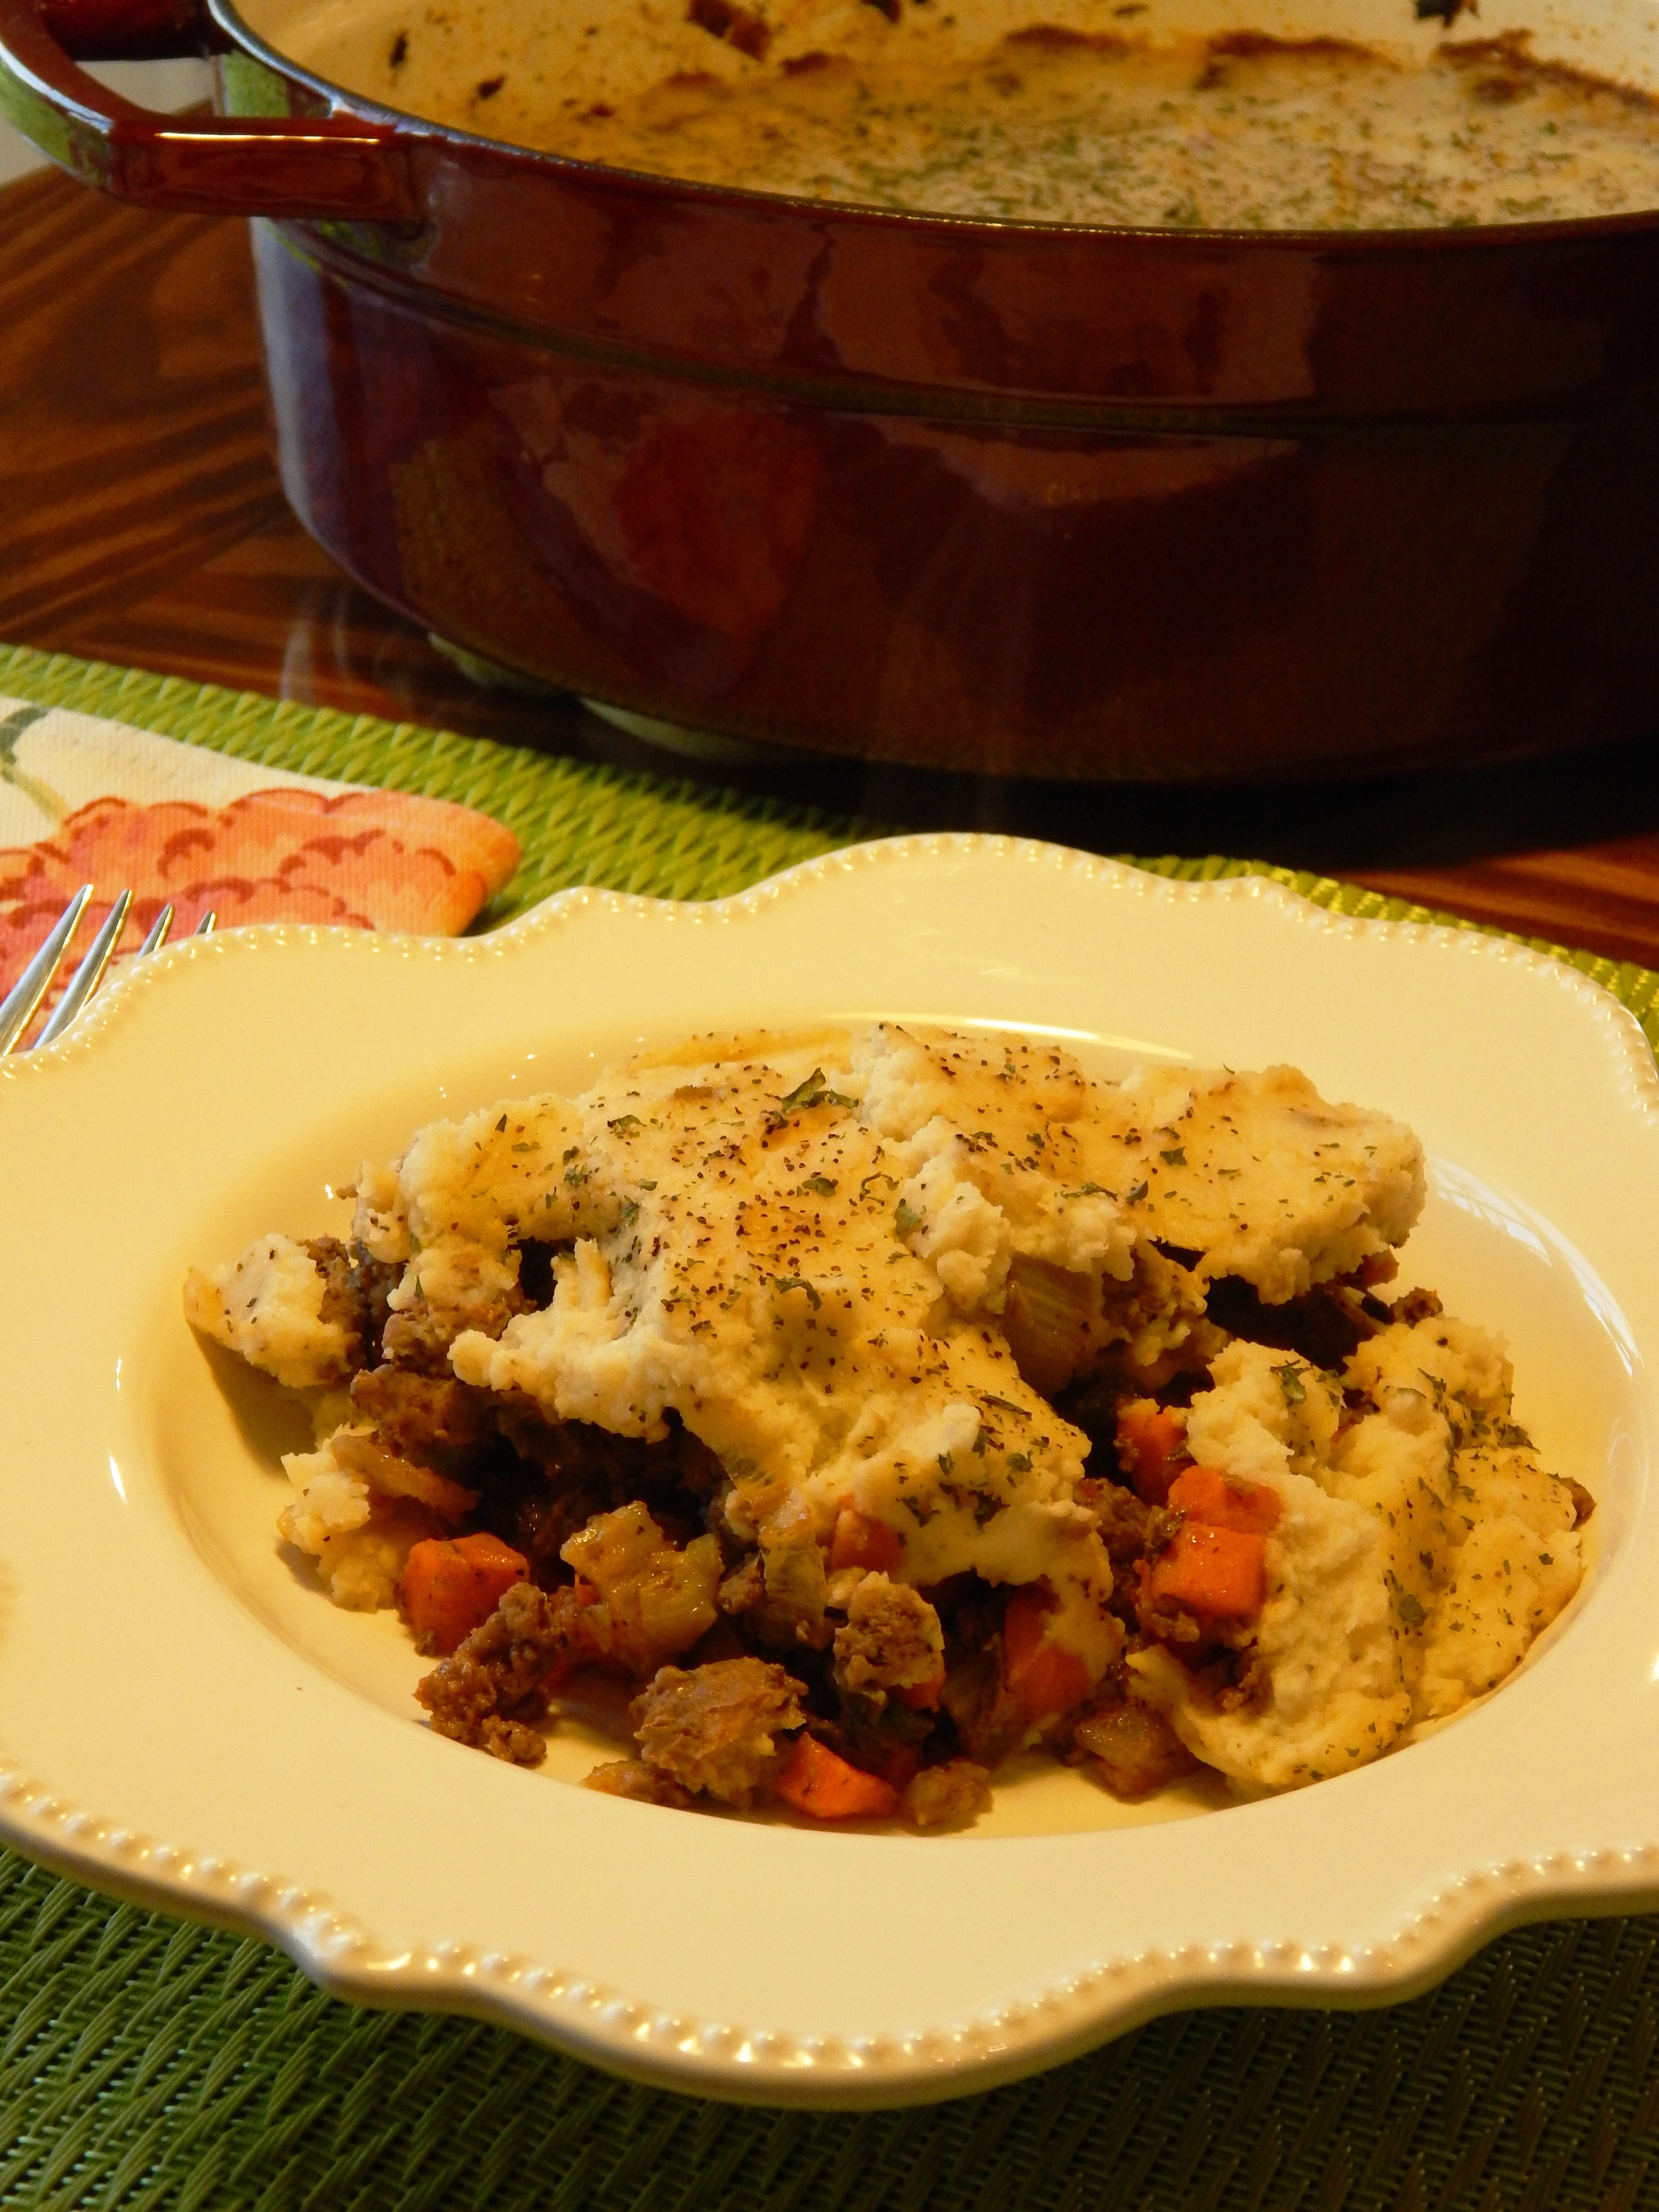
As the weather gets colder and the day light hours get shorter, one pot meals are even more appealing. The definition of comfort food changes with the seasons.  Shepherd’s pie is right up there on the top of the warming winter casserole list!

English Cottage Pie

Shepherd’s Pie

This recipe is Low FodMap, SCD legal, Paleo and Dairy Free.  It has a creamy celeriac root topping and a savory meat and vegetable filling.  I love that it can be made ahead and then put in the oven before dinner. It is on the table for a hungry family in a hurry, especially on the extra busy days of piano lessons and after school activities, or a busy day at work.  It tastes even better the next day, is leftover friendly, and you are getting lots of veggies in this meal. Here is what you need.

Shepherd’s Pie

Ingredients for the Filling:

1 Pound of Grassfed Ground Beef

1 Pound of Ground Bison

2 Cups of Sliced Green Onions (Green Parts Only)

2 Tablespoons Garlic Infused Olive Oil

2 Cups Finely Diced Carrots

2 Medium Fennel Bulbs, Finely Diced

1/4 Cup Tomato Paste (SCD Approved) (See this link for an explanation on legal tomato paste)

1 1/2 Teaspoons Himalayan Pink Salt

1 1/2 Teaspoons Black Pepper

1 Teaspoon Thyme

1 Teaspoon Parsley, plus a little extra for sprinkling on the top

2 Teaspoons Tarragon, crushed

1/4 Teaspoon Rosemary, crushed

 Ingredients for the Topping:

1 Large Celeriac Root (or 2 small)

1/2 Cup Full Fat Coconut Milk

1/4 Teaspoon Himalayan Pink Salt

1/4 Teaspoon Black Pepper

Directions:

Preheat Oven 425º degrees.

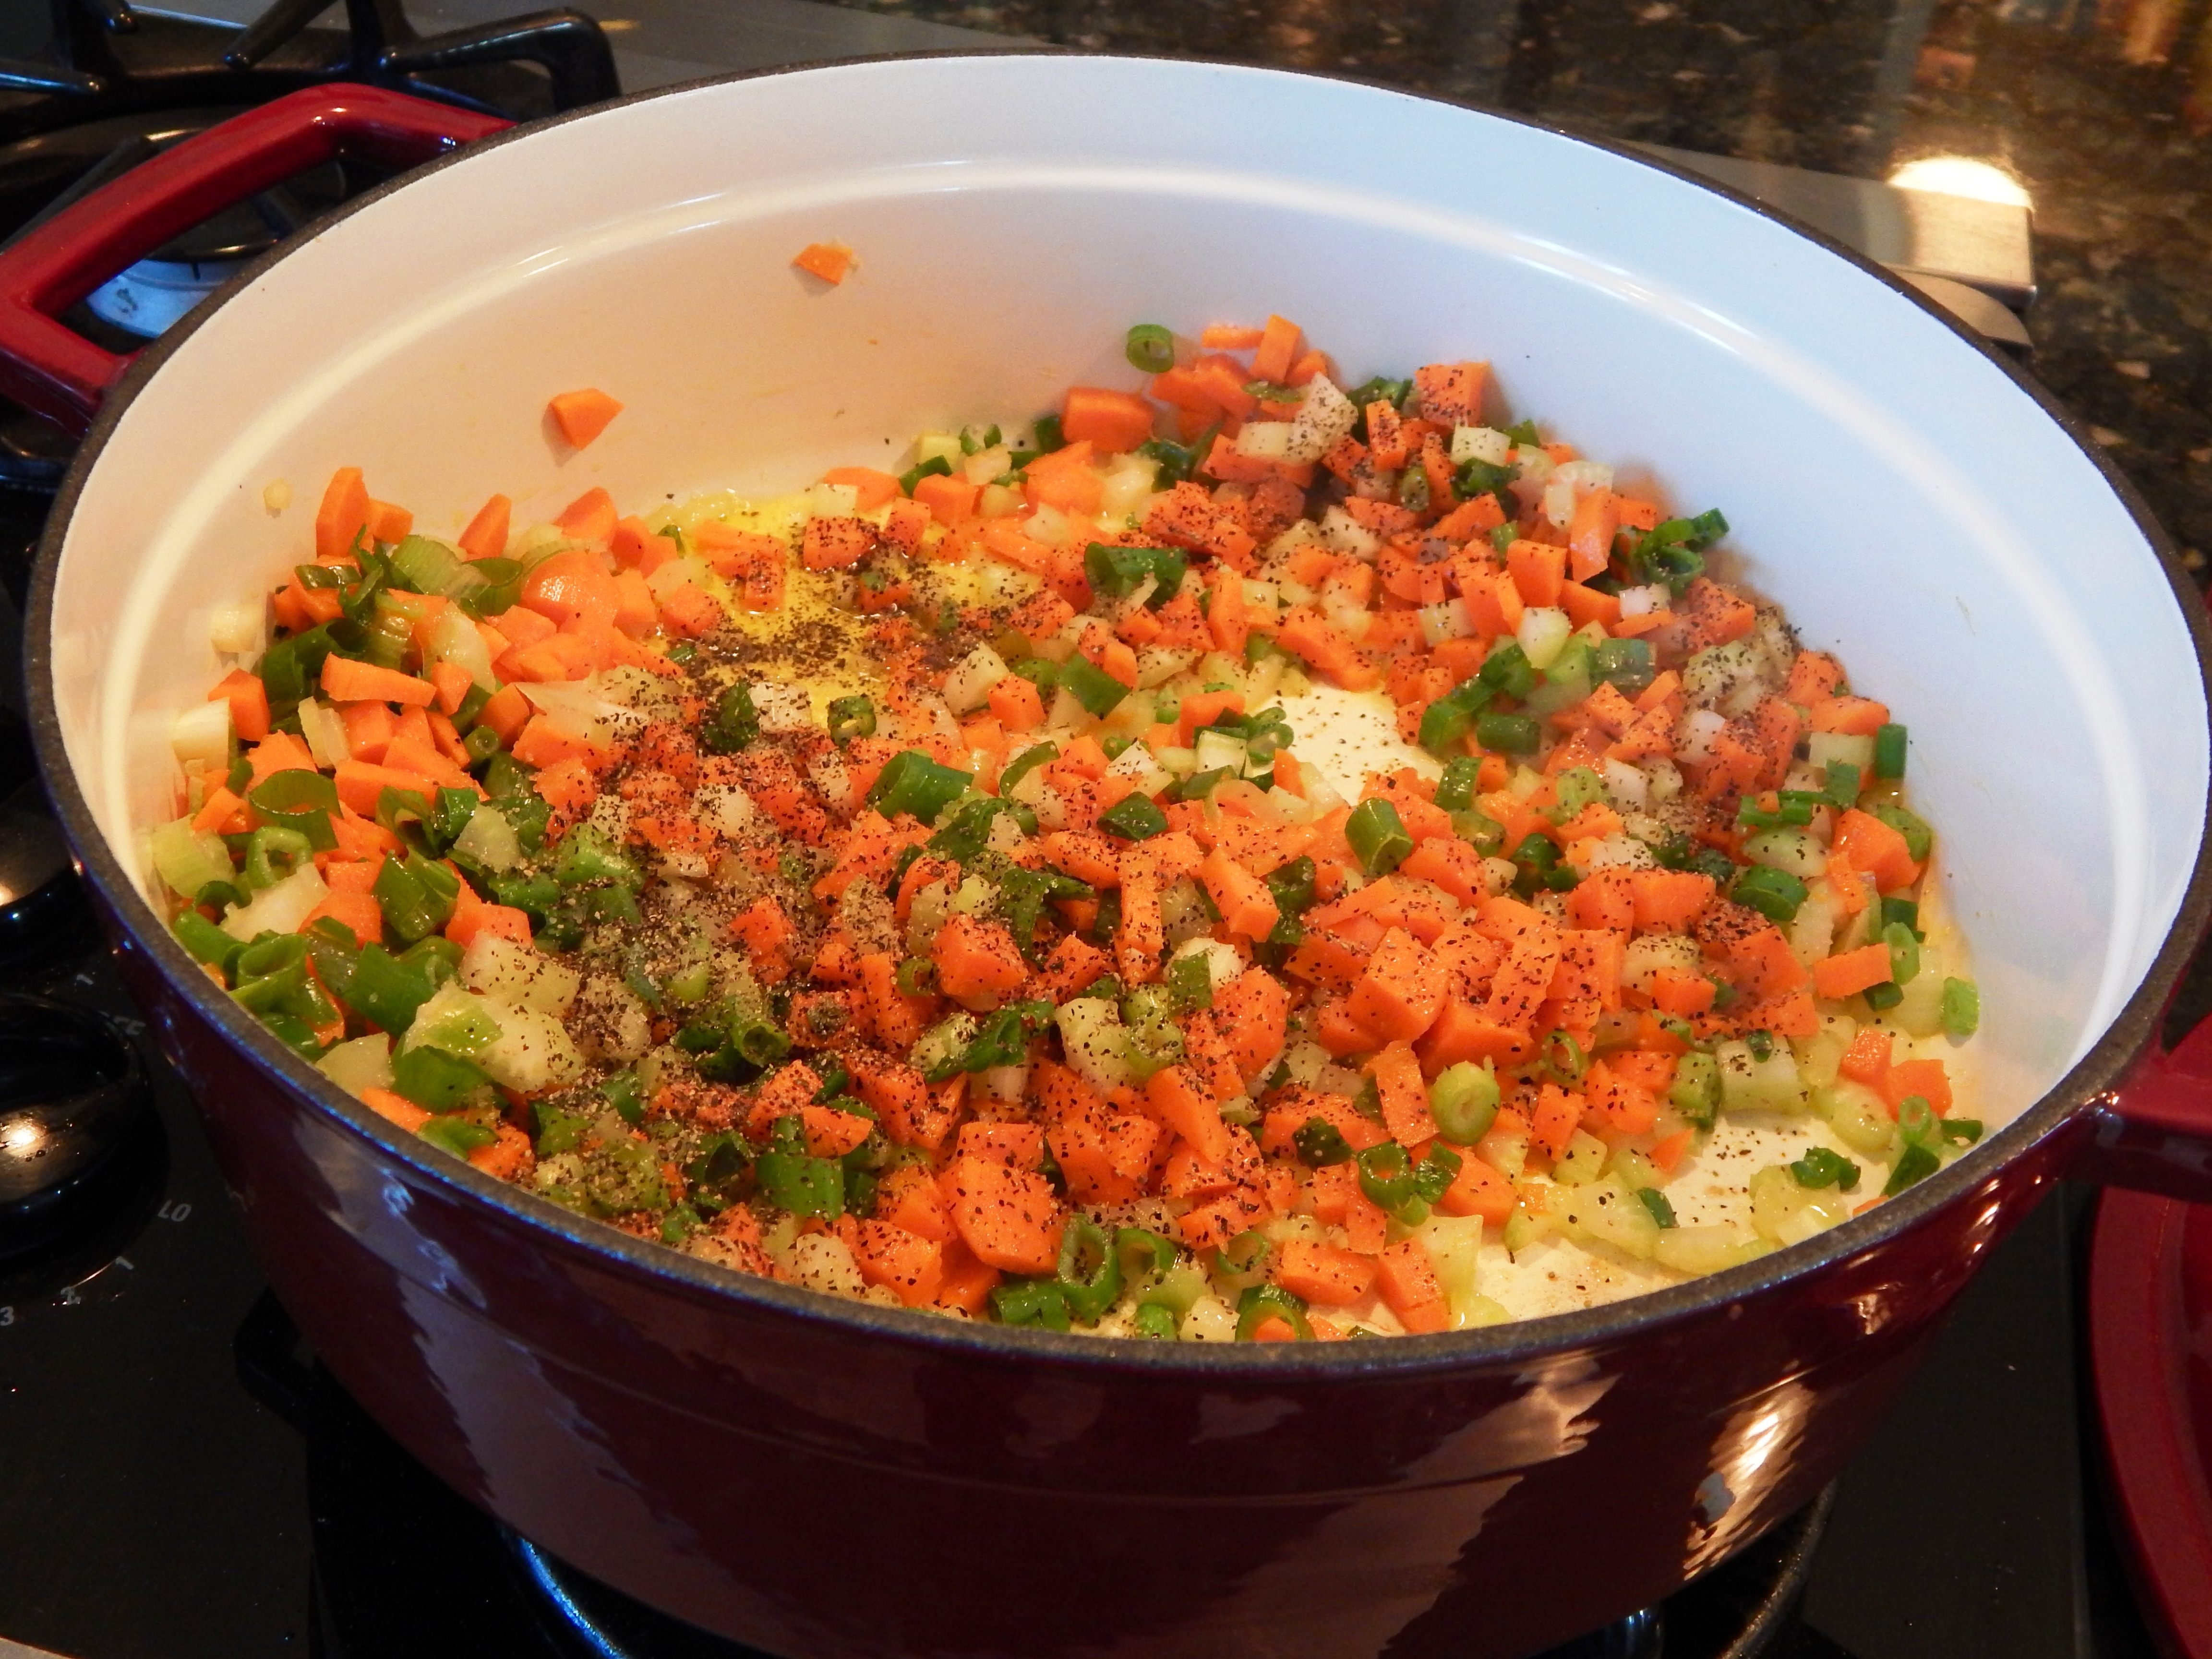
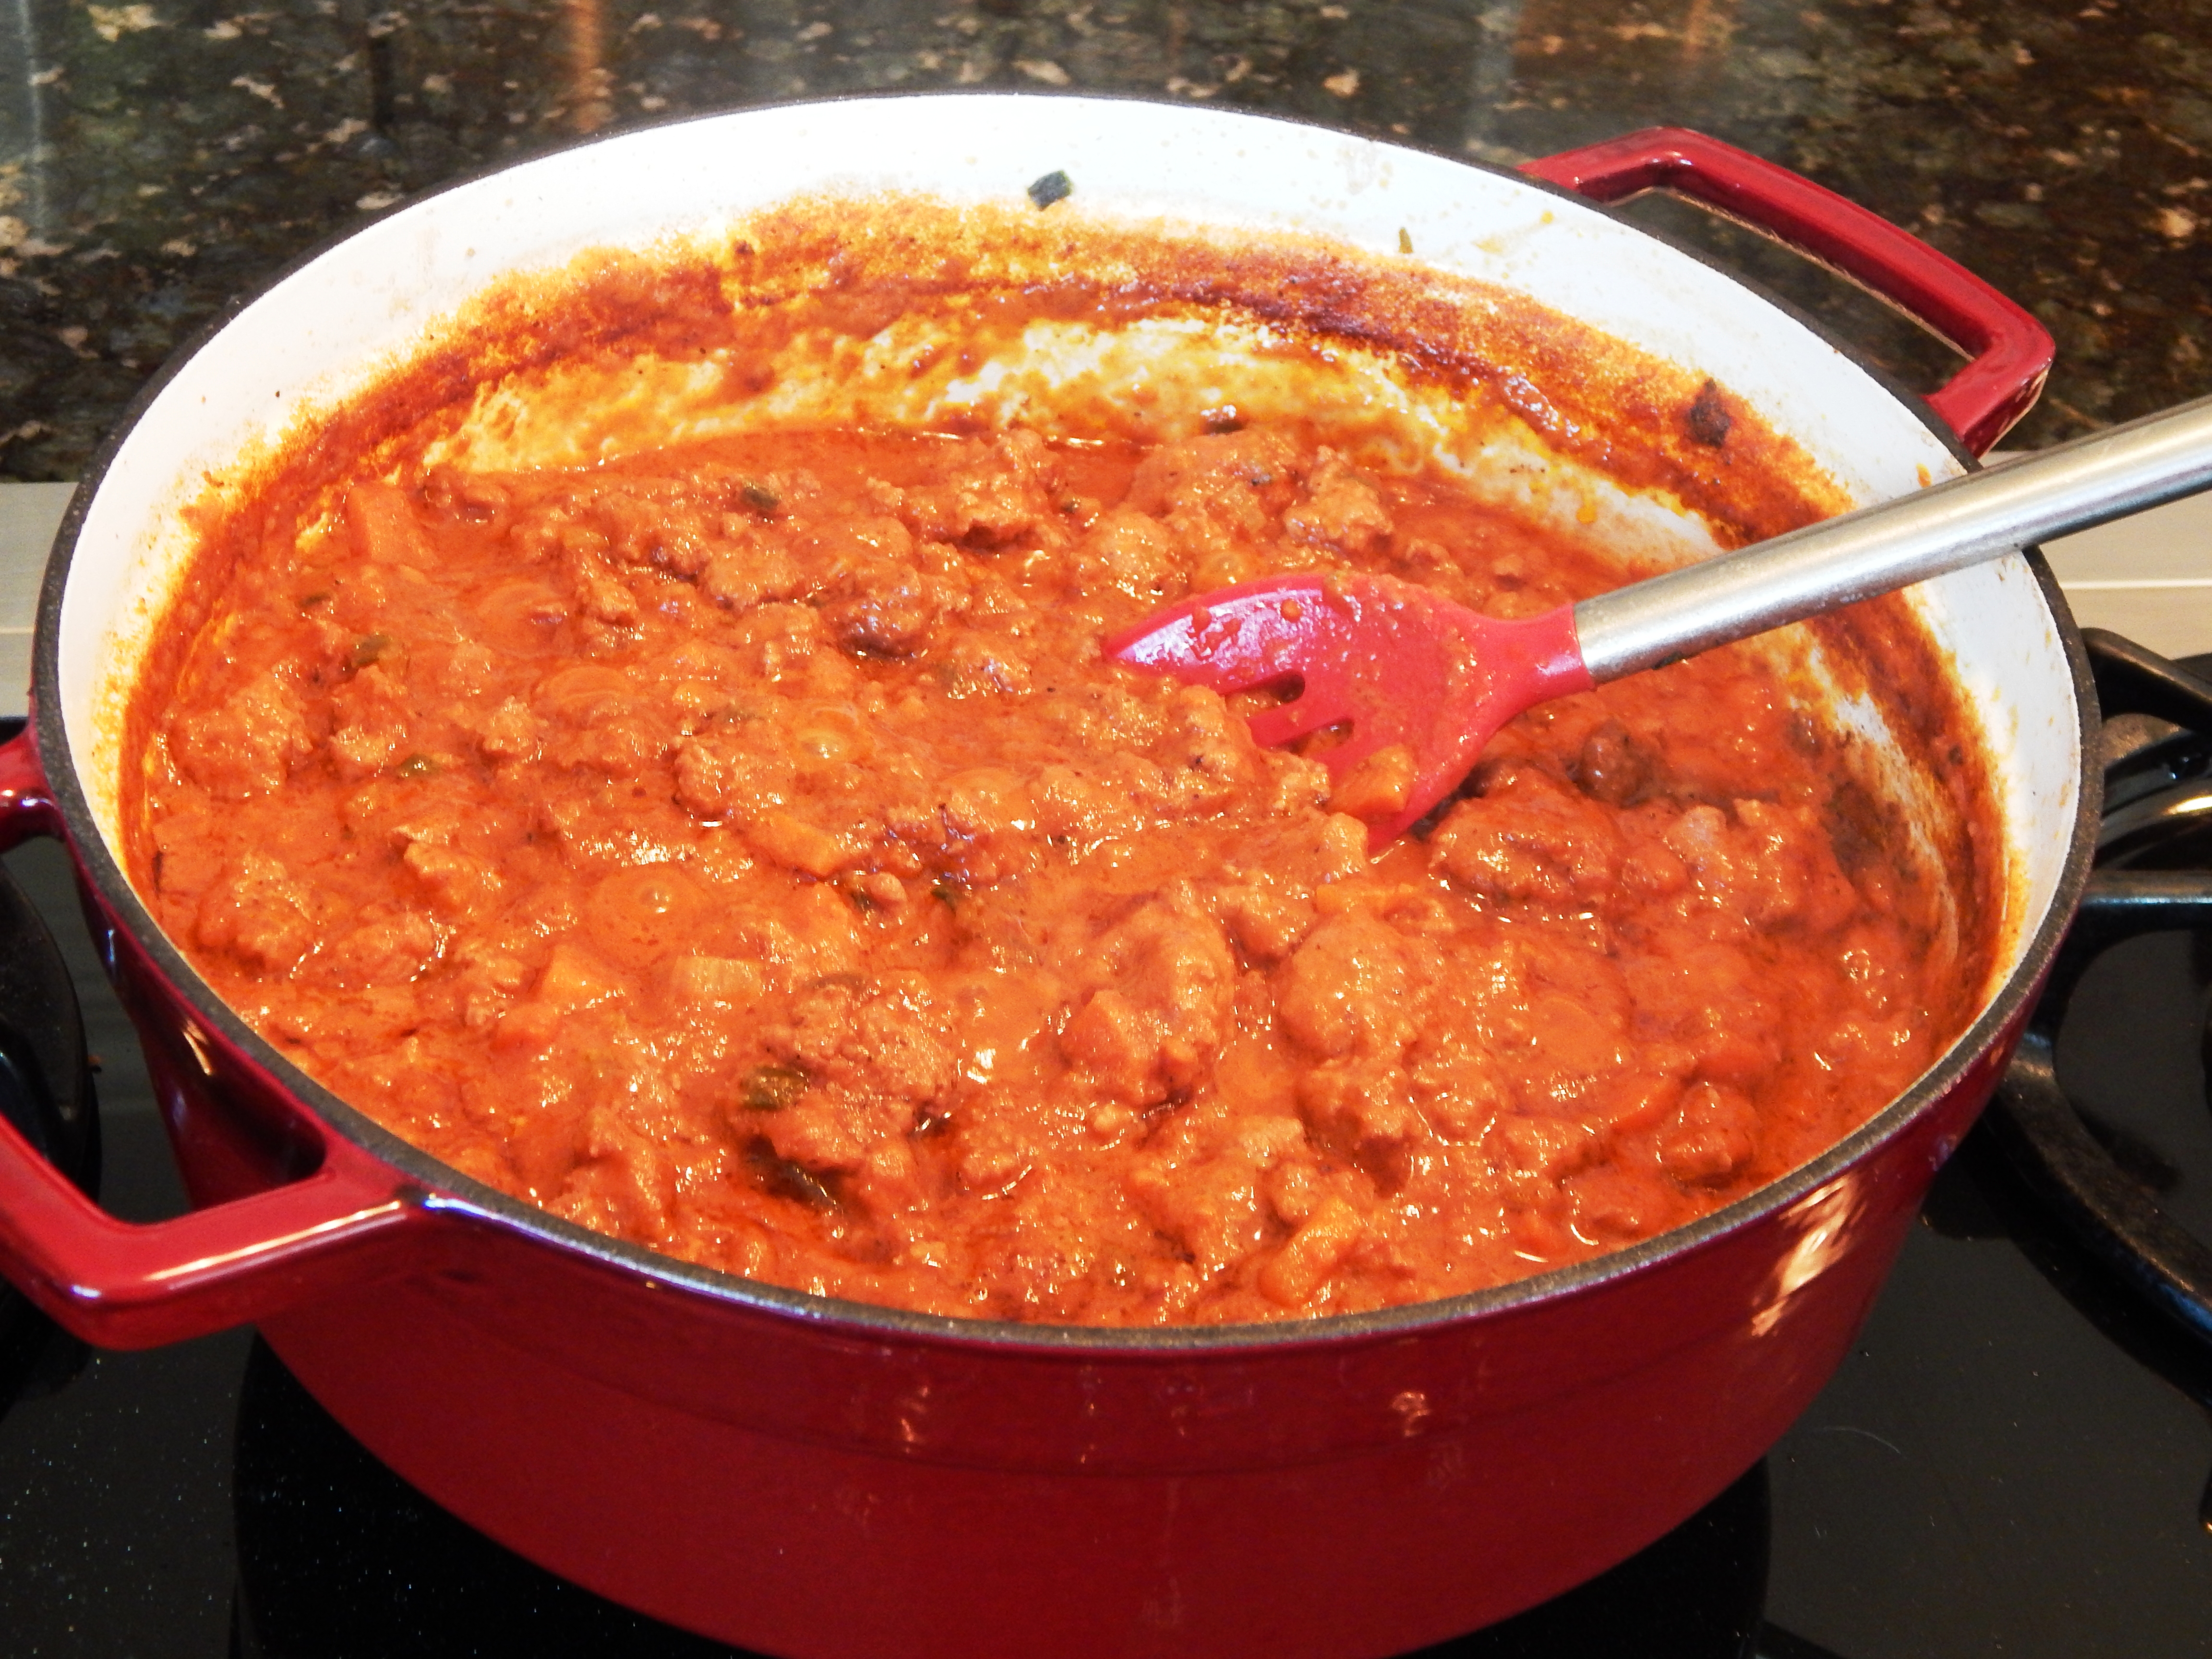
Using a large, heavy enameled cast iron pan (I used a 5 quart), add your garlic infused olive oil to the pan and warm over medium-high heat.  Add all your chopped vegetables, and sprinkle with 1/2 teaspoon of Himalayan Pink Salt and a 1/2 teaspoon black pepper. Cook for 5 minutes until softened, stirring occasionally.  Add your ground meat and sprinkle with 1 teaspoon of Himalayan Pink Salt, 1 teaspoon of black pepper and the herbs.  Sautee breaking up the meat until thoroughly cooked and starting to carmelize on the bottom of the pan.  Stir in the tomato paste, then level the filling out on the bottom of the pan and set aside.

Meanwhile, peel and cube your celeriac root and place in a medium saucepan, then cover with water abut 2 inches above the celeriac root. Bring to a boil on the stovetop, then turn to down to simmer.  When fork tender, this takes about 20 minutes, drain off the water, and place the celeriac root, coconut milk, 1/4 teaspoon Himalayan Pink Salt, and 1/4 teaspoon of pepper in a food processor and process until creamy.  Spread the mashed celeriac in an even layer on top the the Cottage Pie Filling. Sprinkle with a little pepper and a sprinkle of dried parsley flakes.

At this point, you can cover and refrigerate or bake right away.  If refrigerated, allow ten to fifteen more minutes to bake in the oven.  Bake 35 minutes (50 if refrigerated) in the oven uncovered, until the top is starting to brown. Remove from oven and serve. 6 – 8 Servings

English Cottage Pie

Shepherd’s Pie

Eat Your Nutrients!

Eat Your Nutrients!

Pumpkin Creme Brulee

Pumpkin Creme Brulee

Pumpkin Creme Brulee

If you like creme brulee, you are going to love this seasonal recipe for Pumpkin Creme Brulee!  If you have missed creme brulee because you are dairy free, this recipe is no compromise. It is delicious and creamy, a perfect Autumn dessert! Creme Brulee is an easy fancy dessert, but it is also comfort food, it is prepared in advance, chilled and finished off minutes before serving.  I haven’t met anyone yet who doesn’t love it. You are getting the nutritional benefits of egg yolks, pumpkin and good fat in this dessert.

Pumpkin Creme Brulee

Ingredients:

1 Large Pastured Egg

4 Large Pastured Egg Yolks

1/2 Cup Pumpkin Puree

1/4 Cup Clear Honey

1 Can Full Fat Coconut Milk, No Additives

1 Tablespoon Pure Vanilla Extract

2 Teaspoons Pumpkin Pie Spice, Organic Gluten Free 

1/4 Teaspoon Himalayan Pink Salt

4 Teaspoons Clear Honey for the Tops of Creme Brulee

Directions:

Grease 4 ramekins with organic palm shortening or coconut oil. Directions: Preheat your oven 325º degrees.  In a small bowl, whisk together your egg and yolks, honey and vanilla extract. Set aside. In a medium, heavy pot, add your coconut milk, pumpkin puree, pumpkin pie spice and salt. Over medium heat, scald your coconut milk mixture.  When the milk mixture is scalded, slowly add a cup of the scalded milk to your egg mixture whisking constantly. Now, pour your egg yolk mixture slowly back into the remaining scalded milk in the pot, whisking as you do so. (This is done slowly to emulsify and not cook the eggs.)

Pour the custard into the four ramekins, dividing evenly. Place the ramekins in a baking pan that has at least 3 inch sides.  Pour boiling water into the pan so it comes half way up the sides of the ramekins.  Bake 25 to 30 minutes until custard is almost set but still a little soft in the center. It is important not to over bake.  Cool in the refrigerator for 4 hours, or up to two days, covered.

When ready to serve, remove creme brulee from the refrigerator, place a teaspoon of warmed honey on each creme brulee and caramelize the honey with a blow torch or place under your oven broiler for 2 to 3 minutes watching carefully. I used a kitchen blow torch, and it creates a thick delicious topping.  It will not reach the crunchy stage like when using sugar, but it is unique and really decadent.  Sprinkle with a dusting of cinnamon. Serve!

Makes 4 Creme Brulee


Eat Your Nutrients!

Eat Your Nutrients!


Pumpkin Cranberry Biscotti

One of my favorite cookies of all time is biscotti! It is elegant, and I love the shape! Biscotti means twice baked, and the first documented recipe originated in Italy. You start by baking it in a log shape, letting it cool, and then cutting it into long slices and baking it again so it is crunchy and dry, perfect for dipping in a hot beverage. Biscotti and I have a long history.  I am known to get the biscotti jar out when company is over and we are playing cards and having coffee.  I am so happy that eating SCD and Paleo doesn’t mean I have to give up my biscotti! This is a wonderful Autumn recipe with pumpkin and tart cranberries that you are sure to love!

Pumpkin Cranberry Biscotti

Pumpkin Cranberry Biscotti

Pumpkin Cranberry Biscotti

Preheat Oven 350º

Ingredients:

1 3/4 Cups Superfine Almond Flour

2 Tablespoons Coconut Flour

1/2 Teaspoon Baking Soda

1/4 Teaspoon Himalayan Pink Salt

1 Teaspoon Pumpkin Pie Spice

1/2 Cup Pumpkin Puree, SCD Legal

3 Tablespoons Clear Honey

1 Teaspoon pure Vanilla Extract

1/3 Cup Dried Cranberries (Fruit Juice Sweetened)

1/4 Cup Sliced Almonds for the Top

In a medium bowl, whisk together the first five dry ingredients. In a seperate small bowl, melt your honey a few seconds in the microwave, and then whisk in the pumpkin puree and vanilla extract.  Add this to the dry ingredients and stir together vigorously until a ball forms.  Remove the dough from the bowl and knead in the dried cranberries.  Then, place your dough on a parchment lined baking sheet and form into a 14 x 8 inch log.  Flatten the top and press the sliced almonds into the top of the dough. It should look like this after it is baked the first time.

Cranberry Pumpkin BIscotti Loaf

Pumpkin Cranberry Biscotti Loaf Cooled and Ready to Slice

Bake for 20 minutes.  Remove from oven and cool on a cooling rack for one hour. Place cooled log on a cutting board and gently slice with a serrated knife on a diagonal into 1/2 inch slices.  Place on a parchment lined baking sheet and return to the oven and bake seven minutes. Remove from oven and turn biscotti to opposite side and continue baking another 7 minutes or until golden brown and crunchy.

Pumpkin Cranberry Biscotti Second Baking

Pumpkin Cranberry Biscotti  Ready for Second Baking

Cool Completely before storing. Makes 16 Biscotti

Eat Your Nutrients!

Eat Your Nutrients!

SIBO Low FodMap Specific Carb Diet Food Guide

Good Morning Lovely People!

I am feeling so good following the Low FodMap Sibo Food guide developed by Dr. Allison Siebecker.  This is the guide I use when developing my recipes, and I wanted to share it with you.  It is very helpful because it lists all the food in categories and breaks them down further into which ones are the lowest FodMap to the highest and also the illegal ones on the SCD Diet. Click the link below to view it and print it.  I refer to it all the time and even take it to the grocery store with me!

Dr. Siebeckers Sibo Low FodMap Food Guide

Have a beautiful day!

Sam

Eat Your Nutrients!

Eat Your Nutrients!

Bolognese Sauce

If you are looking for a delicious meaty bolognese sauce, then this one is sure to hit the spot!  I cannot call it classic, because it doesn’t contain dairy, and I have taken some liberties beyond the  Academia Italiana della Cucina‘s official definition.  But I have to say, it tastes pretty darn authentic tasting!

Pork Ragu Bolognese

Bolognese

You start with a Soffrito Base also known as the Holy Trinity…Carrots, Onions (Green Onions in this Case) and Celery, finely chopped.

Saffritto for Pork Ragu Bolognese

Saffritto for Pork Ragu Bolognese

Pork Ragu Bolognese Sauce

Ingredients:

1 Bunch of Scallions, Green Parts Only Sliced

4 Carrots, Peeled and Finely Diced

4 Stalks of Celery, Finely Diced

2 Tablespoons of Garlic Olive Oil

1 1/2 Teaspoons of Himalayan Pink Salt

1 1/2 Teaspoons of Black Pepper

2 Pounds Ground Chicken

1 Pound of Sweet Italian Chicken Sausage Links, diced (I used gluten free)

1 Cup of Dry Red Wine

1 Cup Full Fat Coconut Milk, no additives

1 28 oz. Jar Organic Strained Tomatoes

2 Cups Chicken Stock (homemade if you have it)

Directions: Finely Dice your Scallions, Celery and Carrots.  Add two tablespoons of Garlic Infused Olive Oil to a large stock pan over medium high heat. I love this brand and used the 5 quart braiser for this recipe, if you are looking for a good versatile pot. Add your scallions, celery and carrots and sprinkle with 1 teaspoon of Himalayan Pink Salt and 1 teaspoon of Black Pepper. Sautee for five minutes until starting to brown and they are tender, stirring occasionally.  Turn heat to high and add the two pounds of ground chicken and diced sausage sprinkled with another 1/2 teaspoon of Himalayan Pink Salt and 1/2 teaspoon Black Pepper, and continue to cook, breaking up the meat until the meat is starting to caramelize. Don’t skip the caramelization! It adds flavor! It will take about ten minutes.

Soffritto Ready to Sautee

Soffritto Ready to Sautee

When meat has caramelized and you have a nice brown coating on the bottom of your pan, you deglaze! Pour the red wine into the pan, bring to a boil for one minute scraping the bottom of the pan to release all the brown bits and flavor. Add your stock, tomato puree and coconut milk and bring to a boil.  Then, turn heat to a low simmer and cover the pot 3/4 with the lid and simmer for four hours until very thick and reduced.  If it starts sticking before the four hours add more stock just a half cup at a time. Taste and season with additional salt and pepper to taste.

Pork Ragu Bolognese Sauce

Bolognese Sauce

Serve over noodles of your choice.  I used zucchini noodles in the photo below, I have also served it with spaghetti squash noodles.

Pork Ragu Bolognese

Bolognese with Zoodles

Eat Your Nutrients!

Eat Your Nutrients!

%d bloggers like this: