Tag Archives: Dairy Free Option

Sausage and Swiss Chard Vegetable Soup, Low FodMap, Grain Free

We have had several days of rain and cooler weather, and that always gets me craving soup!

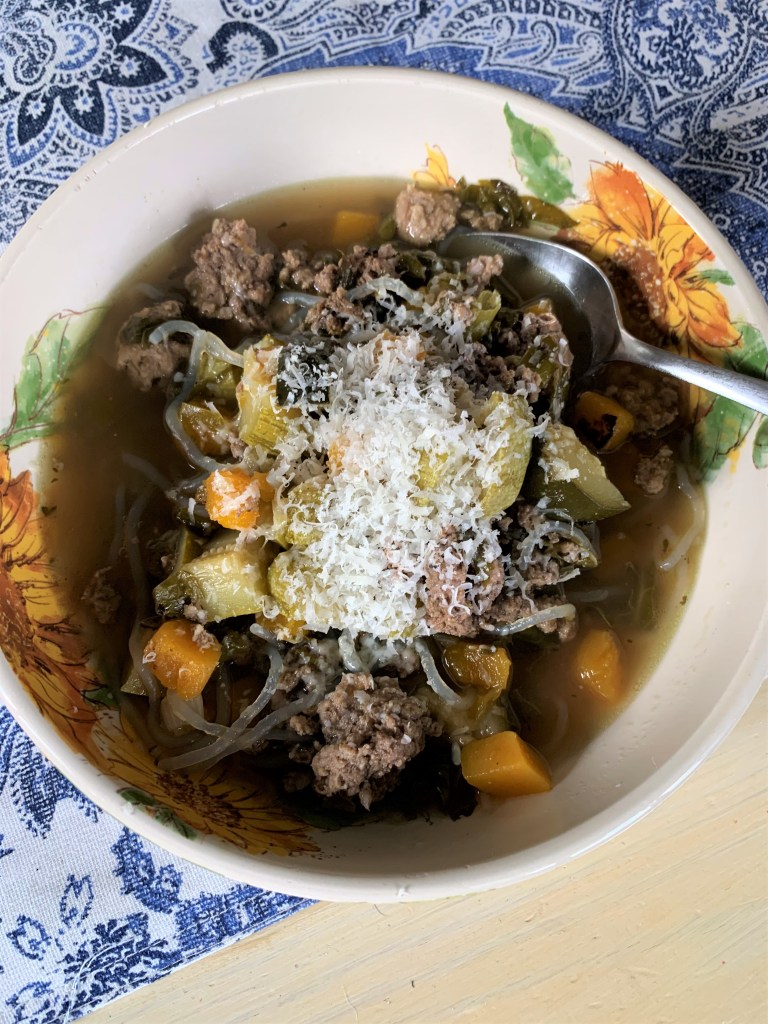
I made my Healing Chicken Soup one day and the next I made this Sausage and Swiss Chard Vegetable Soup using Plant Based, Low FodMap, Low Carb Miracle Noodles. They have a good texture and are wonderful in soups! It was hearty, warming and delicious. So good in fact, that I had leftovers for breakfast!

Soup for breakfast is actually a very nourishing way to start the day when it’s a good one that meets your protein and vegetable requirements.

This soup takes about 30 to 40 minutes to prepare, and then you can just put it in the crock pot for 4 to 6 hours until you want to eat. Alternately, you can simmer it on the stove for 30 minutes and skip the crock pot. I love recipes like that! It gives me more time in the afternoon if I use the crock pot and flexibility.

Sausage and Swiss Chard Vegetable Soup

Ingredients:

1 pound of Pastured Ground Pork

1 pound of Grass Fed Ground Beef

My Low FodMap Sausage Seasoning Blend here:

2 Teaspoons of Ground Fennel

1 Teaspoon of Ground Thyme

1 Teaspoon of Sage

1 Teaspoon of Black Pepper

1 Teaspoon of Salt

Mix the sausage seasoning blend together.

3 Cups of peeled and diced Butternut Squash and 1/2 teaspoon of salt for browning.

4 Cups of Swiss Chard, Chopped

2 Medium Zucchini, Chopped

1 1/2 Cups of Sliced Scallions (green parts only for Low FodMap)

8 Cups of Chicken Stock

1 Package of Fettucini Miracle Noodles

2 Tablespoons of Garlic Infused Olive Oil

1 Tablespoon of Dried Parsley

Optional: Real Parmigiano Reggiano to grate over the top when serving.

Directions:

In a large skillet over medium high heat, place a tablespoon of Garlic Infused Olive Oil.

Add the ground pork and beef to the olive oil, then sprinkle your sausage seasoning over it. Saute this mixture, blending in the seasoning with a spatula, and thoroughly cook and brown the meat. Drain the fat, then add the cooked meat to your crock pot. Using the same pan, add the second tablespoon of Garlic Infused Olive Oil and then add your butternut squash, and sprinkle it with a half teaspoon of salt. Brown it over medium heat for about five minutes. Turning half way through. The squash only needs to be browned, not cooked through. Add the squash to the crock pot with the ground meat.

Add the remaining soup ingredients except the miracle noodles and parsley, including the broth, to your crockpot. Stir, then place the lid on, set the crock pot to high and let cook for 4 to 6 hours.

About 15 minutes before serving, open your Miracle Noodle package, rinse them under cold water, and add them to the soup along with the dried parsley.

If you eat dairy, this is good with real aged parmesan grated on the top.

Zucchini Squash Casserole

Squash Casserole 1

This is such a great old fashioned squash casserole!

Squash Casserole 4

If you like zucchini, but it gets boring for you the same old way. Or, if you are a fan of comfort food in the form of casseroles, like your Mom or Grandma used to make, here’s one that is healthy, delicious and comforting.

Squash Casserole 2

Casserole is great leftover for lunch too! Love me some leftover casserole!  This casserole is meat free, so feel free to use it as a side dish. I like to make pork tenderloin, chicken or bun free burgers to go with it.

Squash Casserole 3

Squash Casserole

Ingredients:

1 1/2 lbs. of sliced zucchini (this is about 3 to 4 medium, depending on the size)

1/3 Cup of Good Olive Oil or Melted Ghee

2 Eggs

1/2 Cup of Mayo (I use Avocado Oil Mayo like this)

1/2 Cup of sliced green onions

1 Orange Bell Pepper, diced

1/2 Teaspoon of Sea Salt

1/4 Teaspoon of Black Pepper

Topping:

1/2 Cup of  Pecans

2 Tablespoons of Goat Cheese (optional) Omit for SCD or substitute with a SCD Legal Cheese. There is a free PDF guide at the top of my home page you can download and print for free.

1 Tablespoon of Garlic Infused Olive Oil

1 Teaspoon of Dried Chives

1 Teaspoon of Dried Parsley

1/4 Teaspoon of Black Pepper

1/8 Teaspoon of Sea Salt

Directions:

Preheat your oven to 350°F.

Grease a 12″ x 8 1/2″ Casserole dish.

To make the casserole filling:

Bring 2 inches of salted water to a boil in a large frying pan with a lid. When the water comes to a boil, add the sliced zucchini and cook for 8 to 10 minutes until tender. Drain the cooked zucchini into a colander. Allow it to sit and drain for ten minutes in the colander. You don’t want a soggy casserole. Meanwhile, whisk together in a large bowl, the olive oil, eggs, mayonnaise, salt and pepper until well combined. Whisk in the scallions and orange bell pepper. Pat the drained zucchini with paper towel to remove any excess water. Then, stir the zucchini into the egg mixture. Pour the zucchini mixture into your greased baking casserole.

Now, make the topping.

Finely chop the pecans, or alternatively pulse in a food processor. I like this handy mini Ninja Express one for this job. It has made my life so much easier, and I don’t have to clean the big food processor. This goes right in the dishwasher! Add in the salt, pepper, chives and parsley, and mix thoroughly. Sprinkle the crumb topping evenly over the casserole. Now, if you are using goat cheese, which is very delicious in this recipe if you tolerate it, sprinkle small pieces of goat cheese over the crumb topping.

Place the casserole into your preheated oven, and bake for 50 to 60 minutes, until the top is golden brown and the casserole is bubbly.

This casserole can be prepped up to a day ahead and baked from the refrigerator. You will need to increase your baking time by ten minutes.

Enjoy!

Squash Casserole 5

*This post has affiliate links in it. I receive a very small commission if you purchase through my links. The small commission helps cover the cost of maintaining this blog.

Squash Casserole, Gluten and Grain Free, SCD

Nutty Chocolate Peanut Butter Crispies

Calling all Chocolate and Peanut Butter Lovers! There is no need to sweat or slave in the kitchen with these no bake bars. You can be in and out in just under 20 minutes without starting your oven.

Nutty Chocolate Crispy Bars

These delicious bars are sweetened with pure Maple Syrup and have natural peanut butter in them along with whole grain brown rice crispies! They also have half the sugar of a traditional crispy treat!

Nutty Chocolate Crispy Bars, Dairy and Gluten Free

In fact, even with the chocolate chips they still contain just about half the amount of sugars that those famous marshmallow treats do. Chocolate and peanut butter are a classic pair, and the nut butter bumps up the nutrition of this bar with protein, plus there are whole grains from the brown rice cereal.

Peanut butter is the bomb in these, but feel free to exchange it for other nut butters if you desire.

Nutty Chocolate Peanut Butter Crispies

Prep Time

5 minutes

Cooking Time

10 minutes

Yields

12 servings

Ingredients

1 Cup of Natural Peanut Butter with just salt added no sugar

1/2 Cup of Pure Maple Syrup

1/2 Cup of Enjoy Life Dark Chocolate Chips or dark chocolate chips of your choice

2 Tablespoons of Coconut Oil, Butter or Ghee

3 Cups of Brown Rice Crispies Cereal (I use Erewhon Brown Rice Cereal)

1/2 Teaspoon of Vanilla Extract

Directions

  1. Grease a square baking dish with a neutral flavored oil (or butter if preferred).
  2. Add the syrup, coconut oil, vanilla and peanut butter to a medium saucepan.
  3. Heat over low heat until creamy and smooth.
  4. Stir in the chocolate chips until they melt.
  5. Remove from heat and stir in rice crispies.
  6. Gently press into your prepared baking dish and allow mixture to set until firm and cool. (about 30 minutes).
  7. Cut into squares and enjoy!

You may have noticed that I am now writing recipes outside of the Paleo template, but you will still see plenty of Paleo friendly recipes. I personally still eat Paleo 80% of the time, but I have developed sensitivities to some of the major Paleo foods used in baking……coconut and almonds. So, I have experimented, had a new food sensitivity lab test, and have found I am doing well with a broader range of healthy choices. All my recipes will continue to be Gluten Free.

Life is a journey, and I hope it is a journey for all who are seeking to better health and happiness!

Food should be a part of the celebration of life, and is meant to be enjoyed. It should help us thrive however, and not hinder our ability to have energy and vitality, as well as longevity. There is a time to celebrate and let go a little, because there is a danger in becoming too rigid beyond what is necessary. However, I have myself been really sick and helped myself greatly through food. Our bio-individuality makes us all unique.

Now go make some delicious, better for you, Nutty Chocolate Peanut Butter Crispies and share them with your friends, kids and family!

XOXO

Sandra

Nutty Chocolate Peanut Butter Crispies! Gluten Free and a Dairy Free Option with Half the Sugar


Grain Free Skillet Monster Cookie!

Grain Free Skillet Monster Cookie - Party Fun!

Fun Food is great for entertaining, and what is more fun that a giant monster cookie made in a cast iron skillet? Make it for your kids and their friends, but don’t forget the adults! They like to have fun too!

Skillet Monster Cookie (Paleo) - Fun Crowd Pleaser

Grain Free Skillet Monster Cookie

Preheat Oven 350º degrees F.

Ingredients:

2 Pastured Eggs

1/2 Cup of Coconut Flour (I Use This)

1/4 Cup of Pure Maple Syrup

1/2 Cup of Ghee, Butter (softened) or Olive Oil, plus 1 Tablespoon for Greasing the Pan

1 Teaspoon of Pure Vanilla Extract (Like This Gluten Free Brand)

1/2 Teaspoon of Sea Salt

1/2 Teaspoon of Baking Soda

1/3 Cup of Dried Cranberries

1/3 Cup of Dried Raisins

1/3 Cup of Raw Pecans

1/3 Cup of Dark Chocolate Chips (I use Enjoy Life)

Party Skillet Monster Cookie - Grain Free Delicious and Fun!

Directions:

In an 8″ Cast Iron Skillet, melt the Ghee or Butter and brush up the sides of the pan. If using olive oil just brush around the bottom and sides of the pan.

In a large mixing bowl, beat your eggs and Ghee, Butter or Olive Oil until creamy with a mixer. Add the maple syrup and vanilla and mix thoroughly. Sift together the coconut flour, salt and baking soda. Put the cookie dough into the greased skillet, and spread it evenly to the edges. Now, sprinkle the cranberries, raisins, pecans and chocolate chips on the top and press into the dough evenly.

Place the skillet into the preheated oven, and bake for 20 to 25 minutes, or until the edges are golden brown. Remove from the oven and what fun!….A beautiful, decadent skillet cookie! Great for a party or cookout!!!

For extra decadence, top the skillet cookie while still warm with coconut milk ice cream, like this recipe!

Crowd Pleasing Giant Cookie in a Skillet! Grain Free, Paleo with a Dairy Free Option!

Italian Bacon Popovers

The air is starting to cool here in preparation for Fall, and that makes me crave popovers!  According to James Beard, although they resemble Yorkshire Pudding, they are purely an American creation.  I have a lot of English heritage, and grew up eating recipes my Grandmother made from  what she called “the old country” (England).  So here is a version of a popover that I find to be Fall Comfort Food in my humble opinion. It is a little American, with an Italian Flair and a bit of English whimsy, but mostly they are plain delish! I added some good quality parmigiano reggiano, which is SCD Legal, but if you don’t tolerate dairy, they are equally delicious without it.  They are so, so good hot from the oven! They are fun to eat, and I used leftover popovers to pack sandwiches for my daughters lunches the next day.  Just split them and fill them for a mini sandwich. So, enjoy a little Fall comfort food and make some popovers!

Italian Bacon Popovers

Italian Bacon Popovers

Italian Bacon Popovers

You can use a popover pan like this, but a muffin pan works just fine! It makes a dozen puffy popovers!

Oven Ready Popovers

Oven Ready Popovers

Ingredients:

2 Tablespoons Coconut Oil or Ghee, Melted

1/2 Cup Cooked, Sugar Free is Bacon (4 slices) cooked and chopped

8 Large Pastured Eggs

1 Cup Full Fat Coconut Milk

1/2 Cup shredded Parmigiano Reggiano, optional Omit for Dairy Free

1/4 Cup Coconut Flour

1/4 Cup Scallions, green tops only, sliced

1 Teaspoon Italian Seasoning

1 Teaspoon Pink Himalayan Salt

1/2 Teaspoon Black Pepper

Preheat your oven 400º degrees.  Place a half teaspoon of melted coconut oil or ghee in each popover or muffin pan cup and brush it up the sides.  Crack eggs into a mixing bowl and whisk together with the coconut milk, whisk in the coconut flour and keep whisking briskly until no lumps, stir in the remaining ingredients, then fill each popover or muffin cup 2/3 full with batter. Don’t overfill, leave room for them to pop up! Your batter will look like this.

Italian Bacon Popover Batter

Italian Bacon Popover Batter

Place the pan in the preheated oven and bake 30 – 35 minutes keeping an eye on them until they are golden brown.  Don’t be tempted to open the oven door. Think Souffle!  When they are done, remove them from the oven and take them out of the pan while still hot and cool.  Eat them warm, or they make a very nice mini-sandwich!

Italian Bacon Popover

Italian Bacon Popover

Web Site Chractor color corrected


%d bloggers like this: