Tag Archives: Real Food

Oven Roasted Fennel, Carrots and Red Onion

Roasted Vegetables

My favorite way to eat vegetables in the colder months is oven roasting! Roasting vegetables in the oven brings out the natural sugars in the vegetables, and it caramelizes them adding even more layers of flavor.

If you have been following me for awhile, you have heard over and over to eat your vegetables and eat your nutrients. 🙂  Oven roasting makes it an easy way to do so! Yes! Some of the health benefits of Fennel is it contains Phytonutrients, Vitamin C, Fiber, Folate and Potassium. Red Onion is a source of Sulfur and Quercetin (cancer protective). Carrots are high in Vitamin A, and also contain good amounts of Biotin and Vitamin K. By eating these three all together, you are getting a powerhouse of beneficial nutrients!

This recipe for Oven Roasted Fennel, Carrot and Red Onion is an outstanding choice to serve at your Thanksgiving table. It is colorful, rustic and so delicious! I hope you give it a try!

Oven Roasted Fennel, Carrots and Red Onion

Preheat your oven to 375Âş degrees.

Ingredients:

2 Fennel Bulbs

6 Medium Carrots

1 Large Red Onion

1/4 Cup Olive Oil

1 Teaspoon of Himalayan Pink Salt or Sea Salt

1 Teaspoon Black Pepper

Directions:

Wash and trim the fennel, and remove the stalks. Slice the fennel into 1/2 inch slices. Peel the carrots and slice. Peel the red onion and cut in half, then into 10 wedges total. In a medium bowl toss the prepared vegetables with the olive oil, salt and pepper. Spread on a parchment lined, rimmed baking sheet. Place in the preheated oven and roast for 30 to 40 minutes until the vegetables are tender and caramelized, tossing with a spatula after the first 20 minutes.

It is ready to Serve!

Enjoy your day!

Eat Your Nutrients!

Eat Your Nutrients!

Go Beyond the Salad

Autumn Leaves

Hello! I hope you are having a peaceful Autumn! What’s new?

When you think about healthy eating, salads and green vegetables usually come to mind. But how about adding a little more variety to your plan?

Roots like carrots, sweet potatoes, and turnips, are a rich source of nutritious complex carbohydrates. Instead of upsetting blood sugar levels like refined sweet foods do, they help regulate them.

Why Eat More Root Vegetables?

Long roots – carrots, parsnips, burdock, and daikon radish – are excellent blood purifiers and can help improve circulation in the body. Round roots – turnips, radishes, beets, and rutabagas – nourish the stomach, spleen, pancreas, and reproductive organs.

Which root vegetables do you eat most?

If you’re like most of the world, it’s carrots and potatoes. Here are a few others to explore:

  • Beets contain an abundance of antioxidants and are highly detoxifying. They contain dietary fiber, magnesium, iron, glycine, carotenoids, lutein, flavonoids and trace minerals.
  • Kohlrabi also referred to as a German Turnip is a good source of Vitamin C, B6, Folate and Thiamine, as well as trace minerals. It is a member of the Brassica family.
  • Celeriac, also known as celery root, is rich in fiber and has a respectable amount of antioxidants. (I like it mashed like potatoes, or a mixture of steamed carrots and celeriac mashed together.)
  • Jicama is crunchy and refreshing and contains a generous amount of vitamin C. It’s a favorite in its native Mexico and South America.
  • Onions are rich in antioxidants and other phytonutrients, making them prized for their ability to strengthen the immune system.
  • Parsnips, which look like giant white carrots, boast a sweet, earthy taste. They also contain plenty of fiber, as well as vitamin C, folic acid, niacin, thiamine, magnesium, and potassium.
  • Radish is an excellent source of vitamin C. It’s also contains calcium, molybdenum, folic acid, and is beneficial for digestion.
  • Sweet Potatoes contain unsurpassed levels of beta-carotene and are also rich in vitamin A. They also provide potassium, phytonutrients, protein, and fiber.

Excited to add more roots to your diet? Here’s a fun, easy recipe:

Easy Roasted Root Vegetables

Easy Roasted Root Vegetables


Easy Roasted Root Vegetables
Prep time: 15 minutes
Cooking time: 45 – 50 minutes
Serves 4 – 6
Ingredients:
1 Sweet Potato
2 Parsnips
2 Large Carrots
2 Turnips or Kohlrabi
1 Daikon Radish (or substitute/add in other favorites like squash or beets)
1/4 Cup Extra Virgin Olive Oil
2 Teaspoons of Sea Salt
1 Teaspoon of Black Pepper
Optional herbs: rosemary, thyme or sage (fresh or dried to taste)Preheat your oven 375 degrees. Peel, wash and slice all the vegetables into long spears or bite sized cubes.
Line a large, rimmed baking sheet with parchment paper, or lightly grease. Place prepared vegetables onto the baking sheet and toss with the olive oil, salt, pepper and herbs of choice.Roast uncovered for 45 to 50 minutes until the vegetables are tender and golden brown. Stir after the first 20 minutes, then continue roasting.Tip: Any combination of vegetable will work. Roasting only one kind of vegetable also makes a nice side dish!

Oven Roasted Root Vegetable Fries

Oven Roasted Root Vegetable Fries

Sour Cherry and Honey Shortbread Cookies

Warning! It is hard not to eat the whole batch of these! The good news is they are delicious, and it is a small batch.

These cookies are an absolutely delicious shortbread cookie treat recipe with the chewy tart bite of cherries!

They are delicate little bites with simple, whole food ingredients that come together in ten minutes.

Sour Cherry & Honey Cookies 5

The recipe makes a small batch of eleven cookies. Just short of a dozen. I have made the recipe several times to perfect it, and eleven is the perfect number.

I have this Moon Cake Mold Press that I used to imprint the tops of the cookies with a rose, but it isn’t necessary to make these cookies. I use it to make gluten free mooncakes during the Autumn Moon Celebration and have had great success with it for cookies. It just makes them fancier, and I am a gadget junkie.

Sour Cherry and Honey Tea Cookies

Sour Cherry and Honey Tea Cookies

The benefits touted in regards to cherries are they are anti-inflammatory, enhance sleep, help with post-workout soreness, reduce stroke risk and more. See this article on cherries if you want to learn more. I love all these benefits, but I especially love the taste of them, and all the benefits are a bonus!

Sour Cherry & Honey Cookies 7

Honey has trace minerals in it and is one of my favorite natural sweeteners. My father was a beekeeper, and I used to help him in the bee hives when I was a child. Honey is truly miraculous.  It is still a form of sugar to our bodies, but a little goes a long way! To make sure I know I am  getting a high quality, pure honey, I buy it from a local beekeeper or farm market where a beekeeper is selling their honey. Local food co-ops are another great place to find a reputable honey source.

Sour Cherry & Honey Cookies 8

This cookie recipe only has seven ingredients, and each one adds flavor.

Sour Cherry & Honey Cookies

Sour Cherry and Honey Tea Cookies

Preheat your oven to 325Âş degrees F.

Ingredients:

1 1/4 Cups Superfine Almond Flour

1/4 Cup Coconut Oil

1/4 Cup Sour (Tart) Dried Cherries (I used an organic cherry with no added ingredients, just cherries)

2 Tablespoons of Local Honey

1 Teaspoon of Fresh Squeezed Lime Juice

1/2 Teaspoon of Pure Vanilla Extract

1/4 Teaspoon of Himalayan Pink or Sea Salt

Directions: Place all the ingredients into a food processor. Pulse until all the ingredients are incorporated and holding together with the cherries in small bits, but not completely pureed into the dough. You should still see bits of nice sized, but not whole, cherries.

Scoop the dough with a tablespoon cookie scoop onto a parchment lined baking sheet, spacing the cookies two inches apart. Press the cookie with a round of the moon cake press or use fork tines to flatten the cookie to an inch thickness.

Bake in the preheated oven for just 9 minutes until the cookies are starting to brown on the edges. Cool completely.

Sour Cherry and Honey Tea Cookies

Sour Cherry and Honey Tea Cookies


Enjoy!

Eat Your Nutrients!

Eat Your Nutrients!

Bacon, Tomato and Basil Spaghetti Squash Casserole

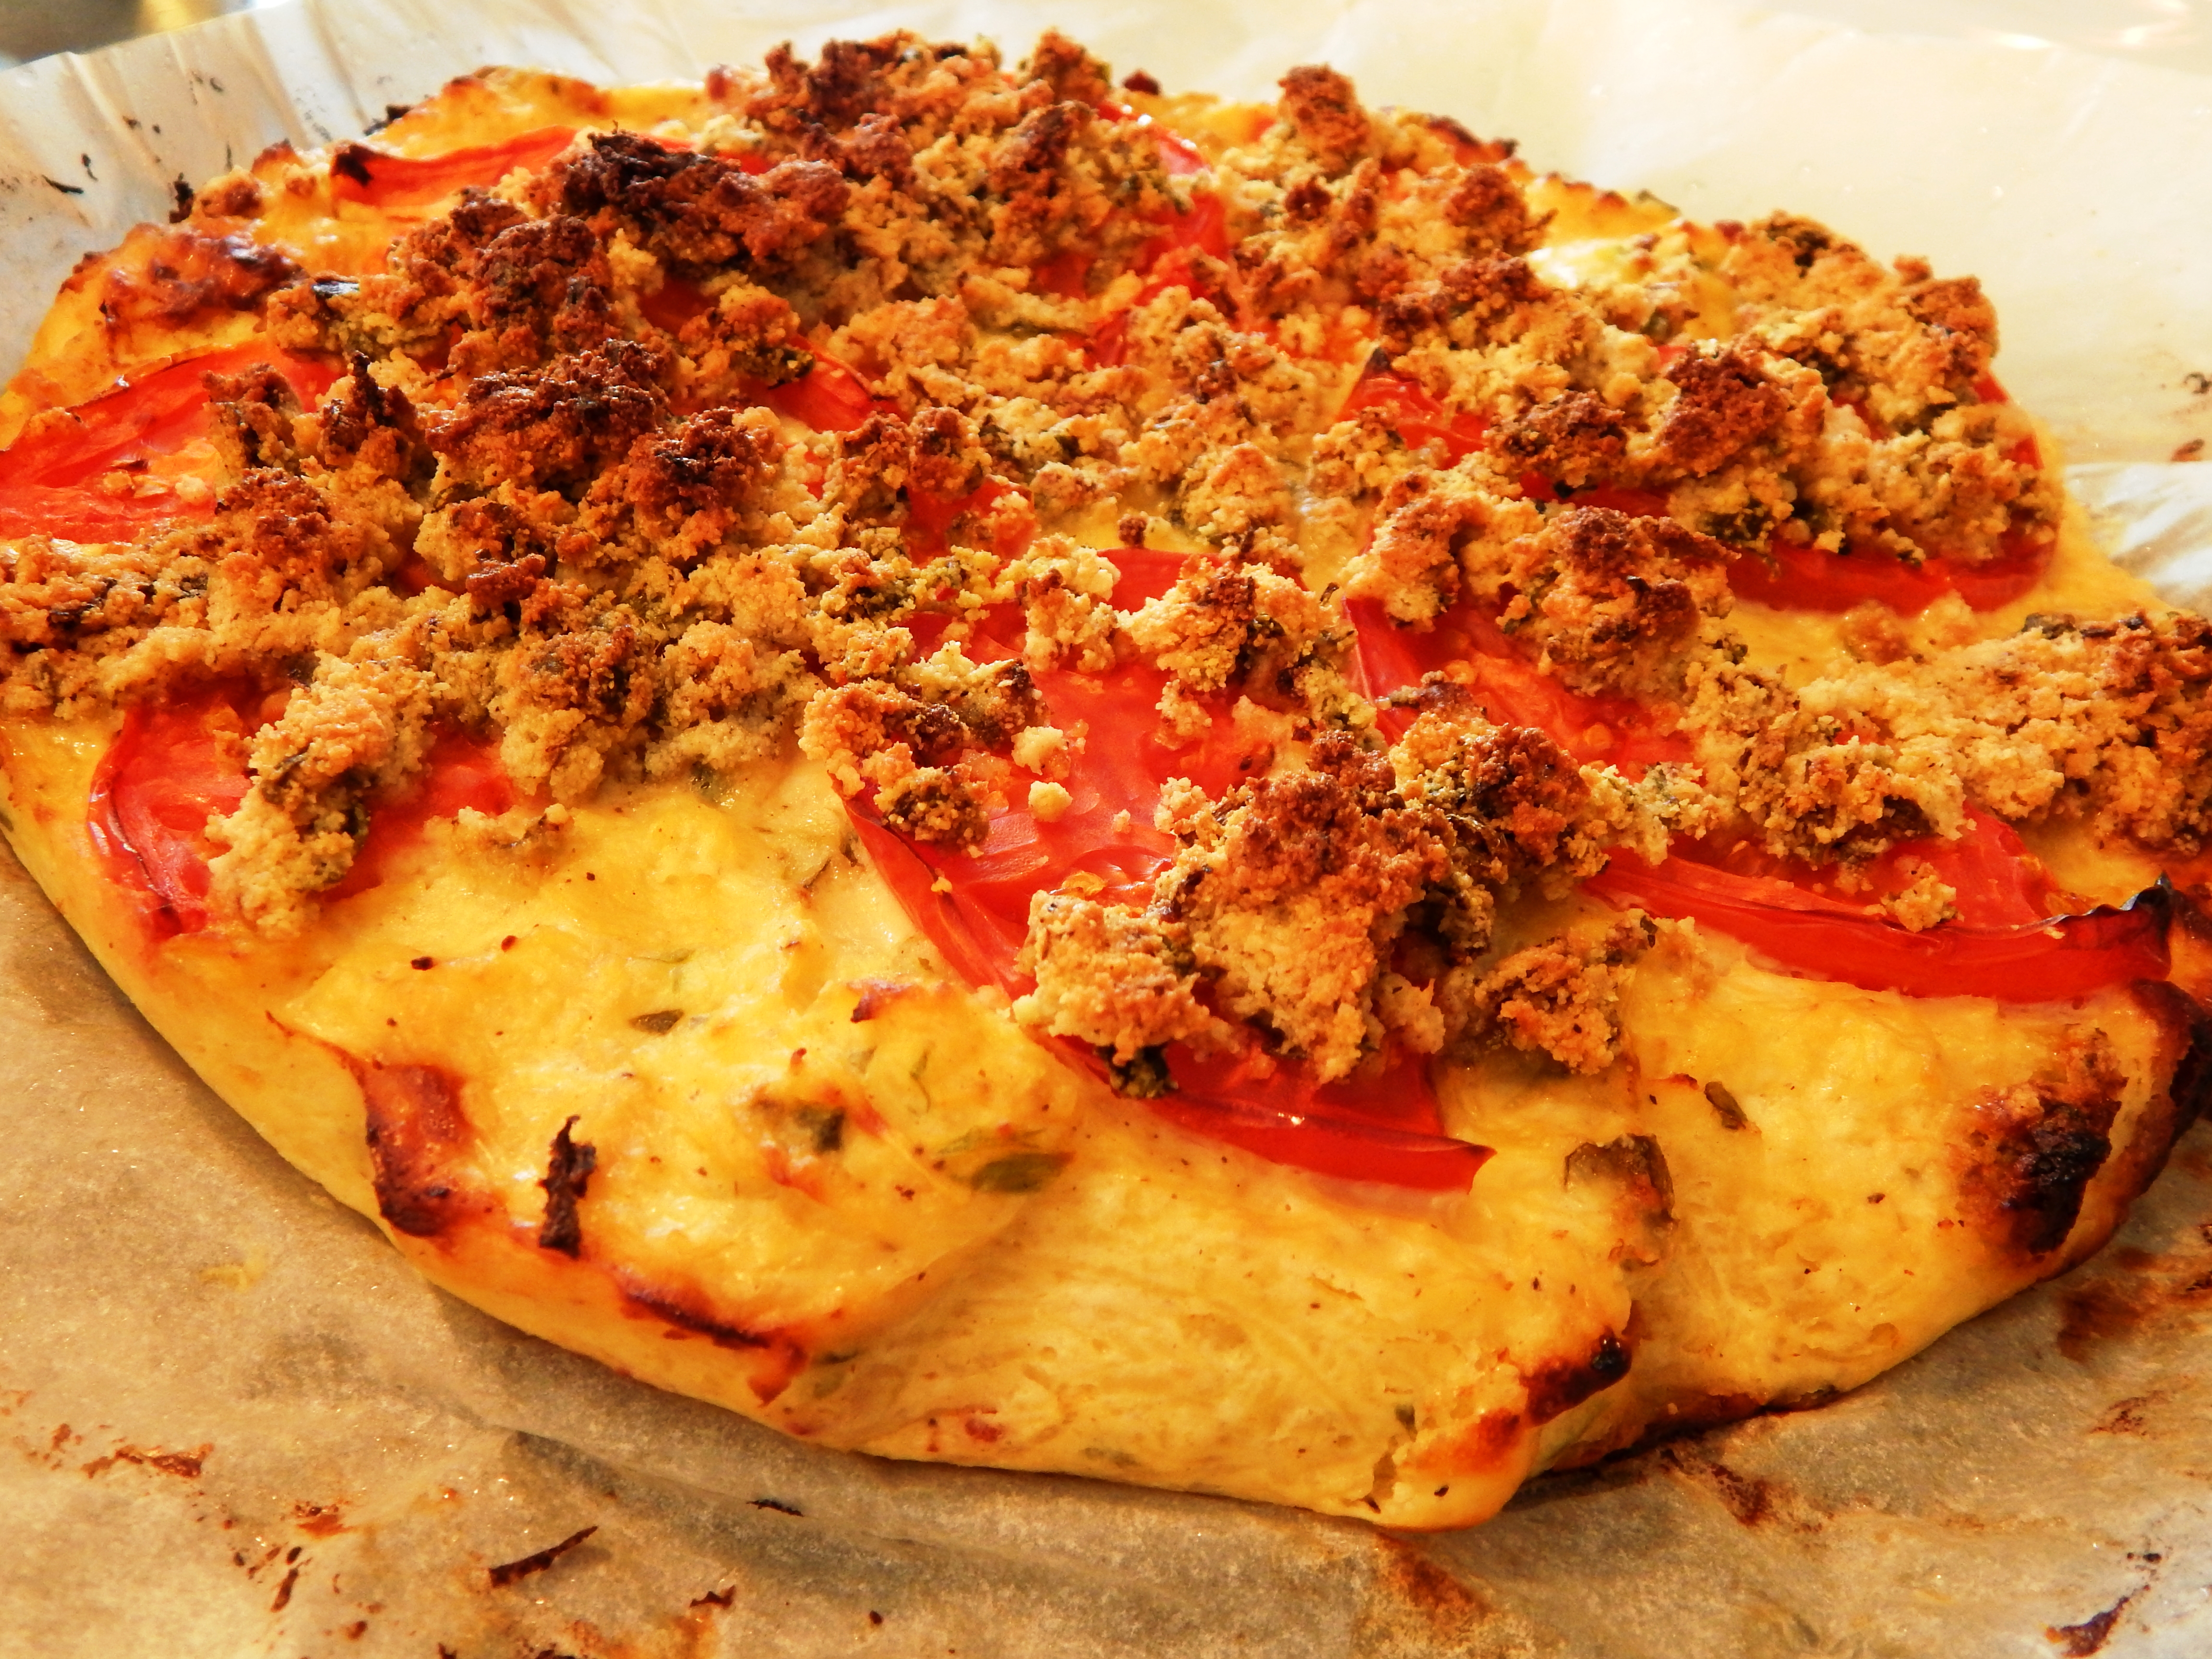
This is the perfect casserole for late Summer! Tomato, Basil and Spaghetti Squash are abundant locally, and this casserole is not only scrumptious, it is beautiful! The texture is soft and fluffy similar to a souffle or a delicate quiche, and the crumb topping adds just the right finishing touch.

Spagehtti Squash Casserole 6

I love all the vegetables incorporated in this casserole. Spaghetti Squash, unlike other winter squashes, has a very mild flavor and is light in color with Vitamin B-6 and Vitamin C, plus every essential mineral is found in spaghetti squash in trace amounts. Isn’t that cool?

Most people know that Tomatoes are a great source of lycopene. They also have excellent amounts of Vitamin C , Biotin and VItamin K included in their nutritional value.  Take advantage of them while they are at their peak and very nutrient rich.

Scallions are an excellent source of Vitamin K. One cup of scallions contains 259% of the RDA of this vitamin.  Holy Smokes! They also may help prevent cancer like other alliums such as garlic and onions.  See this article by The Huffington Post.

I incorporate herbs whenever I can into what I am eating for all their various health benefits and the flavor they add. Basil adds a sweetness to this dish that I love.

Let’s start cooking!

Bacon, Tomato and Basil Spaghetti Squash Casserole

To pre-cook the spaghetti squash, preheat your oven to 350Âş degrees F. Cut your spaghetti squash in half lengthwise and remove the seeds with a large spoon. Fill a large casserole pan with an inch of water and place the squash cut side down after lightly seasoning it with salt and pepper. Bake for one hour until a knife inserted in the squash slides through easily. Flip the squash over cut side up to cool. Then, take a fork and remove the squash into spaghetti-like noodles from the skin. At this point you can refrigerate the squash and make the casserole later, or move on to making the casserole.

To Make the Casserole:

Preheat your oven to 400Âş degrees F. Line a 10 inch round spring form pan with parchment paper after greasing it with coconut oil and set aside.

Ingredients for filling:

1 Medium Spaghetti Squash (approximately 4 cups cooked)

1 Egg

4 Strips of Bacon, cooked and chopped (omit if making it meatless)

1/2 Cup Superfine Almond Flour

1/4 Cup Good Quality Mayo (I used Primal Kitchen Avocado Oil Mayo)

2 Scallions, Sliced

1/4 Cup Fresh Basil (or 1 Tablespoon Dried if you don’t have fresh)

1 1/2 Teaspoon Himalayan Pink or Sea Salt

1 Teaspoon Black Pepper

Pulse all the ingredients except the bacon in a food processor until smooth and incorporated. Fold in the bacon.

Pour the filling into the prepared dish.

Ready to Bake

For the Topping:

Ingredients:

1 Large or 2 Medium, Ripe Tomatoes (sliced in half and then thinly sliced into half moons

2 Sliced Scallions

2 Tablespoons of Fresh Basil (or 1 tsp. dried)

1/2 Cup Superfine Almond Flour

2 Tablespoons of Coconut Oil

1 Teaspoon of Himalayan Pink or Sea Salt

1/2 Teaspoon of Black Pepper

Directions: Place the sliced tomatoes in a decorative pattern on top of your filling (see the photos).

In a mini-processor or a full sized one will work as well, pulse the topping until it looks like crumbs. Sprinkle on top of the casserole evenly.

Bake in your preheated oven for 50 minutes. The topping will be golden brown and the casserole puffed.

Cool ten minutes. Then, remove the outer ring of the spring form pan and serve in the parchment.

This Bacon, Tomato and Basil Spaghetti Squash Casserole will give you all the comforts in comfort food with no Grain or Dairy. Delish!!!!

Eat Your Nutrients!

Eat Your Nutrients!


Simple Peach Ice Cream (Dairy Free)

Peaches are in season now, and juicy ripe peaches are so good in ice cream! My children have been gobbling up all the peaches as I buy them at the organic market, but I was able to snatch a couple to make this ice cream recipe before they were gone. Peaches are very similar to tomatoes in that when they are ripe, and in season, they taste like a different food entirely. Do you know what I mean?

So, today I have a very simple and delicious seasonal ice cream recipe to share that is Dairy Free!

simple peach ice cream 7

SIMPLE PEACH ICE CREAM

You will need an ice cream freezer. I used a Cuisinart.

Ingredients:

Two Ripe and Juicy Organic Peaches, Peeled and Pit Removed

1 Can of Full Fat Coconut Milk

6 Tablespoons of Good Honey

2 Tablespoons of Fresh Squeezed Lemon Juice

2 Teaspoons of Pure Vanilla Extract

1/4 Teaspoon of Ground Cinnamon

Simple Peach Ice Cream Recipe

Directions: Here is where an immersion blender comes in handy, but you can also use a regular blender and get the same results, just more clean up! Place all the ingredients into a 4 cup glass measuring cup, and blend with an immersion blender until smooth. Alternately, place in a blender and blend until smooth.

Refrigerate for four hours to chill thoroughly. Freeze in your ice cream maker.

Enjoy!

Simple Peach Ice Cream

Sandra Shields, Health Coach

Eat Your Nutrients!

Eat Your Nutrients!

Peachy Jar Salad with Ginger Vinaigrette

This jar salad is so full of freshness, it makes me want to sing!

Food is supposed to make us feel good! So often today, the food that makes us feel “good” is not good for us. We have been inundated with ads and media from food manufacturers that tell us a food will make us happy.

Food that truly makes a person happy is the food that supports every cell of the body. Food that your body recognizes and knows what to do with. Pure, real, unprocessed food. It makes us feel good and look good. It gives us energy, and makes our skin glow and hair shine. It promotes longevity and prevents disease. Our bodies are like a very intricate computer that communicates with all the different components. We don’t want to confuse it by putting in artificial food that we weren’t made to process.

Peachy Salad in a Jar with Ginger Vinaigrette

Peachy Jar Salad with Ginger Vinaigrette


You can make this jar salad to pack for lunch, or make a larger version of it for another meal to share. It keeps well also! After a day in the refrigerator, the flavors meld even more!

Peachy Salad in a Jar with Ginger Vinaigrette 4

PEACHY JAR SALAD WITH GINGER VINAIGRETTE

Ingredients for the Salad:

1 Cup of Ripe Tomato (Your favorite, any color. I used Heirloom)

1 Ripe and Juicy Peach (sliced and tossed with a tsp. fresh Lime Juice to prevent browning)

1/2 Cup of Watermelon (cubed)

1/2 Cup of Cucumber (cubed)

2 Green Onions (thinly sliced)

1/4 Cup Raw Pecans

1/4 Cup Green Pepper (diced)

GINGER VINAIGRETTE

This makes a 1/2 Cup of dressing, so you will have extra!

1/3 Cup of Extra Virgin Olive Oil

1 Tablespoons of Fresh Lime Juice

2 Teaspoons of Fresh, Minced Ginger

1/2 Teaspoon of Minced Jalapeno Pepper

1/4 Teaspoon Himalayan Pink Salt or Sea Salt

1/8 Teaspoon of Freshly Ground Black Pepper

Directions: Puree the Vinaigrette ingredients thoroughly in a blender.

To assemble your salad: Use a generous glass jar that holds 4 cups. You can also make two smaller jar salads with pint jars, which hold two cups each.

Place two tablespoons of Ginger Vinaigrette in the bottom of the jar.

Add the other prepared ingredients in the following order from bottom to top:

  1. Green onion
  2. Tomato
  3. Green Pepper
  4. Watermelon
  5. Cucumbers
  6. Peaches
  7. Pecans

Seal your jar, and refrigerate until ready to eat! You have made sunshine in a bottle.

Before eating, toss your salad gently by inverting the jar several times to coat the salad with the dressing. Remove lid and enjoy.

*I  used organic ingredients


Peach Salad in a Jar with Ginger Vinaigrette 2


Peachy Salad in a Jar with Ginger Vinaigrette

Peachy Salad in a Jar with Ginger Vinaigrette


Eat Your Nutrients! Don’t settle for less. It makes All The Difference!

Eat Your Nutrients!

Eat Your Nutrients!


Grilled Zucchini, Tomatoes and Scallions with Fresh Basil and Dill

On a beautiful Summer evening, I don’t want to be in the kitchen. Did you ever notice with grilling, you get to sit and relax while the food cooks more than when you are preparing a meal in the kitchen?

Grilled Zucchini, Tomatoes, and Green Onions with Fresh Basil and Dill

Grilled Zucchini, Tomatoes, and Scallions with Fresh Basil and Dill

Grilled vegetables also taste really delicious, they aren’t mushy, and you can combine ones that have relatively the same cooking time, toss them with a marinade and seasonings and come up with endless one dish vegetable sides.

Here is a fairly quick recipe for grilled zucchini, tomatoes and scallions I find Summery and a crowd pleaser.

Grilled Zucchini, Tomatoes, and Green Onion with Fresh Basil and Dill

Grilled Zucchini, Tomatoes, and Scallions with Fresh Basil and Dill

Grilled Zucchini, Tomatoes and Scallions with Fresh Basil and Dill

Organic Ingredients:

4 Zucchini on the smaller side (about 4 cups) sliced into spears

2 Local Medium Tomatoes (any color)

1 Bunch of Scallions, sliced in half lengthwise

1/4 Cup Fresh Basil, torn roughly into pieces

1 Tablespoon Fresh Snipped Dill

2 Tablespoons of Virgin Avocado Oil

1 Teaspoon of Sea Salt or Himalayan Pink Salt

Directions:

In a large bowl toss all the prepped ingredients together until well coated with oil. Place in a grill pan with holes. Grill on medium for 30 minutes, top of grill down, (relax until the vegetables are tender).

Eat Your Nutrients!

Eat Your Nutrients!

Spicy Fire Crackers

I have  a new love affair! I have know about it for years, but you could say I have been reawakened to its allure and hotness.

Spicy Fire Crackers

Spicy Fire Crackers

What is it? It is Sriracha! While spending some time this Summer in Michigan, I have been enjoying the artisan movement up here for local, small batch, quality food, and I have found a Detroit made fermented artisan sriracha that is addicting. It is made with sugar in the ingredients, but has no preservatives and is clean. I am on vacation and giving myself a slight bit of leeway with a little bit of local Sriracha. Nom Nom Paleo has a DIY recipe for Sriracha sweetened with honey here that I make when I am home.

I miss the spicy chips and crackers of my junkier, processed food days a decade ago………..gosh a decade doesn’t age you too much does it? Well, definitely not when you are eating nutritious food to fuel your body. So, I decided to get into the kitchen on my vacation and make a spicy sriracha cracker that is grain free, real food and Paleo friendly! They are crunchy and spicy reminding me of a firecracker going off in my mouth, but in a very good way!

With almond flour, honey, flax, thyme, olive oil, good sea salt and of course sriracha, the ingredients are pure and snackable and satisfy my crunchy, spicy snack cravings.

Spicy Fire Crackers

Spicy Fire Crackers

Spicy  Fire Crackers

Preheat your oven to 275Âş degrees.

Set out a parchment lined baking sheet.

Ingredients:

1 1/2 Cups Superfine Almond Flour

1/4 Cup Local Honey

3 Tablespoons Sriracha (Nom Nom’s Paleo friendly recipe is here!)

1 Tablespoons of Olive Oil, Coconut Oil or Duck Fat (melt the coconut oil or duck fat if using this fat)

1 Tablespoon Ground Flax

1/2 Teaspoon Ground Thyme

1/2 Teaspoon Sea Salt

Directions: Put all the ingredients into a bowl, whish with a fork until thoroughly combined. Roll between two pieces of parchment paper to 1/4 inch thickness. Score the crackers into small bite sized squares with a pizza wheel.

Bake for 45 minutes in your oven. Cool completely, then break apart on the scores.

That’s it! A delicious, spicy cracker. Enjoy!

Eat Your Nutrients!

Eat Your Nutrients!


Kale Kiwi Green Smoothie (Kale Made Me Do It!)

Nutrition Stripped T-Shirt worn by Sandra Shields, HealthCoach  sameatshernurients.com

Nutrition Stripped T-Shirt worn by Sandra Shields, HealthCoach sameatshernurients.com

Green Smoothies are nutrition powerhouses and a great way to ensure you are getting lots of very important nutrients, fiber, phytonutrients, calcium, and cancer preventative greens, vegetables and fruit in large varieties. They help your hair and nails grow faster….this is due to the nutrient absorption. Blending a smoothie is like predigesting your food, so your digestive system doesn’t have to work as hard to access the benefits. The energy they give you (which isn’t a sugar boost energy you get from too many carbohydrates) is sustainable for hours. They are a great addition to your diet, and you can reap many benefits from them. Drinking green smoothies makes it easy to get in your daily servings of vegetables. I know a lot of people do not eat enough vegetables, and this is an easy way to ensure you do!

If you have never had a green smoothie, you may have to start out a little sweeter when you begin. After your taste buds adjust, and you start feeling like you can conquer anything because you feel so fantastic, you will learn to love the green taste along with the fruit flavor and know you are feeding your body something oh so good for it! I actually love the taste of green smoothies without a lot of fruit now. When this happens, you get to join the seasoned green smoothie club. 🙂

I like to rotate the greens I use in my smoothies to get as much variety as possible. Different greens taste better with certain fruit and vegetables. Experiment and see what works well for you.

Kale Kiwi Green Smoothie

Kale Kiwi Green Smoothie

There are a few things to consider before you start drinking green smoothies regularly. If you are susceptible to kidney stones, you will want to avoid too many high oxalate foods if your doctor has put you on a low-oxalate diet.  These would be foods such as spinach, kale, nuts and kiwi. Here is a list of low oxalate choices for your smoothies.

Choose lower sugar fruit, such as berries if you are monitoring your blood sugar levels, and consult with your doctor if you are on any medication like blood thinners or thyroid medication before drinking daily green smoothies to rule out any food you should avoid adding. Food is medicine.

The smoothie recipe I am sharing with you today uses kale. It is on the sweeter side of a green smoothie due to the addition of kiwi (Excellent source of Vitamin C), Watermelon (lycopene which has sun protective properties and is hydrating) and banana. The raw cocao contains antioxidants and is a source of energy, and chamomile is a mild diuretic (helps reduce water retention).

Kale has a stronger flavor than colorful lettuces and spinach which are mild and good starter choices. Kale is an excellent source of calcium, iron, beta-carotene and vitamin K.

Try a green smoothie challenge…….30 days, one a day, preferably in the morning to start your day, but anytime is okay.

Then let me know how it has made a difference in your life! If you already are drinking green smoothies, I would love to hear your story!

kale kiwi smoothie

Kale Kiwi Smoothie

Kale Kiwi Smoothie

Kale Kiwi Green Smoothie

Ingredients:

1 Kiwi, peeled

1 Cup Cubed Watermelon

2 Cups Kale Leaves, Stems Stripped

½ Ripe Banana

1 Teaspoon Raw Cacao Powder

1 ½ Cups Chamomile Tea Chilled

1 Cup Ice Cubes

1 Tablespoon Tahini or Sunbutter

Blend in a high speed blender until smooth. Drink slowly making chewing motions to help the digestion begin in your mouth.

Enjoy how good it feels to know you have just given your body a loving dose of nutrition!

Have a beautiful day!

Eat Your Nutrients!

Eat Your Nutrients!

Good Morning Gorgeous Smoothie Bowl!

Good Morning Gorgeous! Smoothie Bowl

Good Morning Gorgeous!!! Yes, you are a gorgeous person! Today I have a fantastic new Smoothie Bowl Recipe to share with you that will help make your insides gorgeous too, and when we are gorgeous on the inside, it naturally makes us glow outward! Wouldn’t you agree?  This smoothie is a nourishing breakfast bowl full of only real food, fiber, protein, and you are getting in a serving of greens all in an easily assimilated, highly digestible way! I am a big fan of smoothies in the morning, because our digestive system has been resting as we sleep. It is an optimal time to put a blended meal in our bodies to quickly absorb the nutrients and keep us energized throughout the morning, with just the right amount of calories. This smoothie has low sugar berries, banana and a few slices of mango. The flax helps keep you regular, the seed butter adds healthy fat and protein, and the sliced almonds add crunch!
Here is the recipe. I highly recommend you give this a try! It is such a beautiful way to start your day. The colors nourish your soul (we eat with our eyes too!) and the food nourishes your body. Make a commitment today to do this for yourself!

Have a nourishing week!

Good Morning Gorgeous Smoothie Bowl!

Good Morning Gorgeous Smoothie Bowl!

Good Morning Gorgeous Smoothie Bowl

Ingredients:
1/2 Cup Fresh Raspberries
1/2 Cup Fresh Strawberries
1/2 Cup Fresh Blueberries
1 Ripe Banana
1 Cup Packed Baby Spinach
1 Tablespoon Sunflower Seed Butter or Tahini
2 Teaspoons Ground Flax Seed
1/2 Cup Crushed Ice
1/4 Cup Cold Water
2 Teaspoons of Sliced Almonds
Sliced Mango for the top

Directions: Place all the ingredients into a blender except the Sliced Almonds and Mango and reserving some each of the Raspberries, Strawberries and Blueberries to scatter on the top. Blend on high until smooth. Pour into a bowl (or bowl mug). I am a fan of Affirmation Bowl Mugs like this one.  Scatter with reserved berries, a few slices of mango, and sliced almonds.
Sit down and savor this highly nourishing breakfast. It is a wonderful way to care for your body that will be your home while on this planet!

You can find out more about my Health Coaching on my Website: sandrashieldshealthcoach.com and sign up for my free monthly Health Coaching newsletter (different from my blog newsletter) for tips on creating healthy habits that will last a lifetime!

Have a Gorgeous Week!

Good Morning Gorgeous Smoothie Bowl! Get your day Kickstarted and your Skin Glowing with this Delicious Gluten and Dairy Free bowl of goodness! #smoothiebowl

Eat Your Nutrients!

Eat Your Nutrients!

1 4 5 6 9