Tag Archives: Dairy Free

Gluten Free Coconut Flour Blueberry Muffins

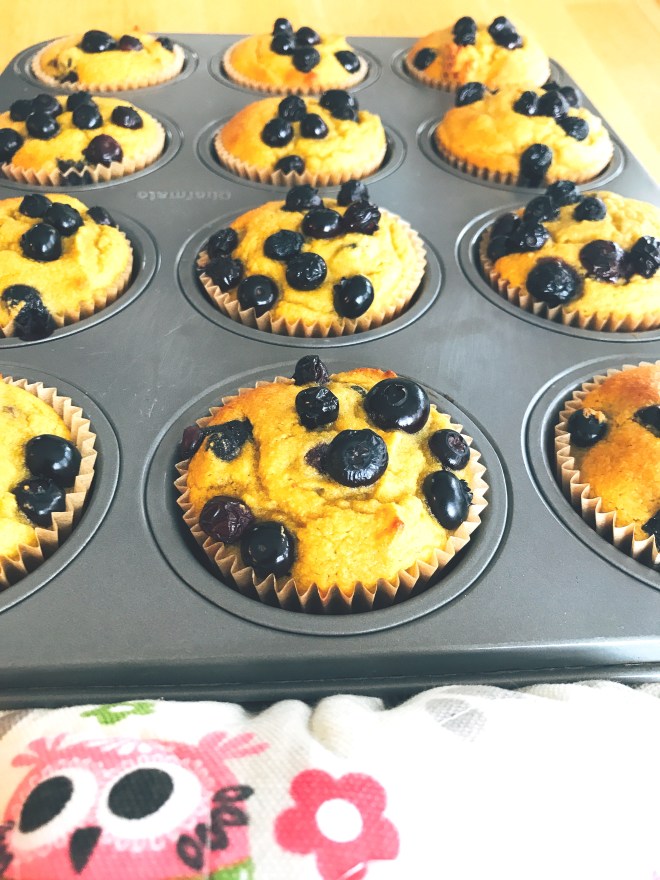
I am crazy about coconut flour baking! Coconut Flour is low carb, gluten free, contains protein, iron, fiber, and healthy fats, and scores low on the glycemic index. Of course all these attributes are fine, but who cares if the finished product isn’t very palatable. But coconut flour makes a fantastic muffin! Scroll down to see the photos of the one I have split open. I wish you could smell them, but you can see the texture! This particular recipe is bursting with blueberries! So, if you are a true blue classic blueberry muffin fan, this is for you!

Gluten Free Coconut Flour Blueberry Muffins

Are you a ship that is staying safe in your harbor? Branch out! Take a plunge and follow a dream. Try something new you have been dying to try but aren’t sure about. Step out of your comfort zone and blossom into the greatness you deserve and are capable of!

Coconut Flour Blueberry Muffins

Gluten Free Coconut Flour Blueberry Muffins

Preheat your oven to 350º degrees F. Line 12 muffin cups with non-stick muffin papers and set aside.

Ingredients:

6 Pastured Eggs

1/2 Cup of Coconut Flour (here)

2 Black Spotted Bananas

1/4 Cup of Olive Oil

2 Tablespoons of Honey

1 Teaspoon of Vanilla Extract

1 Tablespoon of fresh squeezed Lemon Juice

1/2 Teaspoon of Baking Soda

1/4 Teaspoon of Sea Salt

1 Pint of Fresh Blueberries or 1 1/2 Cups of Frozen

Directions: In a food processor with a blade attachment, blend the eggs and banana until the banana is smooth. Add in the rest of the ingredients except the blueberries, and blend for two minutes. Fold in the blueberries, reserving 1/4 cup for the tops if desired. Scoop the batter into the prepared muffin cups, and sprinkle with the reserved blueberries. Let sit for 5 minutes on the counter to allow the coconut flour to soak up the liquid in your batter. Then, bake for 25 to 30 minutes in your preheated oven, or until the tops spring back and they are cooked through. Remove from the oven, and cool for five minutes before removing from the pan and cooling on a wire rack. I give you permission to eat one hot! :-)))

Makes a dozen muffins

Blueberry Muffin.JPG

Coconut Flour Blueberry Muffins Hot From the Oven

Chocolate Fudge Grain Free Brownies

Brownies that are very chocolatey, fudgy and grain free is possible! I kept coming back and experimenting with this recipe over the past several months. Initially they were more cakey than fudgy, and my favorite kind of brownie is fudgy. It is finally blog worthy! Maple syrup is the perfect addition for a chocolate dessert. It compliments the chocolate and is a natural sweetener. There is also some cooled coffee in the recipe to amp it up even further. If you are a baker, you will probably know that coffee makes chocolate taste more chocolatey. Finally, for the ultimate moist fudge flavor, I added 2 ounces of an organic 85% Dark Chocolate Bar. I would very happily make these brownies for my grain loving friends and family with confidence! Aren’t they pretty?

Chocolate Fudge Grain Free Brownies

To make this batch of brownies you will use an 8″ x 8″ square pan. It makes twelve generous brownies or nine jumbo ones.


Chocolate Fudge Grain Free Brownies

Chocolate Fudge Grain Free Brownies

Preheat your oven to 350º degrees. Line a 8″ x 8″ square baking pan with parchment paper.

Ingredients:

3 Eggs

1/2 Cup of Medjool Dates (soaked in warm water for 5 minutes then pitted)

1/3 Cup of Unsweetened Applesauce

1/4 Cup of Maple Syrup

1/4 Cup of Olive Oil

1/4 Cup of Raw Cacao Powder

1/4 Cup of Brewed Coffee (cold)

3 Tablespoons of Coconut Flour

2 ounces of Dark Chocolate, finely chopped (I used organic 85% Alter Eco Dark Blackout Bar here)

2 Teaspoons of Vanilla Extract

1/2 Teaspoon of Sea Salt

1/2 Teaspoon of Baking Soda

Directions: Pulse the dates and eggs in a food processor, then blend until creamy, about one minute.

Add the remaining ingredients, except the 2 oz. of chocolate bar. Blend thoroughly, scraping down the sides of the processor twice. Add the 2 ounces of chopped chocolate and pulse a few times until evenly distributed. You want little pockets of chocolate! Scrape the batter into the prepared square pan. Let sit for ten minutes. Then pop the pan into your preheated oven, and bake for 17 to 20 minutes, until just baked. When you insert a toothpick into the center of the brownies you should have moist crumbs on the toothpick. Don’t over bake.

Cool completely, then slice. Viola! Moist and Fudgy Brownies!

Chocolate Fudge Grain Free Brownies

These Chocolate Fudge Grain Free Brownies are Fudgie Perfection! Gluten Free, Nut Free, Dairy Free!

Chocolate Fudge Grain Free Brownies


Three Ingredient Chocolate Peanut Butter Balls

Dates are a great addition to your diet! I like to throw a couple in a smoothie to add natural sweetness in whole food form or use them to make energy bites with things like nuts and berries in them. These balls are made up of raw cacao, peanut butter (or a nut or seed butter of your choice) and dates. They are healthy and satisfying! I like to pop in these super quick and easy sweet treats when I have a craving for something chewy and chocolate. The raw cacao is loaded with antioxidants and magnesium and is a natural mood elevator. Dates are full of fiber, vitamins and essential minerals and are a whole food, natural sweetener eaten for centuries. The fat in the peanut butter or nut butter of your choice is satiating, and nuts contain protein. Use a peanut butter or nut butter with no added sugar, just salt.

Three Ingredient Chocolate Peanut Butter Balls - Yummy!

Three Ingredient Chocolate Peanut Butter Balls – Yummy!


Three Ingredient Chocolate Peanut Butter Balls

Ingredients:

1 1/2 Cups of Soft Medjool Dates (pits removed, if they are not soft between your fingers, soak them for five minutes in warm water)

1/3 Cup plus 2 Tablespoons of Raw Cacao Powder (like this)

6 Tablespoons of Peanut Butter (no sugar added)

Directions: Place the dates in a food processor with a blade attachment, and puree. Add in 1/3 Cup of Raw Cacao Powder and the Peanut Butter or nut butter. Blend until smooth, scraping down the sides of the processor as needed with a rubber spatula. Place the remaining two tablespoons of Raw Cacao Powder in a bowl. With a tablespoon cookie scoop, scoop the mixture into balls, roll them between your hands to form a round globe, and roll in cocoa powder. The balls can be stored at room temperature, in the refrigerator, or freezer depending on your preference. Pop these in when you need a healthy chocolate fix or a energy boost!

Three Ingredient Chocolate Peanut Butter Balls

Three Ingredient Chocolate Peanut Butter Balls

Eat Your Nutrients!

Eat Your Nutrients!


Coconut Flour Orange Quick Bread or Muffins

I am enjoying the Chocolate Chip Banana Muffins I shared so much that I decided to make an Orange Muffin version that can also be made into a loaf, because I like choices!  These healthy muffins are fantastic because the texture is fine and moist and without the grains and refined carbs. When baking with coconut flour, recipes require more liquid, because coconut flour is highly absorbent. So eggs are perfect, because they give the muffins protein and healthy fat from the yolks. Eggs in baking are great for leavening and texture as well.

Coconut Flour Orange Muffins

Coconut Flour Orange Muffins

The orange zest really bumps up the orange flavor, and fresh squeezed orange juice is used to enhance the texture, flavor and brightness of the muffin. I find muffins so cheery when I sit down to relax and read about something exciting like travel or planning a new garden! Hmmmmmm, not sure why, but it puts me in my happy place! 🙂 So here is a photo of the loaf, and keep scrolling for another muffin picture and the recipe!

Coconut Flour Orange Quick Bread

Coconut Flour Orange Quick Bread


Coconut Flour Orange Muffins

Coconut Flour Orange Muffins


Coconut Flour Orange Quick Bread or Muffins

Preheat the oven to 325º degrees F. Set out a 12 cup muffin pan, or medium loaf pan if making the bread. Line the muffin pan with muffin papers, and if making the loaf, grease the pan and line it with parchment paper.

Ingredients:

6 Eggs

2 Bananas (ripe with some black spots)

1/2 Cup of Coconut Flour

1/3 Cup of Olive Oil (or Coconut Oil)

1/4 Cup of Collagen (optional but great for hair, skin, nails and digestion)

1/4 Cup of Fresh Squeezed Orange Juice

2 Tablespoons of Honey

1 Tablespoon of Orange Zest (make sure you have a fantastic peel for the most flavor)

1/2 Teaspoon of Vanilla Extract

1/2 Teaspoon of Baking Soda

1/4 Teaspoon of Sea Salt

If making the loaf – Thin Orange Slices including the peel, halved.

Directions: In a food processor, blend the bananas and eggs until no chunks remain and you have a creamy yellow mixture. Add the remaining ingredients, and process for two minutes. Scraping the sides of the processor once. Let the batter sit for 5 minutes. Scoop the batter into 12 muffin cups, or pour into your prepared loaf pan. If making the loaf, add the orange slices on the top decoratively. (See photo)

Bake in your preheated oven for 35 minutes if you are making the muffins, or until the tops spring back when lightly touched with your finger. For the loaf, bake for 65 to 70 minutes until a toothpick inserted in the center comes out clean. Remove from the oven and cool five minutes before removing the muffins or loaf from their pans to cool completely. Well, you can eat a warm muffin, but please cool the loaf completely…..it’s the baker in me. Add some decorative zested orange to the tops of your muffins if desired.

Happy Muffining! I know that’s not a word, but I like it!

Eat Your Nutrients!

Eat Your Nutrients!


Smooth and Peachy Coconut Milk Ice Cream

When Spring is getting close and the days are lengthening, I start craving fresh fruity flavors. The beauty of freeze dried fruit is the flavor is intensified, because it is concentrated. So, it is easy to make a fruit forward ice cream or cookie off season. I really like Karen’s Naturals freeze dried fruit. They are organic and contain just fruit, no additives or preservatives. This is a pretty straight forward recipe using just a few quality ingredients to make a smooth and peachy, dairy free, ice cream that tastes fresh, even when peaches are not in season!

Smooth and Peachy Coconut Milk Ice Cream, Dairy Free, Paleo and AIP

Smooth and Peachy Coconut Milk Ice Cream

Smooth and Peachy Coconut Milk Ice Cream

This recipe makes enough for four generous servings of ice cream. It is dairy free, gluten free and honey sweetened. The squeeze of fresh lemon juice brightens the ice cream and gives it the perfect tang.


Serving Up Smooth and Peachy Coconut Milk Ice Cream

Serving Up Smooth and Peachy Coconut Milk Ice Cream


Smooth and Peachy Coconut Milk Ice Cream

Ingredients:

2 Cups of Full Fat Coconut Milk

1 Bag of Just Organic Freeze Dried Peaches (here)

1/2 Cup of Quality Honey (I use local)

2 Tablespoons of Pure Vanilla Extract (use 1/2 teaspoon of  vanilla powder for AIP)

1 Tablespoon of Fresh Squeezed Lemon Juice

1/8 Teaspoon of Sea Salt

Directions: In a high speed blender, puree all the ingredients. Chill in the refrigerator for 4 hours. Churn in an ice cream maker. I use this one.

Enjoy! You can store leftover ice cream in the freezer. It is easy to scoop straight from the freezer because of the higher vanilla content. Have a blast of peach before peach season to celebrate the coming of Spring!

If you want to make a fresh peach ice cream that is dairy free in peach season, check out my recipe for fresh and simple peach ice cream here!

Eat Your Nutrients!

Eat Your Nutrients!


Chocolate Chip Banana Muffins (Dairy and Gluten Free)

I have been joking lately that I have a house full of chimps. I have had a difficult time getting a few black spotted bananas to bake with because my family is eating them so fast. I am not sure what has caused this sudden rise in banana consumption, but I am not going to complain too loudly when bananas are being chosen. I simply have learned to hide some so they get a chance to reach that black spotted stage that makes them perfect for baking!

Grain Free Chocolate Chip Banana Muffins

Coconut Flour Chocolate Chip Banana Muffins

I have been craving a chocolate chip banana muffin, and this one fits the bill perfectly. They are simple to whip up in a food processor, have protein from six eggs, healthy fat from olive oil (they make muffins very moist!) are mostly sweetened with bananas and just a touch of honey, and sprinkled with some dairy free chocolate chips. Heavenly! Scroll down for the recipe which makes an even dozen.

Coconut Flour Chocolate Chip Banana Muffins

Chocolate Chip Banana Muffins – Dairy Free

Chocolate Chip Banana Muffins (Dairy and Grain Free)

Preheat your oven to 350º degrees F. Line 12 muffin cups with non-stick muffin papers and set aside.

Ingredients:

6 Pastured Eggs

1/2 Cup of Coconut Flour (here)

2 Black Spotted Bananas

1/4 Cup of Olive Oil

2 Tablespoons of Honey

1 Teaspoon of Vanilla Extract

1 Teaspoon of Lemon Juice

1/2 Teaspoon of Baking Soda

1/2 Cup of Mini Chocolate Chips plus more for sprinkling (I use these dairy and gluten free ones)

Directions: In a food processor with a blade attachment, blend the eggs and banana until the banana is smooth. Add in the rest of the ingredients except the chocolate chips and blend for two minutes. Add in 1/2 cup of mini chocolate chips and pulse six times just until the chocolate chips are incorporated but not broken up. Scoop the batter into the prepared muffin cups and sprinkle with some extra chocolate chips. Bake for 20 to 25 minutes in your preheated oven until the tops spring back. Remove from the oven, and cool for five minutes before removing from the pan and cooling on a wire rack.

These keep at room temperature for three days. I only know this because I hid one, otherwise my son would have eaten them all. 🙂

Enjoy your day!

Eat Your Nutrients!

Eat Your Nutrients!


Moist and Grain Free Chocolate Chip Banana Muffins

Moist and Grain Free Chocolate Chip Banana Muffins

Hot Spinach Artichoke Dip

Here’s a delish and dairy free Hot Spinach Artichoke Dip recipe just in time for Super Bowl Sunday! It is dairy free, creamy and “cheesy”. Take it to your next shindig. It is the best ever! Serve it with crudites like carrots, red peppers, and healthy chips for dipping. I made my own baked chips using almond flour grain free tortillas cut into wedges and baked in the oven to crisp them up. Brown rice wraps work well also. Use your favorite or what works for you. You will need to soak some cashews for 2 hours before assembling the dip. This makes it very creamy!

Hot Spinach Artichoke Dip - Dairy and Gluten Free

Hot Spinach Artichoke Dip – Dairy and Gluten Free

Hot Spinach Artichoke Dip

Preheat your oven to 350º degrees F. Grease a 1.25 quart baking dish lightly with olive oil.

Ingredients:

1 – 11 oz. container of Fresh Spinach

1 – 14 oz. can of quartered Artichoke Hearts, drained (I used Native Forest)

1 Cup of Raw Cashews, soaked 2 hours in water at room temperature

1/2 Cup of Quality Mayonnaise (I like Avocado Oil Mayo)

2 Tablespoons of Nutritional Yeast (this makes it cheesy and is a good source of B vitamins too. Read more about the benefits here.

2 Tablespoons of Fresh Squeezed Lemon Juice

2 Tablespoons of Garlic Olive Oil or 2 cloves of minced garlic and olive oil)

2 Teaspoons of Honey

1/2 Teaspoon of Sea Salt

1/2 Teaspoon of Onion Powder

Directions: In a skillet, cook your spinach with the olive oil and a large pinch of sea salt. Set aside. In a food processor with a blade attachment, add the cashews, artichoke hearts, lemon juice, onion powder, sea salt, nutritional yeast, honey, and mayonnaise. Blend until the cashews are very smooth. Add in the cooked spinach and pulse just until it is broken up but not completely mixed in. It takes five or six pulses. You should still see the creamy dip and the spinach should stand out. Think marbled effect.

Spoon the mixture into your prepared baking dish, and bake in the oven for 25 minutes.

Remove from the oven, and serve with your accompaniments of choice!

Assemble this ahead of time, then just bake on game day!

Happy Eating!


Hot Spinach Artichoke Dip - Dairy Free

Hot Spinach Artichoke Dip – Dairy Free


Hot Spinach Artichoke Dip - Gluten Free, Dairy Free

Hot Spinach Artichoke Dip – Gluten Free, Dairy Free

This Hot Spinach and Artichoke Dip is as delicious as the classic, but it is without the dairy. Paleo, Gluten Free and Dairy Free. Perfect for a party!


Chinese Almond Cookies – Gluten Free

Chinese Almond Cookies made with almond flour

Chinese Almond Cookies made with Almond Flour

In celebration of Chinese New Year, which we have celebrated every year since the adoption of my two youngest daughters, I made a grain free almond cookie! Whether you celebrate this holiday or not, this is a delicious Chinese Almond Cookie! Gung Hay Fat Choy!

Chinese Almond Cookies made with almond flour

Chinese Almond Cookies – Gluten Free, Paleo

Chinese Almond Cookies, Gluten Free and Paleo

Chinese Almond Cookies, Gluten Free and Paleo


Chinese Almond Cookies

Ingredients:

1 1/2 Cups of Almond Flour

1 Egg

1/4 Cup of Honey

1/4 Teaspoon of Sea Salt

1/4 Teaspoon of Baking Soda

1/4 Teaspoon of Almond Extract

12 Whole Almonds for the Top of the Cookies (I used sprouted almonds)

Directions: Preheat your oven to 350º degrees F. Line a cookie sheet with parchment paper. In a bowl with an electric hand-held mixer, beat the egg and honey. Add the almond flour, sea salt, baking soda and almond extract. Beat until fully incorporated for about one minute. With a tablespoon cookie scoop, scoop the cookie dough onto the prepared cookie sheet about 1 1/2 inches apart. Place one almond on top of each cookie, in the center, and press down gently. Bake in your preheated oven for ten minutes, or until the cookies are golden brown. Cool on the cookie sheet.

Makes one dozen cookies. Low FodMap 1 cookie.

chinese-almond-cookies-ready-to-bake

Grain Free Chinese Almond Cookie

Grain Free Chinese Almond Cookie

Chinese Almond Cookies - Paleo Gluten Free

Chicken and Broccoli Casserole {Gluten Free – Paleo}

Casseroles became popular in the 1950’s, and although I wasn’t around then, they are still a very versatile and popular one dish meal worthy of the table today. I have created a healthy version of one of my favorites!

Chicken and Broccoli Casserole {Gluten Free - Paleo}

Chicken and Broccoli Casserole {Gluten Free – Paleo}

A good casserole should be moist, tasty and have all the components for a one dish meal.  I have been making this casserole recently on a weekly basis. My kids love it! It is really, really good leftover, and great as a packed work lunch.

I used dried tarragon in the filling, which is so good with chicken! A good quality mayonnaise and eggs bind the filling together with the chicken and broccoli. I made coconut flour crepes to layer between the creamy chicken filling. I have made the casserole and baked it right away, and I have also assembled it and refrigerated it for up to a day before baking.

If you like the idea of batch cooking, their are options for cooking the chicken! I like to cook two whole chickens and use one for dinner one night, and shred or chop the other one to use in this casserole. If you use all chicken breasts, the same theory saves time! When you roast the breasts, I highly recommend bone-in, skin on for the moistest chicken breast!

Let’s make a piping hot casserole!

Chicken and Broccoli Casserole {Gluten Free – Paleo}

Ingredients:

4 Cups of Cooked, Diced Chicken

3 Cups of Steamed Broccoli (chopped)

1 1/4 Cups of Good Mayo (I use Primal Kitchen Mayo, it is so good and healthy – here)

3/4 Cup of Full Fat Coconut Milk (my favorite additive-free brand)

2 Eggs

1 Teaspoon of Dried Tarragon

1/2 Teaspoon of Sea Salt or Himalayan Pink

1/2 Teaspoon of Onion Powder

For the filling, whisk together the Mayonnaise, Coconut Milk, Eggs, Tarragon, Salt and Onion Powder. Add in the cooled chopped chicken and chopped broccoli. Place in the refrigerator while you make the crepes.

Crepes

1 Cup of Full Fat Coconut Milk

8 Eggs

1/4 Cup of Coconut Flour

2 Tablespoons of Lemon Juice (I like fresh squeezed)

2 Tablespoons of Olive Oil

1 Teaspoon of Sea Salt

Topping

1/2 Cup of Chopped Red Onion

1/2 Cup of Sliced Green Onion

Directions: Preheat a large non-stick electric griddle to 350º degrees. (A stove top non-stick pan will work too, just make sure your heat is set at medium). Whisk together the crepe ingredients. Whisk until there are no lumps! This is a good time to develop those arm muscles! Let the batter sit for 5 minutes to thicken slightly. Using a 1/4 cup measuring scoop, ladle the batter onto your preheated griddle, and cook until very lightly brown, flip and repeat, just like a pancake. You should have about eight crepes. Cool them on a wire rack. Then, cut them into 1 inch strips.

Preheat your oven to 350º degrees. Grease a 14″ x 10″ casserole with olive oil (size is approximate). Line the bottom of the casserole with 1/2 of the crepe strips. You will not have the bottom perfectly covered, and it is okay. Add the chicken and broccoli filling. Spread the filling evenly. Top with the remaining crepe strips. With a pastry brush, lightly brush on additional olive oil, just onto the strips. Sprinkle with diced red onion and sliced scallions.

Bake for 30 minutes in your preheated oven. Remove the casserole from the oven and cool ten minutes before digging in. Enjoy!

*This casserole can be easily modified to Low FodMap by omitting the red onion and onion powder. Just add more scallions. It is delicious that way as well.

Healthy Chicken and Broccoli Casserole

Healthy Chicken and Broccoli Casserole

Chicken and Broccoli Casserole {Gluten Free - Paleo}

Chicken and Broccoli Casserole {Gluten Free – Paleo}

*Affiliate Link – I receive a very small commission (cents) when you purchase products I recommend through my Amazon links. I use these products myself and never recommend anything I haven’t tried and use regularly. The small commission helps me keep my blog up, so if you have enjoyed my posts and recipes, I appreciate your support. You don’t pay any extra for your products. Thank you.🙂

chicken and broccoli casserole. this casserole is a creamy, grain free, hot casseerole you can assemble in advance and bake later.

Eat Your Nutrients!

Eat Your Nutrients!


Chocolate Coconut Milk Whip

Chocolate Coconut Milk Whip with Raw Cacao

Chocolate Coconut Milk Whip with Raw Cacao


I love a hot coffee in the morning that has some whip on top to slurp! I adore the cold creamy whip with the hot coffee. You don’t need an ISO whip to make this either. I am really loving mine and have been squirting it atop my coffee with abandon. However, I have also made the whip and kept it in a glass container in the refrigerator. It isn’t as airy, but it is definitely yummo. If you want to invest in an ISO Stainless Steel Whipped Cream Dispenser, you can find one here.

So, here is the recipe!

Chocolate Coconut Milk Whip with Raw Cacao

One can of Chilled Full Fat Coconut Milk

2 Tablespoons of Raw Cacao Powder

1 – 2 Tablespoons of Honey (to taste)

1/2 Teaspoon of Vanilla Extract

Directions:

Scoop the coconut cream off the top of the refrigerated coconut milk. It rises to the top of the can when refrigerated for a few hours. Keep the runny part for something else.

In a small blender, like a Ninja or Magic Bullet, blend all the ingredients. Pour it into your ISO Whip Dispenser and charge it as directed. If you aren’t using a dispenser, pour it into a glass container with a lid and refrigerate until it sets up. Then scoop it onto your coffee. Viola! Whip! A good tip is to store the can on it’s side, then whenever you want whip, you can just take it out the refrigerator and shake it a few times before dispensing.

Chocolate Coconut Milk Whipped Latte Topping

Chocolate Coconut Milk Whipped Latte Topping


Chocolate Coconut Milk Whip!

Chocolate Coconut Milk Whip!