Breakfast

Delicious Green Energy Bites Recipe

I’m so glad you’re here! As many of you know, I’m a Certified Health Coach, and I’m passionate about creating recipes that help people feel their best. Recently, I’ve been incorporating Shaklee’s skincare and supplements into my daily routine after thoroughly researching the cleanest and safest brands on the market. After using their products for several months, I decided to become a Shaklee Wellness Advocate. My goal is to support you in feeling your best at any age with clean, science-backed nutrition and skincare. 💚

This February, I’m dreaming of spring! But let’s be honest: winter can leave us feeling a little sluggish, especially towards the end. That’s why I’m excited to share a new recipe to keep your energy up and help you sneak more greens into your day—all while treating your taste buds!

Delicious Green Energy Bites Recipe

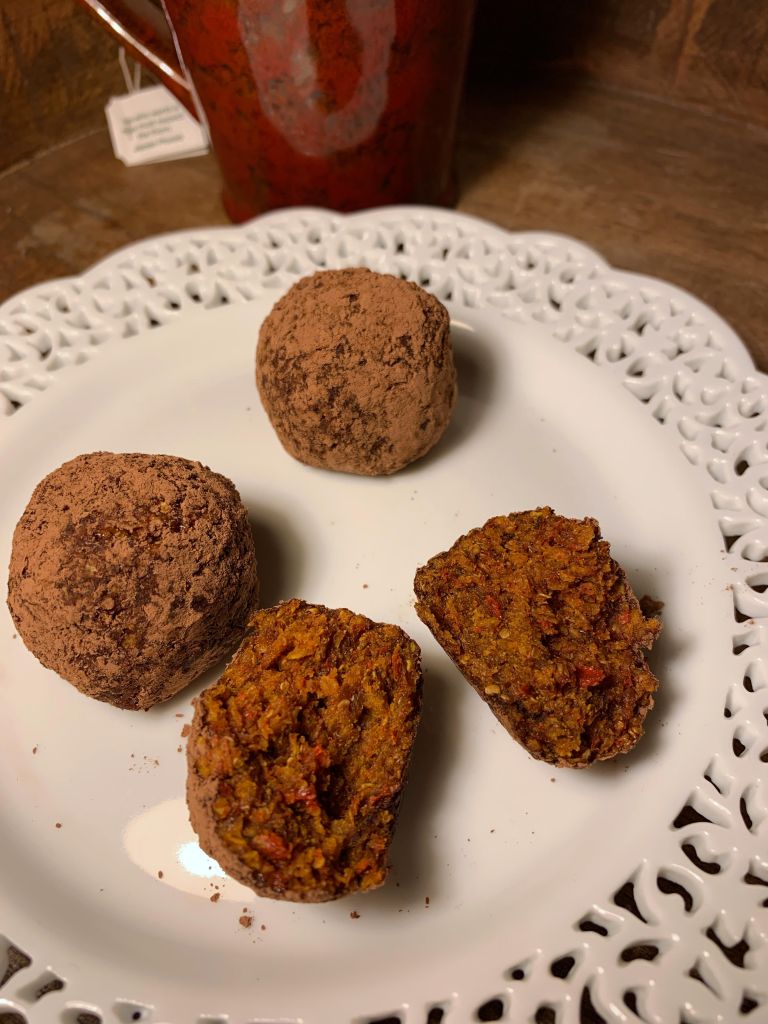
These Green Energy Bites are a simple, delicious way to boost your energy while sneaking in a serving of greens. They’re perfect for picky eaters because you can’t even taste the greens! For a kid-friendly version, I recommend using peanut butter and honey. My kids say they taste like no-bake cookies, which is a win in my book.

One of the key ingredients in this recipe is Shaklee’s Organic Greens Booster. I’ve been using greens powder for over a decade, and finding an organic option is so important because greens are highly concentrated and you don’t want anything but greens in there. Shaklee tests their products for heavy metals and other contaminants and has the highest of safety standards. Just one scoop of this booster equals a full cup of raw, organic vegetables—a mix of kale, spinach, and broccoli sprouts. It contains no artificial flavors, sweeteners, or colors, and it’s gluten-free, non-GMO, vegan, and kosher.

Green Energy Bites

1 scoop Shaklee Organic Greens Booster

1 Cup Rolled Oats

1/2 Cup Nut Butter (Peanut, Almond, or Cashew)

1/4 Cup of Honey or Maple Syrup

1/2 Cup of Very Finely Chopped Nuts (pecans, walnuts, peanuts) (I’ve been using this mini express chopper for years and LOVE it)

1/4 Cup of Mini Dark Chocolate Chips (I use Enjoy Life brand)

1/2 tsp. Vanilla

1 pinch of salt

1 to 2 tablespoons of water if needed for consistency. Only if it’s not coming together.

Instructions:

Preheat your oven to 325 degrees F. Grind your nuts in a mini food processor or chop them very finely. Stir together the oats and finely chopped nuts on a rimmed baking sheet, and toast in the oven for 7 minutes.

In a mixing bowl, stir together the peanut butter and runny warm honey (I used honey and warmed it in the microwave a few seconds until warm and runny) or maple syrup. Combine all the rest of the ingredients except mini chocolate chips. Stir until well mixed.


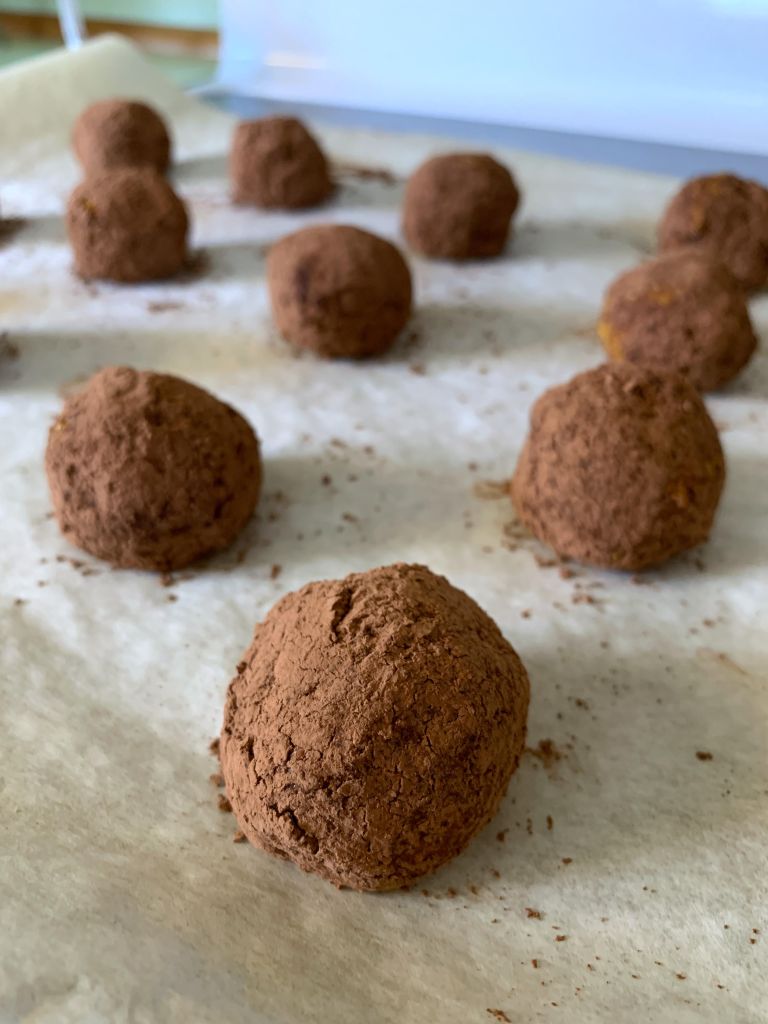
Using a tablespoon cookie scoop, form the balls into round balls, then drop them in the mini chocolate chips and coat them lightly. Place on a tray and refrigerate for 30 minutes to firm up.
Store in an airtight container in the fridge for up to a week.

These bites are perfect for an on-the-go snack, pre-workout fuel, or a healthy sweet treat!

Makes 14

Delicious Green Energy Bites Recipe

Here’s a wellness tip and a little treat just for you: Did you know that adding collagen to your morning routine can support healthy skin, hair, and joints? It’s one of my favorite easy upgrades! This month, Shaklee is offering 15% off when you invest in your health and purchase three select nutrition products of your choice using the code HEALTHY15. This includes the Organic Greens Booster featured in today’s recipe and the Collagen 9.

Why I Love This Recipe:

  • Quick and easy to make
  • Packed with clean, plant-based nutrition
  • Kid-approved
Organic Greens Booster

What’s Your Wellness Goal?
I’d love to hear from you—what’s your top wellness goal right now? Reply and let me know! 💬

Thank you for letting me share this journey with you. I hope you love these Green Energy Bites as much as my family does. Here’s to feeling our best, no matter the season! 🌿

Ramekin Baked Eggs with Polenta, Marinara and Cheese

Hello! How are you? I hope you are having a good July. It’s been quite hot here lately in Northern Michigan, and I have been making these little ramekins of goodness that are full of flavor, have a delicious, creamy texture and are nourishing but not over filling or heavy. Since summer can be busy with a lot more outdoor activities, this recipe uses a premade marinara that is convenient whatever time of year. Who am I kidding, life if always busy.

This recipe is naturally gluten free, and I am happy to have expanded the foods I tolerate well to include polenta and aged cheese. This dish has nourishing eggs full of protein, healthy fats and Omega 3. I try to look for local eggs or pastured organic eggs, and I like the ones with the really yellow yolks. The marinara is a good source of lycopene. Cooked tomatoes have a higher amount than fresh. So, that’s a plus, but those fresh tomatoes in summer are really something aren’t they? Rao’s marinara is just about as close as you will get to homemade. I like to keep a couple jars in my pantry at all times to have handy. The aged cheddar is a source of protein and contains very little lactose, so it is easier to digest if you generally don’t tolerate other dairy. It tastes so good, and just an ounce adds so much flavor. Polenta is naturally gluten free and a source of fiber and protein, and it is a wonderful, creamy texture when cooked properly. My dad used to put leftover polenta in a loaf pan and refrigerate it, then slice it the next day, and brown it on the stove in a pan. It was very good leftover like that. I like to cook mine in an instant pot. What a marvelous, time saving invention! The results are successful every time, and I don’t have to watch the pot as it cooks. I find the texture always comes out perfectly. Try this no fail recipe. I use Bob’s Red Mill Polenta.

This is a very versatile dish good for breakfast, lunch or dinner. It is easily reheatable too. My daughter, who is doing a nursing internship this summer, packs it in her lunch. It is one of those easy recipes that you can effortlessly modify to make more of less.

Here is the recipe. You can make the polenta ahead of time and put these together really quickly. Just reheat the polenta before using. You will only use half the batch in the recipe above to make six ramekins, so you can use the rest for another time or purpose.

Ramekin Baked Eggs with Polenta, Marinara and Cheese

Preheat your oven to 350 degrees F.

Ingredients:

1 Cup of Cooked Polenta. (See the recipe link above.)

Marinara Sauce (I like Rao’s brand)

6 Ounces of Cubed, Aged Cheddar Cheese

Twelve Quality Eggs

Salt and Pepper to Taste

Directions:

Grease 6 Ramekins by brushing the insides with olive oil.

Place the ramekins on a rimmed baking sheet. Spoon in marinara sauce into the bottom of each ramekin. Add a couple large spoonfuls into each. Add 1/4 Cup of warm polenta on top of the marinara sauce and spread it to the edges of the ramekin. Now add about an ounce of cubed cheddar on top of the polenta evenly. Crack two good quality eggs on top of everything and sprinkle with salt and pepper to taste.

Bake the eggs in your preheated oven for approximately 30 minutes, or until the whites are set and your yolks are how you like them cooked. Remove them from the oven, and cool for about ten minutes before eating.

I always love to hear from you and welcome your comments!

Crustless Quiche Florentine (Spinach Quiche)

Ahhhhh! Spring has arrived in Northern Michigan! or has it? That is always the big question Up North. But oh the beauty of it when it does. Spring up here is fickle. We had glorious days last week with the daffodils blooming and the sunshine so warm on your skin. The weather was nice enough for a picnic outside, and I actually put out my repurposed, hand painted ladder back chair I am using this summer for garden decor with a pot of daffodils. Later I will replace them with petunias. See photo down below. But the snow this morning! It was just a skiff and will be melted by noon.

Nice weather always makes me crave a good quiche! This is a new recipe I have written for Quiche Florentine. It is so light and fluffy, and it popped up in the oven and browned beautifully. I used baby spinach and a good aged cheddar with plenty of pastured local eggs. It is delicious, and I am so glad there is a piece left for me for lunch today!

Crustless Quiche Florentine (SCD, Low FodMap, Grain Free)

Crustless Quiche Lorraine

Preheat your oven to 375 Degrees F.

Ingredients:

10 Ounces of Baby Spinach, sauteed in olive oil and sprinkled in salt

12 Pastured Eggs

4 oz. of aged cheddar cheese, shredded

1/2 Cup of Coconut Milk

2 Teaspoons of Dried Chives

1/2 Teaspoon of Salt

1/4 Teaspoon of Pepper

a pinch of Nutmeg

Directions: Grease a deep dish pie pan.

Sautee the spinach in a separate pan with a tablespoon of garlic olive oil, set aside.

Whisk the eggs with the coconut milk, salt, pepper, nutmeg and chives. Fold in the cheese. Pour the egg mixture into your prepared deep dish pie pan. Now, take the cooked spinach and using tongs, place it artfully on top of the egg mixture. Place the pan in your preheated 375 degree F. oven for 40 minutes on the middle shelf until the eggs are set and the top is puffed up. The casserole should register 165 degrees F. in the center. Cool ten minutes before slicing.

Let me show you it sliced!

Crustless Quiche Florentine

The quiche is SCD Legal, Gluten Free, Grain Free and just delicious, real food ingredients.

This is the chair I repurposed for my garden this summer. What do you think? I found it at a consignment shop where I live and had a hole cut in the base and then primed and painted it in whimsical colors with flowers. We get quite a bit of foot traffic by our house in the spring and summer, so I thought it would be enjoyed by the passerby.

Repurposed Garden Decor Chair

At the end of a long, productive day, I like to take a little me time to unwind, and one of my favorite ways to do that is by reading a good book. I recently discovered Viola Shipmen! I was browsing a local bookstore and found a signed copy of The Heirloom Garden. Oh my gosh! Don’t you get so excited when you find an undiscovered to you new author whose books thoroughly suck you in with strong female characters? Now I am reading The Summer Cottage by Viola Shipmen and have more to look forward to after that, with a new one coming out this Summer.

I find a great way for winding down is a good book and a soak in the tub. I’m using Lemongrass Spa’s new Rejuvenate Bath Soak, the luscious Lemon Sorbet body polish and Cactus & Guava body wash. Lots of lovely aromatherapy! 😃

Good Books and Warm Baths

So how have you been doing? Leave me a comment below on your favorite Spring food. Here’s to a wonderful Spring!

Sandra

Instant Pot Egg Bites

I received an Instant Pot silicone egg bites pan for Christmas from my daughters, so of course I had to put it to good use!

This is a delicious way to eat eggs, and so fun. Eggs made in the instant pot are tender and really delicious. In this recipe I used bacon, scallions and spinach and a little nutritional yeast to give it a cheesy flavor without the dairy. This is the Instant Pot I have, and I love it! Instant Pot meals are delicious and I find very easy to digest. My favorite Instant Pot Cookbooks are by Coco Morante. She has three of them The Ultimate Instant Pot Cookbook, The Ultimate Instant Pot Healthy Cookbook, and The Essential Instant Pot Cookbook. Her recipes are all delicious and can be easily modified for nutritional needs! Here’s my recipe for Egg Bites in the Instant Pot!

Instant Pot Egg Bites

Ingredients:

4 Eggs

1/4 Cup of Scallions, sliced

1/4 Cup of Cooked Spinach, cooled and chopped

2 Slices of Cooked Bacon

1 Tablespoon of Olive Oil

2 Tablespoons of Coconut Milk or other non-dairy milk

2 Teaspoons of Nutritional Yeast

1/4 Teaspoon of Salt

1/4 Teaspoon of Pepper

Ghee or Coconut Oil for greasing the Egg Cups. You can also use a non stick cooking spray.

Directions:

In a 4 cup glass measuring cup with a pour spout, whisk together your eggs, olive oil, coconut milk, salt and pepper. Whisk in the nutritional yeast thoroughly. Then, stir in the bacon, scallions and chopped spinach.

Grease your egg cups with a little ghee. Pour the egg mixture evenly into each of the egg cups. They will be about 3/4 full. Place the lid on the egg bites pan. Pour a cup of water into your instant pot. Then, place the egg bites pan on the wire steam rack and carefully lower it into your instant pot.

Secure the lid on the instant pot, and set the steam valve to seal. Select Manual on your Instant Pot and adjust the time to ten minutes. It will take a few minutes to come up to pressure before the cooking time begins. After the cooking time ends, let the pressure come down for 5 minutes before releasing the pressure valve. Remove the lid and pull out your egg bites pan with heat safe mitts. Take off the lid of the egg bites pan and invert the pan onto a plate. Pop out the egg bites by pressing on the bottom of each mold. They are so yummy and kid friendly! Enjoy!

Fruit and Quinoa Granola, Gluten Free, Dairy Free

Guess what makes really great granola other than oats? Quinoa Flakes!

As someone who cross reacts to gluten when eating gluten free oats, quinoa flakes have been a very happy discovery! It can be substituted anywhere oats are called for.

This is a healthy granola recipe that is made with three kinds of dried fruit. I’ve included dried blueberries, raisins and turkish figs in this recipe.

It is sweetened with maple syrup, and the fat used is heart healthy olive oil. I added a touch of warming cozy cinnamon.

How do you like to eat granola? I like it as a yogurt topping and just plain by the handful.

Fruit & Quinoa Granola, Gluten Free, Dairy Free

Preheat your oven to 350 degrees F.

Ingredients:

3 Cups of Quinoa Flakes (my go to gluten free brand)

1/3 Cup of Pure Maple Syrup

1/4 Cup of good Olive Oil

1/2 Teaspoon of Ground Cinnamon

1/8 Teaspoon of Salt

1/2 Cup of Turkish Figs, diced

1/3 Cup of Dried Blueberries

1/3 Cup of Raisins

Directions:

Spread your quinoa flakes in an even layer on a baking sheet, and toast for 8 minutes stirring half way through.

Remove quinoa flakes from the oven and place them in a large mixing bowl.

Heat the maple syrup, olive oil, cinnamon and salt over medium high heat to a rolling boil. Pour the hot mixture over the bowl of toasted quinoa flakes, and stir until evenly and thoroughly coated.

Spread the granola on a parchment lined baking sheet, and bake in the oven for 18 minutes, stirring half way through after 9 minutes.

Remove the granola from the oven and stir in the dried fruit.

Cool completely on the baking sheet before storing in an airtight container.

This will keep for at least a week at room temperature.

Toasted Quinoa Goji Berry Cocoa Energy Balls

These are like a bowl of hot cereal in a ball, which makes them great for breakfast. I love the whole grain earthiness of these energy balls and all the great nutrition in them. The coating of raw cocoa powder on the outside gives them the perfect bittersweet flavor when you bite into them plus an extra nutrition boost.

Not only are these great for breakfast, but for a mid-morning or afternoon snack.

The flavor of toasted quinoa flakes is warm, nutty and gives them depth of flavor. I get my organic non-GMO quinoa flakes at nuts.com. They come in a nice sized bag of one pound or five pounds. Quinoa is a complete protein, it contains all nine essential amino acids, so it is a wonderful choice for breakfast or snacking! It’s also a great source of iron and dietary fiber and easy to digest, because it’s actually a seed, but the nutrition world considers it a whole grain.

Energy Balls Ready to Bake

Goji Berries contain antioxidants and Vitamins A and C and Zeaxanthin which is good for eye health. Dried ones are chewy, and earthy which gives these balls substance, meaning if you like chewy whole grain textures, you will like these a lot. A few of these with a cup of hot tea on a stormy day, like today here, is perfect.

The kitchen smells so good when you are toasting the quinoa flakes, warm and homey. Here’s the recipe.

Toasted Quinoa

Toasted Quinoa Goji Berry Cocoa Energy Balls

Preheat your oven to 350 degrees F.

Ingredients:

1 1/2 Cup of Quinoa Flakes (I love these organic gluten free ones!)

1 Medium Sized Ripe Banana

3/4 Cup of Dried Goji Berries (organic, sundried, no sulphur ones are my choice.)

1/4 Cup of Maple Syrup

2 Tablespoons of Olive Oil

2 Tablespoons of Ground Flax

2 Tablespoons of Cocoa Powder (reserved for rolling) I use raw cacao

1 Teaspoon of Vanilla Extract

1/2 Teaspoon of Ground Cinnamon

1/4 Teaspoon of Ground Allspice

1/4 Teaspoon of Salt

Directions:

On a rimmed cookie sheet lined with parchment paper, spread out your quinoa flakes in a even layer. Toast in your preheated oven for seven minutes stirring halfway through. This will be after five minutes.

Remove the quinoa flakes from the oven when golden brown and set aside to cool.

Place your goji berries in a food processor with a blade attachment and pulverize them on high until they are mostly powder with a few bits left. This takes about one minute. Add the flax and banana (broken into pieces) and blend on high. Scrape down the sides of the food processor with a rubber spatula. Now, add the remaining ingredients except for the quinoa flakes and cocoa powder. Blend until very smooth, scraping down the food processor once. Add the toasted quinoa flakes and pulse until they are evenly and completely blended into your energy mix. It should be thick and easy to scoop.

Lay out a cookie sheet with parchment paper, and put the cocoa powder on a small plate beside it for rolling. With a cookie scoop, scoop out tablespoon sized balls and drop them right onto the cocoa powder. Roll them around with your fingers until coated with the cocoa and then pick them up and perfect them into balls. Place them on the cookie sheet two inches apart. This recipe makes 14 energy balls.

Bake in your preheated 350 degree F. oven for ten minutes. Remove them from the oven, and cool completely on the cookie sheet before eating. These will store in a sealed container on your countertop.

These are a healthy gluten free snack that will give you energy, fiber and great nutrition.

Gluten and Dairy Free Oatmeal Blueberry Muffins

These heart healthy muffins are filled with antioxidant rich blueberries and sweetened lightly with honey. I used sprouted quick oats in the recipe and soaked them for a few minutes in a homemade buttermilk made from oat milk and lemon juice before mixing them into the muffin batter. They bake up in just 18 minutes!

The fat used in this muffin recipe is one of my favorites for keeping cholesterol in check, heart health, and for it’s overall health benefits…..Olive Oil. It works wonderfully in baking. This recipe makes 16 muffins that have a beautiful blueberry cinnamon aroma as they bake, and these will make your kitchen smell very inviting! My teens love these muffins. I always take that as a very good sign I’m on track.

If you are eating for digestive health or to prevent a SIBO relapse, go here to get a free download of Dr. Jacobi’s new The Vegetarian SIBO Bi-Phasic diet. Although I am not a vegetarian, a lot of people are and have a need for a diet plan without meat that is balanced. I am interested in expanding food choices for people with less restriction and helping them maintain their digestive health in a way that coincides with their dietary preferences. Her new vegetarian plan includes sprouted or soaked oats as well as some other gluten free grains. You should always listen to your body, because we are all individuals, and we all respond differently to different foods.

I think you will love this healthy and delicious muffin recipe! It has a wonderful, homey character, is lightly sweet and has a great whole grain texture that is hearty and good!

Gluten and Dairy Free Oatmeal Blueberry Muffins

Ingredients:

2 Cups of Quick Oats (I like One Degree’s Organic Sprouted Oats)

1 Cup of Oat Milk (if making gluten free this brand has clean ingredients)

1/2 Cup of Quinoa Flour

3 Large Eggs

1/4 Cup of Runny Honey

1/3 Cup of Olive Oil

1 Tablespoon of fresh Lemon Juice

2 Teaspoons of Cinnamon

1 Teaspoon of Baking Soda

1/2 Teaspoon of Salt

1/2 Teaspoon of Vanilla Extract

1 1/2 Cups of Frozen Blueberries

Directions:

Preheat your oven to 400 degrees F. Arrange 16 Muffin liners into two muffin pans and set aside.

Stir the lemon juice into the oat milk to create a dairy free buttermilk. In a medium mixing bowl, combine the 2 Cups of quick oats with the oat milk mixture. Let sit for ten minutes to let the oats absorb the liquid and soften.

While the oats are soaking, in a large mixing bowl with a hand held electric mixer, beat your eggs, olive oil, vanilla and honey together until creamy. Then, add in your quinoa flour, cinnamon, baking soda, and salt and beat until thoroughly blended. After the oats have soaked for ten minutes, spoon them into your batter and mix until thoroughly incorporated. The batter will be nice and thick. Finally, fold in your frozen blueberries just until combined so you don’t get blue streaks.

With a muffin scoop or 1/4 cup measure, scoop the muffin batter evenly into your prepared muffin cups. Bake in the preheated 400 degree F. oven for 18 minutes or until they spring back. 400 degrees is a higher heat, so make sure you don’t let them go too long.

Remove the muffins from the oven and cool five minutes before transferring them to a cooling rack. Dig in. They are great warm too!

Cranberry-Orange English Muffins – Grain Free

Cranberry Orange English Muffins Gluten Free Dairy Free

Reducing your grain consumption or eating grain free, whether for health reasons, or because you are eating a lower carb diet, doesn’t mean you have to be without English Muffins!!!

English Muffins, I have missed you so!

Cranberry Orange English Muffins are one of my favorites! You can make these English Muffins in a little over 30 minutes. They are like a warm hug. Slather them with your favorite spread. The ones shown here are topped with American Spoon Blueberry Spoon Fruit. They always list allergens on their jams, spreads and products, and almost everything is gluten free.

This recipe makes 4 English Muffins. To make these a Cinnamon Raisin English Muffin, substitute raisins for the cranberries, omit the orange zest, and add 1/2 teaspoon of cinnamon.Cranberry Orange English Muffins Grain Free

Cranberry-Orange English Muffins – Grain Free

Preheat your oven to 350° F.

Spray four English Muffin Rings with cooking spray and place them on a parchment lined cookie sheet. I used Avocado Oil Spray.

Ingredients:

1/2 Cup of Coconut Flour

2 Eggs

1/4 Cup Avocado Oil or Olive Oil

4 Teaspoons of Ground Flax

2 Tablespoons of Fresh Orange Juice

1/2 Teaspoon of Orange Zest

1 Tablespoon of Honey (may substitute maple syrup)

1/2 Teaspoon of Sea Salt

1/2 Teaspoon of Baking Powder (here is my recipe for corn free baking powder)

1/4 Cup of Dried Cranberries (I used apple juice sweetened)

Directions:

Beat together eggs, honey, orange juice, orange zest and avocado oil until creamy. Add in the coconut flour, ground flax, sea salt and baking powder. Beat until thickened. Fold in the cranberries.

Fill the four English Muffin Rings evenly. Using the back of a wet spoon, smooth the batter to the edges of the rings evenly. Re-wet the spoon as needed. No sticking this way!

Mist the tops of the English Muffin batter lightly with more cooking spray. Bake in your preheated oven for 20 minutes, or until the edges are turning golden brown and the center are baked through. Remove from the oven, and cool for five minutes. Remove the rings. If they stick a bit, run a knife around the edges. Cool completely. Split the English Muffins carefully with a bread knife. Enjoy!

Cranberry-Orange Grain Free English Muffins


Raspberry, Blackberry, Mango Smoothie

Raspberry Blackberry Mango Smoothie

Are you ready for a super delicious, berry infused, smoothie to jump start your day?

This smoothie has your daily allowance of selenium with the addition of just two Brazil nuts! Brazil nuts are a rich source of selenium. Selenium is one of the nutrients that helps regulate thyroid function, as well as boost immunity, and so much more. Learn  more here from Dr. Axe on the benefits of selenium. Other good food sources of selenium are liver, eggs, grass fed beef, yellowfin tuna, cooked halibut, sardines, turkey, and spinach.

The berries in this smoothie are fantastic sources of Vitamin C, Magnesium and Fiber. Mango is great for the skin and digestion, as well as a good source of Vitamin C and Fiber. I added almond butter for healthy fat and some protein, and ground flax. There is an option to add in Grass Fed Collagen (I have it every day in my smoothies no matter what kind I make for my hair, skin, nails and gut health. It is tasteless, and also is a source of protein.) The lime juice gives the smoothie an extra zip like a sweet tart, and coconut water is very hydrating. I just love the flavor and color of this health promoting smoothie!

Raspberry, Blackberry, Mango Smoothie

Ingredients:

1 Cup of Coconut Water

1/2 Cup of Frozen Raspberries

1/2 Cup of Frozen Blackberries

1/2 Cup of Fresh or Frozen Mango

2 Brazil Nuts (I use this gluten free brand)

1 Tablespoon of Almond Butter

1 Rounded Tablespoon of Grass Fed Collagen (optional)

1 Tablespoon of Lime Juice

1 Rounded Teaspoon of Ground Flax

1/2 Cup of Crushed Ice

Directions:

Add all the ingredients to a blender and blend until smooth. Pour into a tall glass and add a straw. Enjoy!

Sam


Supercharge Kiwi Green Smoothie

We are into mid-October already, the winter season is almost here as well as the holidays, and school is in full swing! My two teenage daughters have super busy schedules this year, as well as myself and Doug. Our whole family starts their mornings with a healthy smoothie every weekday, because they make us feel so good all morning! I am happy everyone is leaving supercharged with great nutrition before they go out the door, and we even got our 22 year old son, Jeffrey on board! What convinced him was not only that they tasted good, but how he felt having them! Young men are tough to convince, you know that invincibility and all.

So, we are big on smoothies here at our house, and especially when they have some leafy greens in them. Did I ever tell you that when my husband, Doug, started having green smoothies consistently five years ago his grey hair almost completely disappeared? He noticed the way he felt was different too, more energized and lighter. He has gotten asked if he colors his hair. If you knew him, you would know that no way would he do that being a no fuss, get it done, kind of guy. It was all the antioxidants in smoothie form easily accessible to his body!

I love the immune boosting benefits, fiber and nutrients in this delicious new green smoothie recipe! Kiwi is an amazing addition to a smoothie, because just one kiwi packs 106% RDA of Vitamin C! They are also a good source of digestive enzymes and fiber. There are two kinds of leafy greens in this smoothie, kale and spinach. Kale and Spinach contain Vitamin A, Vitamin K, Calcium and Vitamin C, Antioxidants, Fiber, and are detoxifying plus so much more! I added avocado for healthy fat and creaminess and frozen banana. There is also a splash of lemon juice and a teaspoon of raw honey.

Supercharge Kiwi Green Smoothie

I will be writing some new healthy smoothie recipes the next few months that are palate pleasing, because healthy smoothies should be delish! You can choose from them based on your preferences and health goals. I recommend rotating them. You can find more tasty and healthy smoothies in my Seven Days of Smoothies Challenge in my recipe index here under beverages and breakfast.

Food should be our first defense and protection of our health. Every person is bio-individual, but healthy food is a must for everyone! Your body knows the difference! Supercharge your day by starting with a healthy smoothie!

Supercharge Kiwi Green Smoothie

Ingredients:

1 Kiwi (ripe and peeled)

1/2 Cup of Frozen Green Grapes (You can use unfrozen)

1/2 Cup of Frozen Kale

1/2 Cup of Frozen Leafy Spinach

1/2 Frozen Banana (I keep a bag of peeled, ripe bananas in my freezer cut into pieces)

1/4 Avocado (ripe)

1 Tablespoon of Lemon Juice

1 Teaspoon of Raw Honey

1/4 Teaspoon of Vanilla Extract

1/2 Cup of Crushed Ice

Directions:

Place all the ingredients in a blender and blend on high until smooth and creamy. Pour into a tall glass and add a straw. 🙂

and……… I realized you haven’t seen Ming Ming in a while unless you are following me on Instagram! So here she is in her No. 1 Dog Sweatshirt!

Enjoy Your Day!

Sam

Ming


1 2 5