Tag Archives: AIP Paleo

Salmon Patties on Roasted Cabbage with Avocado

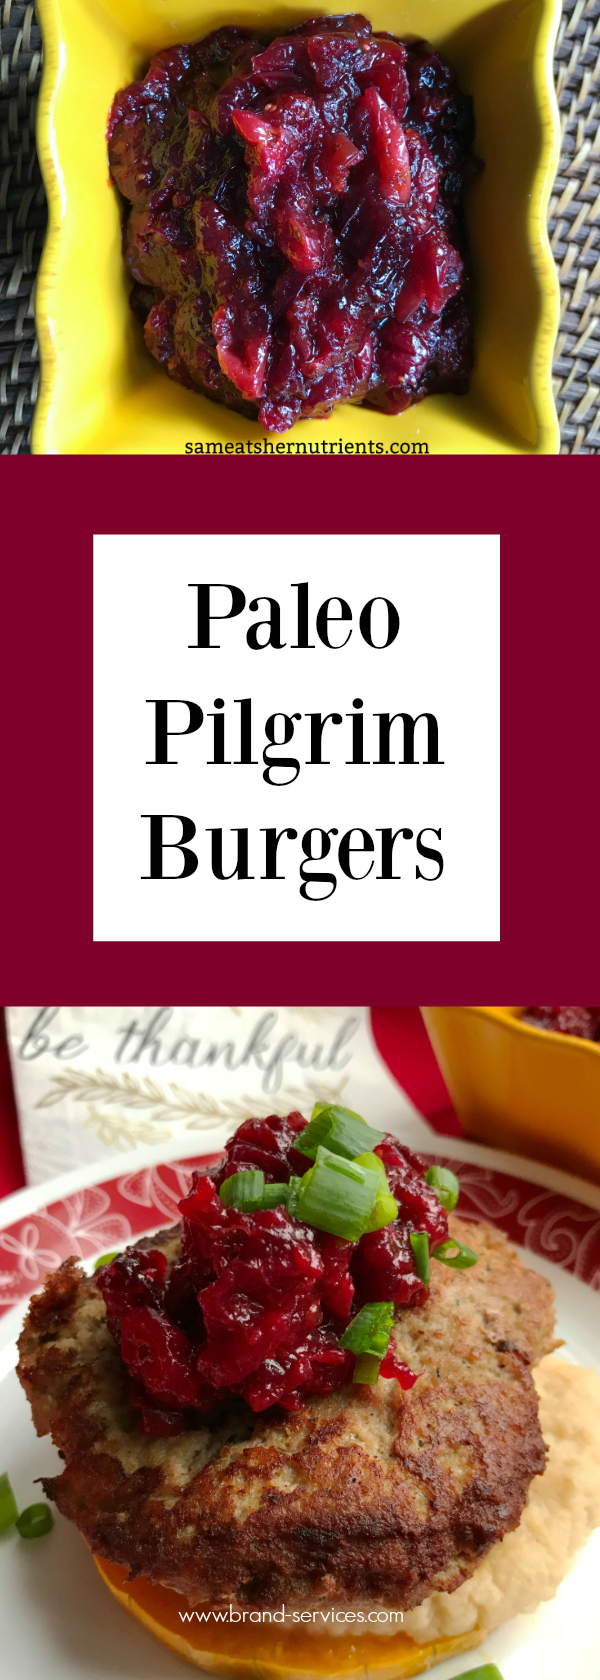
It’s almost a New Year, and I know you most likely want this to be your healthiest year yet! I know I do! In times when obesity is at an all time high, even in our children, and the next generation is the first not expected to live as long as their parents, there has never been a more urgent time to clean up our eating so we can live longer for our loved ones, and leave a legacy of healthy habits for our children to follow. I’ve attached a short video below of Dr. Oz speaking about this and using food as medicine.

That being said, we don’t have to sacrifice delicious food to be healthy and improve our health. That is a myth! Because, real food is delicious food, and I would argue the most delicious of all if our palettes are back on track, and we have so many different spices and herbs and alternatives at our fingertips!

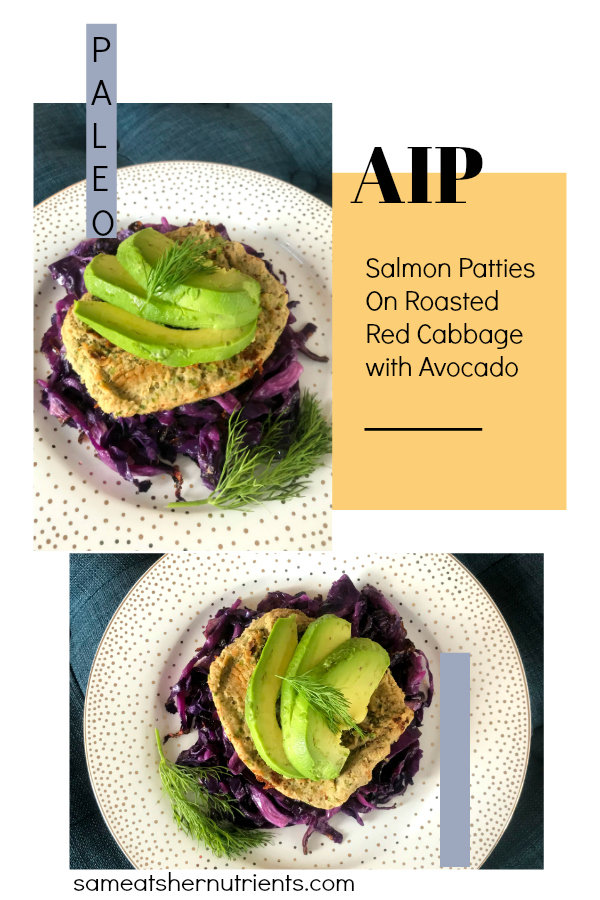
Here is a wonderful salmon dinner using canned non-GMO salmon. It is a budget friendly meal, topped with a fat everyone loves…….the beloved avocado! The salmon burgers have fresh dill in them and other dried herbs, and are delicious! Have I ever told you how much I love herb shears? I am short on the patience required to finely mince herbs like parsley, dill, etc. Kitchen herb shears are so fast, and the mince is super fine. I put a link below if you are interested in seeing what I’m talking about. They come in super handy and are inexpensive!

Salmon Burger with Avocado on Roasted Cabbage

Salmon Patties on Roasted Red Cabbage with Avocado

Makes 12 Patties – 2 per serving.

Ingredients for Salmon Patties:

3 – 7.5 oz. Cans of Canned Salmon (I used Crown Prince Non-GMO)

6 Tablespoons of Coconut Flour

1 1/2 Cups of Minced Celery

3/4 Cup of Red Onion (chopped)

1/4 Cup of Coconut Milk

1 1/2 Tablespoons of Gelatin (I used this)

1 Teaspoon of Sea Salt, divided

1/4 Teaspoon of Dried Oregano

1 Teaspoon of Dried Marjoram

1 Teaspoon of Dried Parsley

1 Tablespoon of Fresh Minced Dill (or 1/2 teaspoon dried) (I use these herb shears for mincing herbs. They are fabulous and fast!)

1 Tablespoon of Garlic Infused Olive Oil (you may substitute 2 cloves or garlic and regular olive oil if you like)

2 Teaspoons of Cider Vinegar

2 Tablespoons of Avocado Oil or Olive Oil

Ingredients for Roasted Red Cabbage:

1 Large Head of Red Cabbage, Cored and Shredded with a sharp knife

1/4 Cup of Avocado Oil or Olive Oil

2 Tablespoons of Apple Cider Vinegar

1 Teaspoon of Sea Salt

Directions:

Preheat the oven to 400º F. To prepare your red cabbage, toss the cabbage with 1/4 cup of Avocado Oil, the apple cider vinegar, and sea salt. Lay on a large rimmed baking sheet, and spread it out in an even layer. It shrinks by about 50 percent when cooking. Place it in your preheated oven, and roast for a full 40 minutes, tossing with tongs after the first twenty minutes. When it is done, it will have crispy brown edges.

Cook the minced celery, red onion, and 1/4 Teaspoon of Sea Salt in 1 tablespoon of Garlic Infused Olive Oil over medium high heat on your stove top until soft. While this is cooking, whisk together the coconut flour, gelatin, herbs and the other 3/4 teaspoon of sea salt. In a large mixing bowl, place the drained, canned salmon, the cooked celery and red onion, apple cider vinegar, coconut milk and coconut flour mixture, and mix until thoroughly incorporated. Add two tablespoons of Olive Oil to a large oven safe, non-stick skillet. With a half cup measure, scoop out the salmon mixture onto the greased skillet, and form twelve patties by pressing them down with the tips of your fingers until they are and inch thick.

When the cabbage is almost done, you can cook the patties. Since everything in these patties are fully cooked, the object is to brown them on both sides. These patties are delicate and delicious, but care is needed in flipping them.  Cook the prepared patties over medium high heat about 4 -5 minutes a side. Then, pop them into the oven for 5 more minutes with the cabbage.

To serve, place a generous mound of roasted red cabbage on your plate. Top the cabbage with a salmon patty and sliced avocado. Feel free to drizzle with a sauce. I never say no to that! I like the Mastadon BBQ which is here.

Salmon Patty Dinner

Paleo AIP Salmon Patties that are grain and egg free and AIP Paleo. They are seasoned with dill and served on a bed of oven roasted cabbage, topped with healthy avocado!

In this short Interview with Dr. Oz and our President, Dr. Oz discusses solutions to our all-time high obesity rates in adults and children in our country. Dr. Oz is a huge advocate for food as medicine!

Here’s to a healthy 2018!

Sam

Broccoli Radicchio Salad with Bacon

Broccoli Radicchio Bacon Salad with Cranberries

This flavorful, nutrient rich, salad with chopped radicchio and oven roasted broccoli is a delicious mixture of crunchy, sweet and salty. The salad is tossed with apple juice sweetened cranberries, salty bacon and is drizzled with a honey lemon vinaigrette. The colors are bright and vibrant, and it keeps well in the refrigerator for three days.

Radicchio originated in Italy, and gives the salad a pop of  color as well as phytonutrients, flavonoids, vitamin c, k and b vitamins. It has a bold flavor and looks similar to red cabbage, but is nothing like it other than color. It is a member of the chicory family.

Broccoli is a vegetable in the cruciferous family and is full of nutrients. At the top of the list is vitamin k, c, chromium, folate and many more. This is a really delicious and eye catching salad!

Broccoli Radicchio Salad with Bacon and Cranberries Paleo AIP

Broccoli Radicchio Salad with Bacon

Ingredients:

8 Cups of Raw Broccoli Florets plus 2 Tablespoons of Olive Oil or Avocado Oil and 1/4 teaspoon of sea salt

Two small heads of Radicchio (8 Cups) Washed and shredded with a sharp knife

1/2 Cup of Crumbled Cooked Bacon (I used sugar free Paleo bacon)

1/4 Cup of Apple Juice Sweetened Cranberries (I use these)

Preheat your oven to 400º degrees F. Toss the broccoli florets in the oil and sea salt. Roast in your preheated oven in the center rack for approximately 25 to 30 minutes until crispy and brown. They will be almost like a chip. They should be golden brown and crispy on the edges, but not burned.

Meanwhile, place your washed and shredded radicchio into a large bowl and make the vinaigrette.

Honey Lemon Vinaigrette

Ingredients:

1/4 Cup of Olive Oil

1 Tablespoons of Fresh Lemon Juice

2 Tablespoons of White Balsamic Vinegar (my favorite brand)

2 Teaspoons of Honey

1/2 Teaspoon of Sea Salt

Directions: Whisk together all the ingredients until emulsified.

Pour the dressing over the radicchio. Pour the prepared dressing over the top and toss to coat thoroughly. When the broccoli is done, place it on top of the dressed radicchio while it is hot. Add the cranberries and crumbled bacon. I like to serve it layered like this with a long set of salad tongs.

That’s it! It’s ready to serve, and as I said, this salad stays fresh in the refrigerator for several days. The radicchio is a sturdy leaf and doesn’t wilt or get soggy with the vinaigrette added to it, and the flavors just get better.

Sam

Broccoli Radicchio Salad with Bacon Paleo AIP Gluten Free


Paleo Pilgrim Burgers

Paleo Pilgrim Burger

Here is a delicious Paleo rendition of the Pilgrim Burger with all the flavors of Thanksgiving! It is a burger with a squash or sweet potato bun, mashed celeriac or potatoes, a turkey burger, and fresh cranberry sauce on top! Thanksgiving flavors in a burger!

Paleo Pilgrim Burger

Fresh and Quick Cranberry Sauce:

Fresh and Quick Cranberry Sauce

Ingredients:

8 ounces of organic fresh cranberries

1/3 Cup of Maple Syrup

2 Teaspoons of Fresh Organic Orange Zest

3 Tablespoons of Fresh Squeezed Orange Juice

1/4 Teaspoon of Ground Cinnamon

1/4 Teaspoon of Ground Ginger

1/8 Teaspoon of Ground Cloves

1/4 Teaspoon of Sea Salt

Bring the cranberry mixture to a boil, and then reduce to a simmer and cook 7 – 8 minutes until the cranberries pop. Set aside to cool for 15 minutes, and then take a potato masher and mash until there are still some cranberry pieces in it, but is creamy. Place in a serving bowl.

For the “bun”:

Preheat your oven to 400° F. Lay out a rimmed cookie sheet covered with parchment.

Bun Ingredients:

1 Butternut Squash, Top half without seeds peeled and sliced into 1/2″ rounds

or

1 Large Sweet Potato, Peeled and sliced into 1/2″ rounds

Directions: Place the rounds onto the baking sheet and brush with olive oil and sprinkle with sea salt. Bake in your preheated oven for 30 minutes until soft when pierced with a fork.

For the Mashed Celeriac or Potatoes you will need:

2 medium Celeriac Root peeled or 2 to 3 large russet potatoes

1 Cup of Chicken Broth or Bone Broth, more if needed

1/2 Cup of Coconut Milk

2 Tablespoons of Olive Oil or Ghee

Sea Salt to Taste

Directions: Cook the cubed celeriac or potatoes in the chicken broth, covered at a simmer until tender. Place in a food processor, and add the coconut milk, fat of choice and salt to taste. Puree until smooth and creamy. Now for the burger!

Paleo Pilgrim Burger with Fresh Cranberry Sauce

Ingredients for the Burger:

2 lbs. of Ground Turkey

1 Tablespoon of Maple Syrup

2 Teaspoons of Sea Salt

2 Tablespoons of Grated White Onion

2 Tablespoons of Olive Oil

1 Teaspoon of Apple Cider Vinegar

1/2 Teaspoon of Ground Sage

1/2 Teaspoon of Thyme

Chopped Green Onion for the top.

Directions: Mix all the ingredients together, and form into 6 patties. Heat a cast iron skillet to hot, and place additional olive oil in a cast iron skillet to coat the pan. Cook three burgers at a time. To assemble, place the squash bun or sweet potato round on the bottom, add a generous scoop of mash, the burger and then top with the fresh cranberry sauce. Sprinkle with green scallions. Serve hot!

You can make this as often as you like, but it is especially delicious over the holidays! A fancy way I like to serve them is to assemble them all on a large turkey platter, and let everyone pick their favorite!


Peach Mango Sorbet

Peach Mango Sorbet - Paleo

The peaches are so good this year, and I have been finding ways to enjoy them almost every day while they are fresh and in season. One of the ways I have been eating them is by making a fresh sorbet with peaches and mango in my blender for instant sorbet. I peel and dice the fresh fruit and freeze it first. Find the full recipe below.

Peaches are packed with nutrition and soluable fiber and aid digestion. Here’s a great article on 18 Amazing Benefits of Peaches including skin health, vision, immune system and anti-aging properties. I added just 1 1/2 tablespoons of low glycemic coconut sugar to the recipe that serves three. It is important to buy organic peaches, because they are on the dirty dozen list.

Here’s the simple and delicious recipe for you to enjoy!

Peach Mango Sorbet

Ingredients:

2 Organic Peaches, Washed, Peeled, Diced and Frozen

1 Mango, Washed, Peeled, Diced and Frozen

1 Tablespoon of Fresh Squeezed Lemon Juice

1 1/2 Tablespoons of Coconut Sugar

Directions: Add all the ingredients to a high speed blender with a plunger (I used a Vitamix) and blend until thick and creamy. Serve immediately, or place the sorbet in a glass freezer dish and freeze for later. If you save it for later, remove the sorbet from the freezer and let it sit on the counter for ten to fifteen minutes to soften.

Enjoy your day!

Sandra

Chinese Orange Chicken

Juicy chicken thighs and fresh squeezed orange juice and zest really make this skillet to oven soy free Chinese Orange Chicken shine!

Chinese Orange Chicken

Chinese Orange Chicken


Coconut aminos is a fantastic substitute for soy sauce. I was thrilled to discover it several years ago, because it is hard to make some favorite Asian dishes without that distinctive salty umami flavor.

As with so many Chinese dishes, there is chopping and dicing required, but this Orange Chicken comes together very quickly after the prep, which can be done at your convenience, or all at once, and there is no messy deep frying. The total cooking time is about 25 minutes from stove to oven. Feel free to serve this with a steaming hot scoop of Jasmine Rice! There is plenty of sauce to meld into the rice. 🙂

Chinese Orange Chicken

Chinese Orange Chicken


Chinese Orange Chicken - Soy Free

Chinese Orange Chicken – Soy Free


Chinese Orange Chicken

Ingredients:

2 1/2 pound of boneless chicken thighs, diced into 2 inch pieces

2 Cups of Diced Carrots

1 1/2 Cups of Diced Yellow Onion

1/2 Cup of Sliced Green Scallions

1/4 Cup of Honey

1/3 Cup of a Good Quality Honey or Molasses Sweetened BBQ Sauce (like this or this both gluten free)

Zest and Juice of 1 Large Orange (make sure your microplane grater is sharp to get all the zest like this one)

3 Tablespoons of Apple Cider Vinegar

2 Tablespoons of Coconut Aminos (find it here)

3 Tablespoons of Olive Oil (Garlic Infused if you are eating Low FodMap)

3 Cloves of Garlic, Minced

1 1/2 Teaspoons of Sea Salt, divided

3/4 Teaspoon of Ground Ginger

Directions: Preheat your oven to 375º degrees. Use a large oven-safe, non-stick skillet, or stainless steel pan.

Add one tablespoon of olive oil to the pan and warm over medium high heat. Add the diced carrot and onion and a half teaspoon of sea salt. Cook for 5 minutes, stirring occasionally. Remove the carrots and onions from the pan and set aside. Add the remaining two tablespoons of olive oil to the pan along with the garlic (or garlic infused olive oil) and let it just sizzle. Add the diced chicken. Your pan should still be over medium high heat. Don’t disturb the chicken for about five minutes or until it is browned on the bottom. With a large spatula, flip the chicken pieces to the other side, and brown that side for about five more minutes. Meanwhile, whisk together the orange juice, zest, honey, coconut aminos, ginger, cider vinegar, and bbq sauce. When the chicken is browned, add the carrots and onions back in and incorporate. Pour the sauce over the mixture, and let it come to a simmer. Pop the whole pan into the oven and bake for ten minutes. Remove from the oven. The sauce will have thickened just right and the chicken will be cooked through.


*Affiliate Link – I receive a very small commission (cents) when you purchase products I recommend through my Amazon links. I use these products myself and never recommend anything I haven’t tried and use regularly. The small commission helps me keep my blog up, so if you have enjoyed my posts and recipes, I appreciate your support. You don’t pay any extra for your products. Thank you.🙂

Orange Tarragon Chicken with Caramelized Pears

Tarragon imparts sweetness to sauteed pears. This chicken dish comes together quickly and tastes elegant.

orange-tarragon-chicken-and-caramelized-pears-plated

I received a fruit and nut gift basket this week as a gift, and it included organic pears which are delicious just plain when perfectly ripe…..so good! When you slice and cook them in some olive oil and add onions, they are divine, soft, savory and sweet. Then add some juicy chicken thighs, and you have a fantastic main dish!

Orange Tarragon Chicken with Caramelized Pears

Preheat oven 375º degrees.

Ingredients:

8 boneless chicken thighs

1 Ripe Pear, cored and sliced (it doesn’t need to be really ripe, but soft)

1 Yellow Onion, diced

Zest and Juice of Two Oranges

3 Tablespoons of Olive Oil

2 1/2 Teaspoons of Tarragon

1 1/2 Teaspoons of Herbamare Sea Salt Seasoning (this kind)

Directions: In a large oven proof skillet, add 2 tablespoons of olive oil and heat over medium high heat until warm. Add the pears and onion to the olive oil in the skillet, then sprinkle with 1/2 teaspoon of Herbamare and 1 teaspoon of tarragon. Cook for 5 to 10 minutes stirring occasionally until the pears and onion are soft and starting to caramelize.

pears-onion-tarragon-in-olive-oil

Meanwhile, cut each boneless chicken thigh into quarters and sprinkle with the remaining 1 1/2 teaspoons of tarragon and 1 teaspoon of Herbamare seasoning salt.

Remove the caramelized pear and onion from the pan and set aside. Add the last tablespoon of olive oil, and then the seasoned chicken. Sprinkle the orange zest onto the chicken. Sautee for 4 minutes then flip the chicken and cook for 4 more minutes. Add the orange juice to the pan and cook for 1 minute to reduce the juice. Stir in the pear and onion mixture. Place the pan in the oven for ten minutes.

Remove from the oven and serve and enjoy!

orange-tarragon-chicken-and-caramelized-pears

Eat Your Nutrients!

Eat Your Nutrients!


*Affiliate Link – I receive a small commission when you purchase products I recommend through my Amazon links. I use these products myself and never recommend anything I haven’t tried and use regularly. The small commission helps me keep my blog up, so if you have enjoyed my posts and recipes, I appreciate your support. You don’t pay any extra for your products. Thank you.🙂


Instant Pot Chuck Roast

Instant Pot Chuck Roast

Instant Chuck (in the Instant Pot)

An Instant Pot is an incredibly fast way to cook when you are busy and don’t have a lot of time to spend in the kitchen.  Making a pot roast takes time in the oven, about three to four hours to get it fork tender, but with an instant pot you can be ready to eat in about an hour. That is total cooking time, not total time you have to be in the kitchen. Once you get it going, you can walk away. Love it!

I added plenty of vegetable sides to make a healthy dinner. The bed of cabbage soaked up all the juices, and we had carrots and broccoli as well. You choose! 🙂

Instant Pot Chuck Roast

Ingredients:

3 lb. Chuck Roast (cubed into 1 1/2″ chunks)

1 Cup of Broth

1/2 Cup of Fresh Squeezed Orange Juice

1/2 Cup of Coconut Aminos here

2 Leeks, Sliced into rounds

3 Tablespoons of Umami Blend (recipe here)

2 Tablespoons of Honey

1 Tablespoon of Minced Fresh Ginger

cutting-chuck-roast-for-instant-pot

Directions: Cube the Chuck after you have seasoned both sides with Umami Herb Blend. Put the Beef into the instant pot. Whisk together the orange juice, coconut aminos, broth, honey and ginger. Pour over the beef and add the leeks. Place the top on your instant pot and seal the steam valve at the top. Press the Meat/Stew selection, and you are done. The chuck will cook for 35 minutes, then do a cool down. Release the steam valve, and after the steam is released, remove the top and that’s it! You have a delicious, fork tender roast in a third of the time!

chuck-roast-instant-pot


instant-pot-with-chuck-roast


chuck-roast-and-leeks-in-instant-pot


instant-pot-chuck-roast

Eat Your Nutrients!

Eat Your Nutrients!

*Affiliate Link – I receive a small commission when you purchase products I recommend through my Amazon links. I use these products myself and never recommend anything I haven’t tried and use regularly. The small commission helps me keep my blog up, so if you have enjoyed my posts and recipes, I appreciate your support. You don’t pay any extra for your products. Thank you.🙂

Easy Coconut Milk Whipped Cream Five Ways!

Whipped Cream is one of the great pleasure of life! Gosh, I have missed my coffee shop beverages with all that delicious whip on top after going dairy free! Just before Thanksgiving, I finally purchased my own professional whipped cream dispenser, and I am so glad I did. I have been enjoying whip on my Matcha Latte’s I make at home, and Coffee, and also whipped topping for dessert on Thanksgiving. I am having a blast with it! Look at the gorgeous ways you can use it! You can also use a hand held mixer to make this whipped cream. Make sure your coconut milk is very cold.

chocolate-cherry-coconut-milk-whipped-cream

So, I have five variations of whip to share with you today, and it is super easy! Here’s how!

a-medley-of-coconut-milk-whipped-creams

easy-coconut-milk-whipped-topping-5-ways

Directions to make Coconut Milk Whipped Cream:

Refrigerate a can of full fat coconut milk for a minimum of four hours so it is nice and chilled. This is the brand I recommend. Pour the coconut milk into a bowl with a pour spout, and whisk it until it is creamy and blended well. (If you are making it with a hand held mixer, scoop of the coconut cream and reserve the coconut water in the bottom for another use.) Add it to your Stainless Steel Whipped Cream Dispenser. You can get it here for a good price. You will also need the cartridges to charge your dispenser here. Screw the top onto the dispenser, and add the decorator tip. Charge it as directed with one charger. You will hear the air dispelling into the whipped cream in the can. Now shake it up. I found shaking it thoroughly and more than you think you need yields the best whip, so I shake my can up and down about 50 times. It’s a good arm workout too. 🙂

It’s ready to use. The five variations are easy and delightful! Another super fun thing to do is give company a choice of what variation they want to have because it is not incorporated into the whip itself.

Cacao Dusted Whip!

Cacao Dusted Whip!

  1. Sprinkle with a dusting of cinnamon
  2. Sprinkle with a dusting of raw cacao (substitute carob powder for AIP Paleo)
  3. Sprinkle with freeze dried Just Cherries. They are freeze dried and so crush beautifully. (here)
  4. Chocolate Cherry Whip! Sprinkle on a dusting of raw cacao and some crushed cherries!
  5. Whip it up with plain whip! Equally delicious.

If you would like your whipped cream sweetened, add in two tablespoons of organic powdered sugar and beat first with an electric mixer before pouring it into the dispenser.

Let me know what your favorite way to have your whip is! Share with me in the comments below, and also, has this inspired you to try different whip flavors of your own?

cocao-dusted-coconut-milk-whipped-cream

*Affiliate Link – I receive a small commission when you purchase products I recommend through my Amazon links. I use these products myself and never recommend anything I haven’t tried and use regularly. The small commission helps me keep my blog up, so if you have enjoyed my posts and recipes, I appreciate your support. You don’t pay any extra for your products. Thank you. 🙂

Date Sweetened Spice Muffins (Nut Free, Dairy Free, AIP Paleo)

Date Sweetened Spice Muffins (Nut Free, Dairy Free, AIP Paleo)

There is a new kid in town, and it is Tigernut Flour. I used it in a previous recipe here and am really liking it. It is not a nut at all but a tuber, and it acts as a prebiotic. Tigernut Flour has been around for over 4,000 years, and contains nutritional benefits like phosphorous, potassium, calcium, magnesium, iron, and vitamins E and C.

I have been experimenting with it in the kitchen during the last month, because I am all of a sudden reacting to nuts and nut flours. 😦 I also have found it is a good idea to rotate my food to avoid developing any other sensitivities. Also, after being almost two years free of SIBO and following a Low FodMap diet, I slowly added in safe starches to improve gut motility and feed the good bacteria I have been working so hard on. I was pleasantly surprised to find everything improved, and the SIBO did not return. I have been using Tapioca Starch, Arrowroot, and eating White Rice occasionally, all with very positive results.

Since I started my blog to empower myself to eat delicious foods on a restricted diet, the blog is evolving, as I have healed and have added in new ingredients, always seeking optimal health, energy and just plain feeling good. The addition of starches not only has helped my overall digestive system (in moderation), but is also helpful post workout for me!

All that aside, this recipe took some time, and I had some flops,  but I have to say, I am very, very happy with the results here! It is a muffin that is dense, with a pleasing, (not gummy, ewwww!) texture. The muffins are sweetened with just dates and have other whole foods in them like carrots, green plaintains, coconut oil and applesauce. I could eat them every day.

Date Sweetened Spice Muffins (Nut & Egg Free, AIP Paleo

This recipe makes 16 muffins. They freeze well also!

Date Sweetened Spice Muffins

Preheat your oven to 350º degrees. Line two muffin pans with 16 paper liners and set aside.

Ingredients:

1 Cup Dried Medjool Dates (about 8 large, soaked in warm water for ten minutes, pits removed)

2 1/2 Cups Shredded Carrots

2 Green Plantains (Difficulty finding plantains, Walmart has them. Plantains are cheap!)

1/2 Cup Applesauce (no sugar added, preferably organic)

1/2 Cup Tigernut Flour

1/4 Cup Coconut Flour

2 Tablespoons Coconut Oil (melted)

2 Tablespoons Ground Cinnamon

1 Teaspoon Baking Soda

1 Teaspoon Baking Powder (homemade corn free recipe here)

1/2 Teaspoon Sea Salt

1 Teaspoon Ground Ginger

1/4 Teaspoon Ground Cloves

1/4 Teaspoon Mace (or Nutmeg may be substituted if not AIP they are very similar)

Directions: In a food processor, puree the green, peeled plaintains, that have been cut into chunks, with the applesauce and dates (drained after soaking) until very smooth, about three to five minutes. Meanwhile, whisk together your dry ingredients. Add the carrots to the pureed plantain mixture and puree until smooth. Add in the dry ingredients and melted coconut oil. Pulse until thoroughly incorporated.

Scoop into the muffin papers with a muffin scoop.

Bake 30 to 40 minutes until the muffins spring back when touched with the tip of your finger.  I used a convection oven, so the cook time is a little shorter than a conventional oven. Remove from muffin tin and cool on a wire rack.

Wishing you and yours a very Happy and Blessed New Year!

  • Not recommended for those with SIBO


No Bake Peppermint Ice Caps

Ready for a yummy no bake recipe? Try these little two bite no bakes using mini muffin cups! Little hands can help make them.

They are ready in a jiffy!

No Bake Peppermint Ice Caps Collage

No Bake Peppermint Ice Caps

Directions: Line a mini muffin pan with 18 mini muffin papers.

Bottom Layer Ingredients:

1/2 Cup Coconut Butter, (Softened in the Microwave for 30 seconds)

1/4 Cup Carob Powder

2 Tablespoons Maple Sugar

2 Tablespoons Coconut Milk

2 Tablespoons Coconut Oil, Melted

1 Teaspoon Vanilla Extract, Alcohol Free for AIP

Blend the ingredients together with a hand-held electric mixer. Using a teaspoon cookie scoop, scoop and roll the mixture into balls. Then, press into the bottom of each mini muffin cup. If the mixture is soft at this point, freeze for 20 minutes before proceeding so you can press the top layer evenly onto the bottom. This will depend on how much you soften your coconut butter.

Top Layer:

1/2 Cup Coconut Butter (Warmed in the microwave for 30 seconds)

1 Tablespoon of Maple Sugar

1/8 Teaspoon of Peppermint Extract, Alcohol Free for AIP I use this

Blend together with a hand-held electric mixer. Scoop into scant 1 teaspoon balls and roll between your hands. Press onto the top of the bottom layer, and gently pat to the edges of the mini muffin cup.

Refrigerate for 1 hour. Serve.

Store in the refrigerator, or at room temperature.

Make 18

This recipe is part of the Phoenix Helix AIP Recipe Roundtable Roundup here!

Paleo AIP Recipe Roundtable