Snacks

Chocolate Nut Butter Cups

These rich little powerhouses of goodness are a great treat to have on hand! Just one of these is enough to satisfy a sweet tooth. You can offer these decadent cups to those who are gluten free, dairy free, health conscious or vegan.

Chocolate Nut Butter Cups - Raw Chocolate, Dairy and Gluten Free

As a chocolate lover, as most girls are, these are chocolate fudge creamy goodness! With raw cacao, cashew butter, pecans and coconut oil at the top of the list, there is a lot of healthy ingredients you can feel good about, and no refined sugar!

Chocolate Nut Butter Cups Healthier Snacking

Keep these in the freezer or refrigerator. I like the firmness the freezer gives them, you choose.

Nut Butter Cups No Refined Sugar Raw Cacao

Prep Time

30 minutes

Prep Notes

These are a lower sugar treat that has healthy fats and Superfood Raw Cacao Powder in them. They are a good choice when you want something sweet.

Cooking Time

60 minutes

Yields

Makes 24

Ingredients

For the Chocolate Portion:

1 Cup of Raw Cacao Powder

6 Tablespoons of Coconut Milk

5 Tablespoons of Coconut Oil

1/4 Cup of Almond or Cashew Butter

2 Tablespoons of Maple Syrup or Raw Honey

1 Teaspoon of Vanilla

3/4 Teaspoon of fine Sea Salt

For the Filling:

1 Cup of Raw Pecans

3 Tablespoons of Maple Syrup or Raw Honey

1/2 Teaspoon of Vanilla Extract

a pinch of Sea Salt

Directions

  1. Place Mini Muffin Cup liners in a 24 count Mini Muffin pan
  2. In a Medium bowl with an electric mixer, mix together all the chocolate ingredients, and set aside.
  3. In a food processor, grind the raw pecans until they are a fine crumb consistency. Add in the honey, vanilla and salt, and pulse until it holds together when you squeeze it.
  4. Place 1 teaspoon of chocolate mixture in the bottom of each muffin cup, and press flat and evenly with your fingers.
  5. Scoop a scant teaspoon of pecan filling onto each muffin cup and press flat and evenly to cover the chocolate bottom.
  6. Finely, add the remaining chocolate mixture to the tops of each chocolate butter cup and press evenly. It will be a scant teaspoon for each. It’s okay if they are not perfectly covered. They are pretty that way.
  7. Freeze for 30 minutes.

Notes

Store in the Freezer or Refrigerator in a sealed container.

Chocolate Nut Butter Cups! These are creamy and delicious with ingredients you can feel good about. Dairy Free, Gluten Free, Paleo, Vegan

Scrumptious Strawberry Mango Fruit Roll Ups

Fruit Roll Ups 4

Make some of these Scrumptious Strawberry, Mango fruit roll ups and store them in an airtight container for a quick, sweet and chewy, all natural snack.

Fruit Roll Ups 2

I make these in a food dehydrator and slice them into strips that are then rolled up in parchment paper and tied with a string. They are sweet and a little tart.

Fruit Rolls Ups 6

My kids love these packed in their lunches or as a grab and go snack. Clean and simple deliciousness!

Fruit Roll Up 1

Scrumptious Strawberry Mango Fruit Roll Ups

Ingredients:

2 Pints of Fresh Organic Strawberries

2 Ripe Mangoes

2 Tablespoons of Raw Honey

1 Tablespoon of Fresh Squeezed Lemon Juice

1 Tablespoon of Gelatin

2 Tablespoons of Hot Water

A Pinch of Sea Salt

Directions:

Clean and hull the strawberries and place them in a high speed blender. Clean, peel and pit the mangoes and add them to the blender with the strawberries. Add the honey, lemon juice and salt. Blend until pureed. Now you will add the gelatin. Heat 2 tablespoons of water in your microwave until very hot. Whisk in the gelatin until it is foamy. Pour this into the blender with the strawberry mango mixture and blend until smooth and incorporated.

Set out six dehydrator trays (my dehydrator is an Excalibur) and line them with non-stick drying sheets (like these). Pour the fruit roll up mixture evenly onto six sheets. Pick up the sheets and swirl by tipping them to spread then out into 8″ circles.

Dehydrate at 135° degrees for approximately 18 hours, or until they are no longer tacky in the center but not crispy. They should still be pliable.

Remove the fruit roll ups from the dehydrator and cool. After they are cool, using kitchen scissors or a sharp knife, slice each roll up into strips. Cut parchment the same width as the fruit strips and roll them up with the parchment. Tie with a string. Place them in a sealed container and store at room temperature.

\Scrumptious Strawberry Mango Fruit Roll Ups


Sweet Potato Toast Three Ways!

Sweet Potato Toast Three Ways

You can make a Large Batch of Sweet Potato Toast for dinner, tapas or appetizers with three different themes! What a way to pack in nutrients in a super delicious and gorgeous, eye appealing way! It’s like appetizers for dinner!!! Who wouldn’t love that?

Theses are quite simple to make. You don’t have to get your toaster out and stand there watching it batch after batch! I don’t really have time for that, and I’m sure you don’t either. You toast these in the oven! It works like a dream!

This recipe uses two medium sweet potatoes and toppings that add crunch, sweet and savory! Deliciousness!!!!

Sweet Potato Toast Three Ways, Dairy, Gluten and Grain Free for Tapas, Appetizers and a Fun Dinner

Sweet Potato Toast 3 Ways

2 Medium Sweet Potatoes (skin on)

1/4 Cup of Olive Oil

1 Ripe Mango

1 Avocado

Mayo (I used Avocado Oil Mayo)

Ranch Dressing (I used my SCD LowFodmap Recipe)

Apple Butter

1 Roasted Salmon Filet

Pumpkin Seeds (I used sprouted)

Fresh Basil

Green Olives, Sliced

Sea Salt

Pepper

Directions:

Preheat your oven to 400° degrees F. Scrub the sweet potatoes and slice lengthwise 1/2 inch thick leaving the skin on (the skin is very nutritious and holds the sweet potato toast together).

Lay the sweet potato toasts onto a parchment lined, rimmed baking sheet and brush with olive oil front and back. Sprinkle them with sea salt and pepper to taste. Roast the sweet potatoes for 40 minutes total, flipping them half way through.

In the same oven, roast a salmon filet brushed with olive oil, salt and pepper for 15 minutes, or until done.

Remove the sweet potatoes and salmon from the oven, and place on a cooling rack to cool. Now prepare your toppings.

Avocado Sweet Potato Toast – Spread mayo on first, then top with sliced avocado, sprinkle with sea salt, pepper and fresh torn basil.

Avocado Sweet Potato Toast

Mango Sweet Potato Toast – Spread apple butter on the sweet potato toast, then top with sliced mango and sprinkle with pumpkin seeds.

Mango Sweet Potato Toast

Salmon Sweet Potato Toast – Spread ranch dressing on the sweet potato toast, top with flaked salmon, sliced olive and scallions and a pinch of salt and pepper.

Salmon Sweet Potato Toast

I like to put these on a big cutting board in the middle of the table and let people choose!

Makes about 12 toasts – 4 of each kind

Have fun!

Make Sweet Potato Toast easily in your oven with three different toppings! Delicious for Tapas, Appetizers and a Fun Dinner!

Hidden Fruit and Veggie Chocolate Muffins Your Toddler Will Love!

While so many are obsessed with Keto lately, some of us are still just trying to get a toddler to eat their veggies!

fruitandveggiemuffinsinabasket

These Hidden Fruit and Veggie Muffins appeal to all ages, but if you are trying to get a toddler to eat more veggies, and his palate is just not there yet, these taste like regular ole chocolate muffins! They are quite nutritious and low in added sugar.

chocolatefruitandveggiemuffinscenter

My 2 year old Grandson, Theodore, gobbles these up happily! Sometimes he even eats two at a time!

theoeatingchocolatemuffin

Such a happy face!!! toddlerapproved

Hidden Fruit and Veggie Chocolate Muffins

Preheat your oven to 350° F.  Line a muffin pan with muffin liners.

Ingredients:

3 Eggs

1 15 oz. Can of Butternut Squash (I use Farmer’s Market Organic which is readily available in most grocery stores)

1/2 Cup of Diced Zucchini

1/2 Cup of Fresh or Frozen Blueberries (thawed)

1/2 Cup of Coconut Flour

1/4 Cup of Cacao Powder (I used this kind)

1/4 Cup of Avocado Oil or Olive Oil

1/4 Cup of Pure Maple Syrup

1 Teaspoon of Vanilla Extract

1 Teaspoon of Baking Powder (Here’s my DIY Corn Free Baking Powder Recipe)

1 Teaspoon of Cinnamon

1/2 Teaspoon of Sea Salt

1/2 Teaspoon of Baking Soda

Directions: It is so simple because we are using a food processor with a blade attachment. Add your eggs, diced zucchini, butternut squash and blueberries to the food processor and process until smooth. Add all the remaining ingredients and process for one minute. Scrape down the sides of the bowl, and process another 30 seconds.

Fill your muffin cups evenly. I like to use a muffin scoop. Bake in your preheated oven for 35 minutes, or until a toothpick inserted into the center of a muffin comes out clean.

Makes 12 Muffins

chocolatefruitandveggiemuffins4

thesemuffinsarechocolatelyandyourtoddlerwouldneverguessheiseatingfruitandveggies21glutenfree2cdairyfree2cgrainfree

*This post has affiliate links in it. I receive a very small commission if you purchase through my links. The small commission helps cover the cost of maintaining this blog. Thanks! 🙂


Apple Maple Coffee Cake with Maple Glaze

Apple Maple Coffee Cake with Maple Glaze Paleo

I’m sitting in my kitchen this morning listening to the rain pour down outside. It is really pleasing and cheerful after such a long hot and humid spell. It feels so refreshing after the oppressive heat. The air is cooler and more invigorating. I am envisioning everything getting washed fresh to bring in the new season.

Apple Maple Cake Grain Free Moist and Delicious

Because it is September, and the apples are in season, my mind always wanders to baked apples, warm cinnamon, cloves and spices.

What better way to welcome in the cooler weather than a coffee cake filled with delicious softly baked apples.

Whole Apple Maple Coffee Cake - Whole top View

Ming always gets frisky in the cooler weather, so we will be doing more outside walks. In the heat she just plops down and refuses to budge. Fawn pugs do have a double coat, which must be terribly hot. I can only imagine if I were wearing not one, but two coats in the hot weather, what I would do. Here she is in her beautiful new collar and leash from Pack Leashes. We always get her a brand new spiffy collar after Summer, and I found this company recently that donates 4 pounds of dog food to a no kill shelter with every purchase, plus their leashes are guaranteed for life! Gotta love that! You can get 20% off your purchase from me when shopping with them by using the code MINGANDLILY at checkout.

ming

I’ve recently been busy in my sewing room making quilts. In this case they are two panda quilts, one is finished, and I am almost done with the second. I’ve been sewing since I was in middle school. I made one of my prom dresses in high school, then when my husband and I bought our first home, I made window treatments, pillows, table runners and other home decor. When we had our little girls, I sewed them dresses and Halloween costumes and stuffed animals. Then a nice women in our town introduced me to quilting, and I found a whole new avenue that I really loved. Two years ago I opened an Etsy Shop, Porcupine Craft Studio.  You can visit if here: Right now I have many different bags available, and my daughter Jessica makes greeting cards using quilling art. The quilts will go in the shop in the next couple weeks. I find time to sew in the evenings, and I  find it relaxing and an enjoyable creative outlet.

Here’s my latest quilt.

Apple Maple c

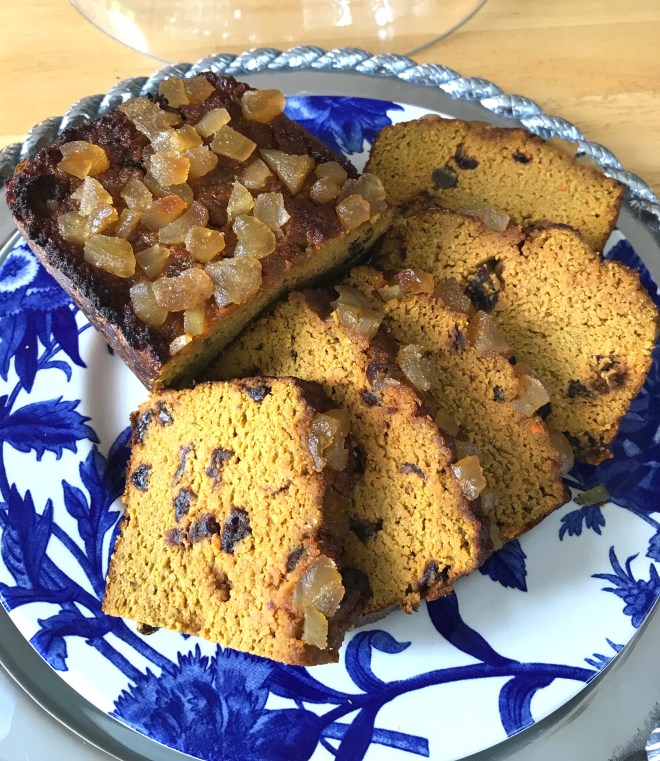
Back to the Apple Maple Coffee Cake! It is perfect for a rainy day or a sunny autumn day. This recipe is grain free, dairy free and nut free. I topped it with a creamy coconut butter maple frosting which is spread over the baked apple top. The cake is baked with the apples in the bottom, which makes them perfectly soft.

Apple Maple Coffee Cake with Maple Glaze

Preheat the oven to 350º degrees F.

Ingredients for the Cake:

3 Cups of Peeled, Cored and Sliced Apples

1/2 Cup of Maple Sugar

1/2 Cup Plus 2 Tablespoons of Coconut Flour

6 Pastured Eggs

1/4 Cup of Organic Shortening 

1/4 Cup of Coconut Butter

1 Tablespoon of Pure Vanilla Extract

1 Tablespoon of Fresh Lemon Juice

1 1/2 Teaspoon of Baking Soda

2 Teaspoons of Ground Cinnamon

1/4 Teaspoon of Nutmeg

1/4 Teaspoon of Ginger

1/4 Teaspoon of Allspice

1/8 Teaspoon of Cloves

1/4 Teaspoon of fine Sea Salt

Ingredients for the Maple Glaze:

1/2 Cup of Coconut Butter 

2 Tablespoons of Real Maple Syrup

Directions:

Grease an 8″ spring form or cake pan with organic shortening. Draw a round circle on parchment paper using the bottom of the cake pan as a template. Cut out the circle and place it in the bottom of the greased pan.

Place the peeled, sliced apples in the bottom of the pan in concentric circles starting on the outside and working your way in.

apples

In a food processor, add six eggs and the maple sugar. Process until creamy. Add the lemon juice, vanilla extract, coconut butter (soften the coconut butter just slightly for ten seconds in the microwave) and palm shortening, process until creamy. Add the coconut flour, baking soda, salt, and all the spices. Process for thirty seconds, then scrape down the sides of the processor, and process another minute. Scoop the cake batter over the apples and spread evenly over the apples to the sides of the pan.

*If using a spring form pan, I recommend placing it on a cookie sheet to bake in case of leakage.

Bake in your preheated oven for 45 to 55 minutes, or until a toothpick comes clean when poked in the middle of the cake with just a few crumbs on it.

Remove the coffee cake from the oven, and cool on a wire rack for ten minutes. Remove the sides of the spring form pan and cool completely. If using a cake pan, run a knife around the edges of the cake pan, and invert onto a wire rack to cool. When the cake is cooled, you are ready to make the glaze.

This is super simple and delicious. Soften a half cup of coconut butter in the microwave. Do this in ten second increments just until it is soft. Whisk in two tablespoons of pure maple syrup with a fork. Then, spread the glaze evenly over the coffee cake. Now it is all done and ready to serve.

You can absolutely pour this glaze over the cake when it is still warm and serve it that way too! There is nothing better than a warm coffee cake!

Apple Maple Coffee Cake with Maple Glaze. This cake is moist and perfect for Autumn. Grain, Dairy and Nut Free!

Superfood Cinnamon Goji Berry Muffins

Superfood Cinnamon Goji Muffins Gluten Free

How’s your August so far? The Summer is flying by, and I have been trying to soak up every minute of it by getting outside as much as possible. I have been taking these Superfood muffins with me! The Goji berries and cinnamon gives them a delicious earthy, whole grain flavor.

Superfood Cinnamon Goji Berry Muffins

My daughter, who is going to be a Senior this year, has her first job over the Summer at a very busy ice cream shop, and we are getting ready for Senior Portraits this month. It’s true, they grow up too fast. It’s been an adjustment for her younger sister, who is the baby of the family, but we have been enjoying Mother/Daughter one on one time.

What’s been your favorite thing so far about this Summer? I hope you are living with an attitude of abundance. There is always something that is good, and having a good attitude can completely change your outlook. Being happy and bright is a habit that can be cultivated until it just comes naturally, just as negative thoughts and attitudes are. Our bodies and health respond to our attitude, moods and beliefs. So, take time every day to do something you love, and also embrace your have to do’s. It really doesn’t serve us at all to moan and groan about having to clean, go to work, grocery shop, etc. Doing it with a good, can do attitude makes life so much better! Cultivate happiness.

So, here is this amazing muffin recipe that promotes health and tastes delicious!

Superfood Cinnamon Goji Berry Muffins

Soak your dried goji berries in water overnight in the refrigerator, or for two hours at room temperature making sure the berries are completely covered with water.

Ingredients:

1 1/2 Cups of Diced Zucchini

3 Eggs

1/2 Cup of Coconut Flour

1/2 Cup of Soaked Goji Berries (Like these), soaked and drained

1/4 Cup of Coconut Sugar

1/4 Cup of Coconut Milk

1/4 Cup of Avocado Oil

1 Tablespoon of Ground Cinnamon

1 Teaspoon of Vanilla Extract

1/2 Teaspoon of Baking Soda

1/4 Teaspoon of Sea Salt

Directions:

Preheat your oven to 350° degrees F. In a food processor, add your diced zucchini and process to make crumbs. Add the eggs, and puree. Now, add the coconut sugar, avocado oil, cinnamon, coconut milk and vanilla. Process until creamy. Add the coconut flour, baking soda, and salt, and process for one minute. Finally, add all but two tablespoons of the goji berries and pulse just until combined.

Scoop the muffin batter into 12 muffin cups lined with muffin papers and sprinkle the remaining goji berries on top of the muffins. Bake in your preheated oven 25 to 35 minutes, or until the muffins spring back to the touch. Remove them from the oven, and cool five minutes in the pan before transferring to a cooling rack.

Enjoy!

goji superfood muffins

Grain Free Superfood Muffins! Paleo, Dairy Free deliciousness!


Banana Crunch Cookies

Banana Crunch Cookies - Grain Free

Make these crunchy cookies reminiscent of banana cream pie and pecan sandies.

They have a wonderful caramel banana flavor and the texture of a pecan sandie.

Banana Crunch Cookies Grain Free AIP Paleo

Using banana chips is they key to the crunch! I crushed the banana chips to resemble chopped nuts, and stirred them into the dough. Then I sprinkled some extra crushed banana chips on top.

You can use honey or maple syrup in this recipe.

plate of banana crunch cookies - AIP Paleo

Banana Crunch Cookies

Ingredients:

1/2 Cup of Banana Chips (I use these. The ingredients are just bananas and coconut oil)

1/2 Cup of Coconut Flour

1/4 Cup of Avocado Oil

3 Tablespoons of Coconut Butter (softened)

2 Tablespoons of Coconut Sugar

2 Tablespoons of Honey or Maple Syrup

1 Tablespoon of Grass Fed Gelatin (I used this kind)

1/4 Teaspoon of Vanilla Powder (Vanilla Extract if not strict AIP)

1/4 Teaspoon of Ground Cinnamon

1/4 Teaspoon of Ground Mace

1/4 Teaspoon of Sea Salt

1/4 Teaspoon of Baking Soda

1/4 Teaspoon of Cream of Tartar

Directions:

Preheat your oven to 350° degrees F.

Lay out a cookie sheet lined with parchment paper.

Crush the banana chips using a small food processor (or you can put them in a ziplock back and pound them with a rolling pin until they resemble small chopped nuts).

In a medium mixing bowl, add the avocado oil. Then, sprinkle the oil with the grass fed gelatin, and beat with an electric hand-held mixer. Add the coconut sugar and honey, beat. Soften the coconut butter in the microwave for a few seconds, then add it to the bowl and beat until creamy and incorporated. Add the coconut flour, vanilla powder, cinnamon, mace, sea salt, baking soda and cream of tartar and mix until combined. Add 3 tablespoons of crushed banana chips to the cookie dough and mix. Reserve the remaining crushed banana for the tops. Using a tablespoon cookie scoop, scoop up the dough, then pack it firmly into the scoop before releasing it onto the prepared cookie sheet. You will have 9 cookies. Flatten each cookie with the palm of your hand. Sprinkle the remaining crushed banana chips evenly onto each cookie. Bake in your preheated oven for 9 minutes.

Cool completely on the cookie sheet.

Makes 9

Banana Crunch Cookies - Nut Free, Egg Free, Dairy Free, AIP Paleo

Carrot Cake Quick Loaf – Grain Free

Moist and delicious Carrot Cake Quick Bread? Yes, please! This quick bread recipe is grain and dairy free and lower in carbs. It has chopped crystallized ginger sprinkled on the top, raisins in the batter, and is sweetened with pure maple syrup! There are plenty of carrots and the warm spices of classic carrot cake! I like to snuggle up with a piece of this and a good book or my favorite Netflix series!

Carrot Cake Quick Loaf

The batter blends up quickly in a food processor, so there is no need to grate the carrots, which can be tedious. Line your baking pan with parchment to lift the loaf right out of the pan and have an easy clean up!

Carrot Cake Quick Bread Loaf

sliced carrot cake loaf

Carrot Cake Loaf

Preheat your oven to 325º degrees. Grease a 5″ x 7″ Loaf Pan and line it with parchment. I like to cut a piece to fit the long sides of the pan with some extra over the edges so I can simply lift it out of the pan. See photo below.

Ingredients:

3 Cups of Chopped Raw Carrots

6 Eggs

1/2 Cup plus 2 Tablespoons of Coconut Flour, scooped and leveled (I use this brand)

1/4 Cup of Apple Butter

1/2 Cup of Raisins

1/3 Cup of Avocado or Coconut Oil

1/4 Cup of Pure Maple Syrup

1 Teaspoon of Pure Vanilla Extract

2 Teaspoons of Cinnamon

1/2 Teaspoon of Ground Ginger

1/4 Teaspoon of Mace or Nutmeg

1/4 Teaspoon of Sea Salt

1/2 Teaspoon of Baking Soda

1/4 Cup of Candied Ginger, Chopped (omit for very strict Paleo as there is a bit of sugar here)

Directions:

Using a food processor with a blade, chop the carrots, processing until they are a crumble consistency. Add the eggs and blend until pureed with the carrots. Add the Coconut Flour and remaining ingredients, except the crystallized ginger for the top, and process for about two minutes, scraping the sides of the bowl a couple times with a rubber spatula. The coconut flour will start absorbing the liquid and be a nice cake-like batter. With a rubber spatula, scrape all the batter into your prepared loaf pan, and rap the pan on your counter a couple times to level the batter somewhat. Take your crystallized ginger and sprinkle it on the top of the batter. Bake in the oven for 1 hour 30 minutes keeping a close eye on the bread at the end. It is done when the loaf springs back in the center when touched with your finger.

Remove from the oven, and cool for ten minutes in the pan. Then, remove the loaf from the pan and cool completely on a wire rack before slicing.

Enjoy!

Grain Free Carrot Cake Loaf - Grain Free with Raisins, Maple Syrup and Crystalized Ginger! Paleo, Gluten and Dairy Free

Blueberry Lemon FroYo

Blueberry Lemon FroYo

Fro Yo is one of Summer’s simple pleasures! It has the frozen sensation and creaminess of ice cream, but has the benefit of being healthier, with more protein and probiotics to promote good gut micro flora. Why not take it up a notch further by making your own healthier version with less sugar and more real food goodness like fruit, pure honey, cinnamon and fresh Greek yogurt which is packed with calcium and protein? Here is an easy and super delicious recipe! Feel free to mix up the fruit you use.

Lemon Blueberry Fro Yo, Gut Healthy, No Refined Sugar, Real Ingredients Frozen Yogurt

BLUEBERRY LEMON FROYO

Ingredients:

3 Cups of Greek Yogurt (24 Hour Homemade Yogurt for SCD)

3 Cups of Frozen Blueberries

1/4 Cup of Honey

2 Tablespoons of Fresh Squeezed Lemon Juice

1 Tablespoon of Pure Vanilla Extract

1/2 Teaspoon of Ground Cinnamon

In a food processor, add all the ingredients and pulse, then blend until you have a smooth consistency with most of the blueberry smooth and creamy. Taste to make sure the sweetness is to your liking.

Place your FroYo base into an electric ice cream maker, and churn as directed on your machine. I used this one, and it took 30 minutes.

The FroYo is best eaten immediately, but you can freeze any leftovers in a sealed container, and let it thaw on your counter until soft enough to scoop.

Cookies and Fro Yo

You can find the recipe for the Cashew Lemon Cookies pictured here. 🙂


Grain Free Skillet Monster Cookie!

Grain Free Skillet Monster Cookie - Party Fun!

Fun Food is great for entertaining, and what is more fun that a giant monster cookie made in a cast iron skillet? Make it for your kids and their friends, but don’t forget the adults! They like to have fun too!

Skillet Monster Cookie (Paleo) - Fun Crowd Pleaser

Grain Free Skillet Monster Cookie

Preheat Oven 350º degrees F.

Ingredients:

2 Pastured Eggs

1/2 Cup of Coconut Flour (I Use This)

1/4 Cup of Pure Maple Syrup

1/2 Cup of Ghee, Butter (softened) or Olive Oil, plus 1 Tablespoon for Greasing the Pan

1 Teaspoon of Pure Vanilla Extract (Like This Gluten Free Brand)

1/2 Teaspoon of Sea Salt

1/2 Teaspoon of Baking Soda

1/3 Cup of Dried Cranberries

1/3 Cup of Dried Raisins

1/3 Cup of Raw Pecans

1/3 Cup of Dark Chocolate Chips (I use Enjoy Life)

Party Skillet Monster Cookie - Grain Free Delicious and Fun!

Directions:

In an 8″ Cast Iron Skillet, melt the Ghee or Butter and brush up the sides of the pan. If using olive oil just brush around the bottom and sides of the pan.

In a large mixing bowl, beat your eggs and Ghee, Butter or Olive Oil until creamy with a mixer. Add the maple syrup and vanilla and mix thoroughly. Sift together the coconut flour, salt and baking soda. Put the cookie dough into the greased skillet, and spread it evenly to the edges. Now, sprinkle the cranberries, raisins, pecans and chocolate chips on the top and press into the dough evenly.

Place the skillet into the preheated oven, and bake for 20 to 25 minutes, or until the edges are golden brown. Remove from the oven and what fun!….A beautiful, decadent skillet cookie! Great for a party or cookout!!!

For extra decadence, top the skillet cookie while still warm with coconut milk ice cream, like this recipe!

Crowd Pleasing Giant Cookie in a Skillet! Grain Free, Paleo with a Dairy Free Option!