Tag Archives: Grain Free

Pumpkin Spice Muffins with Chocolate Chips and Raisins – (Toddler Approved!)

Happy Fall Y’all! It’s officially here, and I have a new Pumpkin Spice Muffin recipe for you with Chocolate Chips and Raisins that is grain free and Toddler Approved! My Grandson, Theodore, was here yesterday when I was testing them, and he LOVES them! Look at the pictures of him enjoying one below! πŸ™‚ These muffins are sweetened with maple syrup, have healthy olive oil in them, pumpkin, raisins, spices, and my favorite allergen free dark chocolate chips!

Pumpkin Spice Muffins with Chocolate Chips and Raisins - Grain Free

Here is my little grandson who is 13 months old eating one. He was saying “Mmmmmm!” as he ate it!

Toddler Grandson Enjoying a Pumpkin Spice Chocolate Chip Muffin baked by Mimi

Yup, he totally loved them!

Toddler Approved Pumpkin Spice Muffins with Chocolate Chips and Raisins

Healthy muffins are great to have on hand, so I like that this recipe makes a larger batch. You can also freeze half of them.

Pumpkin Spice Muffins with Chocolate Chips and Raisins Toddler Approved!

Pumpkin Spice Muffin - halved

Pumpkin Spice Muffins with Chocolate Chips and Raisins (Toddler Approved!)

Preheat your oven to 350ΒΊ degrees F. Lay out two muffin pans with muffin wrappers. I like these unbleached natural baking cups. They never stick and there are no dyes in them. This recipe makes 17 muffins.

Ingredients For The Batter:

6 Pastured Eggs

1 Can of Pumpkin (I use this organic brand)

1/2 Cup of Coconut Flour

1/4 Cup of Olive Oil

1/4 Cup of Pure Maple Syrup

1/2 Cup of Raisins

1/2 Cup of Dark Chocolate Chips (I use this allergen free brand that is delicious!)

1 Teaspoon Vanilla Extract

1 Teaspoon Fresh Lemon Juice

1/2 Teaspoon Baking Soda

1/2 Teaspoon of Cinnamon

1/2 Teaspoon of Ground Ginger

1/4 Teaspoon of Sea Salt

1/8 Teaspoon of Ground Cloves

a pinch of Nutmeg or Mace

Ingredients for the Topping:

1/3 Cup of Raisins

1/3 Cup of Dark Chocolate Chips

Directions:

In a large mixing bowl, add the eggs, pumpkin, olive oil, maple syrup, vanilla and lemon juice. Beat with a hand held electric mixer until combined. Add the coconut flour, salt, spices and baking soda, and blend for two minutes. Fold in 1/2 cup of raisins and 1/2 cup of dark chocolate chips.

Scoop the batter with a muffin scoop into your prepared muffin pan. In a small bowl, mix together the raisins and chocolate chips. Then, sprinkle evenly on top of the muffins. tap very gently into the batter.

Bake in your preheated oven for 25 minutes, or until the tops spring bake when touched.

Remove from the oven, and cool for five minutes, then remove from the muffin tins and cool completely on a wire rack.

Enjoy these delicious pumpkin spice treats, and share them with those you love! πŸ™‚

Sam

Pumpkin Spice Muffins with Chocolate Chips and Raisins - Gluten Free


Griddle Burger and Sandwich Buns – Coconut Flour

These savory griddle buns are the perfect vessel for burgers and sandwiches! They have carrots and scallions in them and are nutritious, delicious and grain free! These are great for egg sandwiches, meatloaf sandwiches, and burgers of all kinds. Top it with my Tomato Basil Jam recipe and your eyes will roll to the back of your head. πŸ™‚ Leave out the scallions and make a nut butter and blueberry jelly sandwich using my Blueberry Spoon Fruit recipe!

Griddle Burger and Sandwich Buns (Carrot Scallion)

I used steamed carrots in this recipe, and they would be equally delicious with pumpkin or butternut squash, so feel free to switch it up. The pumpkin would be very handy if you didn’t have time to steam the carrots.

Griddle Burger and Sandwich Buns

Griddle Burger and Sandwich Buns

Ingredients:

  • 3 Tablespoons Coconut Milk or Almond Milk
  • 1/2 Cup ofΒ Β Coconut Flour
  • 2 Cups Steamed Carrots, Mashed (or substitute butternut or pumpkin)
  • 2 Scallions, green parts only for Low FodMap, thinly sliced
  • 4 Eggs
  • 1/4 Cup of Olive Oil, Coconut Oil or Ghee
  • 1/2 teaspoon Sea Salt orΒ Β Himalayan Pink Sea Salt
  • 1/4 teaspoon Baking Soda

Directions:

Preheat a large electric griddle to 350ΒΊ F degrees.

These are easy and quick! Add all your ingredients to a food processor, and blend until smooth.Β  Let batter sit for 5 minutes.

Then, brush the griddle lightly with olive oil. With a muffin scoop or 1/4 cup measure, scoop the batter onto the griddle, and spread with the back of a spoon to rounds about the thickness of pancakes. Cook until golden brown, and then flip and cook the other side, just like you would a pancake. Cool on a wire rack.

Makes ten buns or five sets of sandwich buns.

You can make a double batch and freeze these for weeknight ease!

Have a fabulous day!

Sam πŸ™‚

Health Benefits of Pumpkin and Recipes!

What better way to celebrate the Autumn season than making recipes with pumpkin and reaping the health benefits too! Pumpkin is great for eye health, delivering a 100% RDA of Vitamin A in just half a cup. It is a healthy source of fiber, and theΒ beta-carotene andΒ carotenoids in orange vegetables like pumpkin may help prevent cancer and keep wrinkles at bay! (A diet rich in a large variety of fruits and vegetables will keep your skin glowing and your body at it’s best). Pumpkin is a good source of Vitamin C , Vitamin E, Potassium and trace minerals. I have some of my favorite pumpkin recipes listed below. I just love Fall!

XOXO

Sam

43580275 - 10 health benefits information of pumpkin. nutrients infographic

Delicious Ways to Eat Pumpkin – Recipes!!!

Frosted Jackolantern Pumpkin Cookies

Grain Free Pumpkin Spice Coffee Cake

Pumpkin Cranberry Biscotti

Pumpkin Creme Brulee

Pumpkin Pecan Quick Bread (Grain Free)

Pumpkin Spice Coffee Creamer

Pumpkin Chocolate Chip Mug Muffin

Holiday Pumpkin Vanilla Bean Tart

References:

Medicinal and Biological Potential of Pumpkin Pub Med

8 Impressive Health Benefits of Pumpkin Huffington Post

Pumpkin Nutrition University of Illinois

What Are Pumpkins Good For? Food Facts Mercola

Pumpkin: Health Benefits and Nutritional Breakdown Medical News Today

Butternut Squash Soup with Roasted Chicken and Vegetables

Hello! How’s your September going? My two girls have both started high school this year. I have been getting my gardens in shape and doing some Fall decorating.

Autumn is just around the corner, and this is a hearty, warming soup full of delicious nutrition! It is rib sticking healthy comfort food that you will want to make again and again this fall and winter!

Butternut Squash Soup with Roasted Chicken and Vegetables - Paleo

This soup is pure goodness in a bowl and pretty enough to serve to and impress guests! I love the rich creaminess of the soup and the toppings that you can sink your teeth into…..my kind of soup in the Fall! The fresh parsley adds brightness to the flavor, and the cumin and coriander give the soup an earthy richness. The honey, djon and splash of apple cider vinegar add that extra zing or umami.

Hearty Butternut Squash Soup with Roasted Chicken and Vegetables

Roasting vegetables makes them sweeter tasting and the browning adds flavor, flavor and more flavor! I am in love with this bowl of soup, and I think you will be too. πŸ™‚

Butternut Squash Soup with Roasted Chicken and Vegetables

Butternut Squash Soup with Roasted Chicken and Vegetables

Ingredients for Soup Base:

1 Butternut Squash (peeled, seeded and cubed)

6 Carrots (peeled and sliced)

2 Leeks (white parts, sliced)

1/4 Cup of Olive Oil

1 Tablespoon of Ground Cumin

1 Teaspoon of Sea Salt

1 Teaspoon of Coriander

1 Teaspoon of Ground Fennel

1 Quart of Low Sodium Chicken Broth (I used this)

1/2 Cup of Coconut Milk (I used Thrive Brand with no additives)

1 Tablespoon of Dijon Mustard

1 Tablespoon of Honey

1 Tablespoon of Apple Cider Vinegar

1 1/2 Teaspoons of Dried Oregano

1 Teaspoon of Turmeric


Ingredients for the Soup Topping:

1 Whole Roasted Chicken (I like to batch roast two chickens and use one for the soup)

3 Cups of Brussels Sprouts (halved)

3 Cups of Fennel (chopped)

2 Tablespoons of Olive Oil

1/4 Teaspoon of Sea Salt

1/4 Cup of Chopped Fresh Parsley (for topping)

Directions:

Preheat the oven to 400ΒΊ degrees. In a large bowl, toss together the butternut, carrots and leeks with the olive oil, ground cumin, coriander, ground fennel and sea salt. Then, lay out your cubed Butternut, Carrots and Leeks on one, or two, parchment lined cookie sheets. The vegetables should be in a single layer. Roast the vegetables in your preheated oven for 40 minutes.

In a large stock pan, add the roasted vegetables and 1 quart of good quality low sodium chicken stock, the cider vinegar, honey, dijon, oregano and turmeric. Bring to a high simmer, and simmer for ten minutes. Cool slightly, then add the soup to a blender in two batches and puree, or use an immersion blender. Add the soup back to the pot. Salt to taste if needed.

While the soup base simmers, toss the Brussels sprouts and fennel with the 2 tablespoons of olive oil and 1/4 teaspoon of sea salt, and roast for 20 minutes in your 400ΒΊ degree oven. While the vegetables are roasting, shred 3 cups of roasted chicken and warm it.

To serve:

Ladle the soup into a bowl, top generously with shredded chicken, the roasted Brussels sprouts and fennel, and sprinkle with chopped parsley.

Yum, a delicious, hot and hearty main dish soup full of nourishment and healthy comfort!

Serves 6

Enjoy your day!

Sandra


Grain Free Spice Cake with Dairy Free Maple Buttercream and Blackberry Swirl

Birthday Spice Cake with Vanilla Blackberry Buttercream

It was my birthday this week, and I am a self-professed cake addict! So what is a girl gone grain free to do when she misses her traditional spice cake, comes from an artisanal baking background, and wants something fancy for her birthday dessert? Well it’s been on my to do list to make a celebration cake recipe of my own for a few years now, and I finally did, with some inspiration from some of my favorite traditional baking books and my love of blackberries!

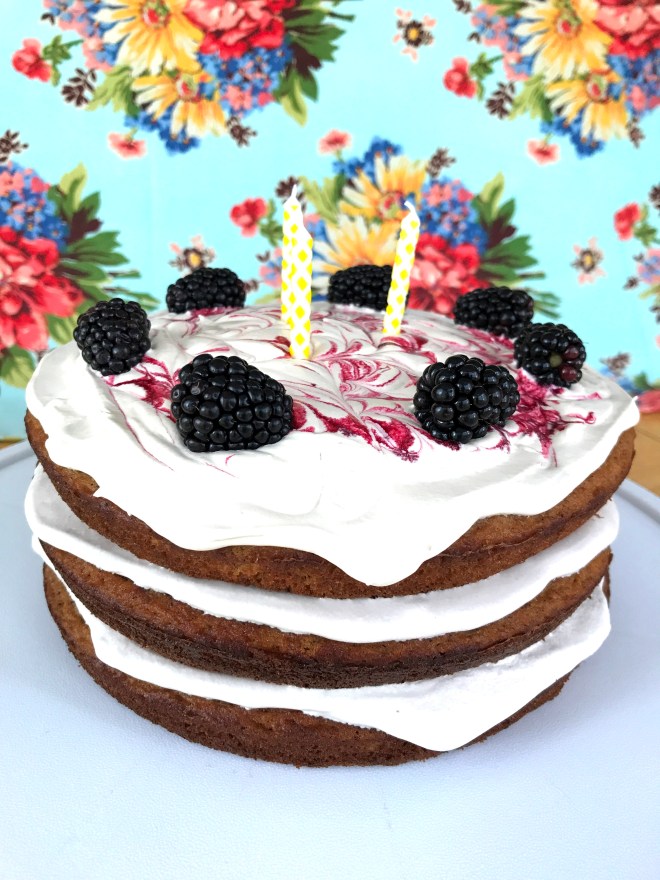
I made this cake with three layers. The recipe is written for individual layers so that you have the option to make two or three layers for your cake depending on how many servings you need. Three layers makes the cake look more impressive and serves twelve people, two layers will serve eight.

Grain Free Spice Cake with Dairy Free Maple Buttercream and Blackberry Swirl

For the Cake:

Preheat the oven to 350ΒΊ degrees F.

Grease 8″ cake pans with organic shortening, and line the bottoms with parchment paper cut into a circle to fit the pan. I do this by setting the pan on top of the parchment and drawing a circle around the outside of the pan with a pencil and then cutting out the circle.

Ingredients:

1/3 Cup of Coconut Flour

3 Pastured Eggs

1/3 Cup of Coconut Milk

1/4 Cup of Applesauce (no sugar added)

2 Tablespoons of Olive Oil

2 Tablespoons of Maple Syrup

1 Teaspoon of Pure Vanilla Extract

1/2 Teaspoon of Baking Soda

1/2 Teaspoon of Cinnamon

1/4 Teaspoon of Ground Ginger

1/4 Teaspoon of fine Sea Salt

1/8 Teaspoon of Cloves

1/8 Teaspoon of Nutmeg

1/2 Teaspoon of Fresh Lemon Juice (this is added at the end to activate the baking soda)

Directions:

Add the eggs and coconut milk to a mixing bowl. Beat with a hand held electric mixer. Add the remaining wet ingredients except the lemon juice, and mix with for one minute. In a separate bowl, whisk together the dry ingredients. Add the dry ingredients in two batches to the wet ingredients, mixing for one minute after each addition. Finally, add the fresh lemon juice and mix for approximately 30 seconds. Pour the cake batter into the prepared pan and bake for 35 minutes or until a toothpick comes out clean when inserted into the center of the cake.

Cool on a wire rack for five minutes before removing the cake from the pan and cooling completely on a wire rack.

Grain Free Birthday Cake with Vanilla Blackberry Buttercream

Blackberry Syrup

You can make the syrup up to three days in advance. But you can also make it on the day you bake the cake. It is straightforward and cools quickly.

Ingredients:

1 pint of fresh blackberries

1/4 cup of honey

pinch of salt

Directions:

Reserve seven blackberries for the top of the cake. Place the remaining blackberries, honey and pinch of salt into a small saucepan, and bring it to a boil over medium-high heat. After it comes to a boil, reduce the heat, and simmer the blackberries, honey and salt for ten minutes on the stove. Using a fine mesh sieve and a bowl, pour the blackberries into the sieve over the bowl, and gently press the juices into the bowl. Discard the pulp and seeds. Cool in the refrigerator or let cool at room temperature. Set aside for when you are ready to decorate the top of the cake. You will want to make sure it is completely cool before swirling in on the top of your frosting.

Dairy Free Maple Buttercream

The inspiration for this buttercream comes from Joanne Chang owner of Boston’s Flour Bakery!

Ingredients:

1 1/2 Cups of Maple Sugar

6 Egg Whites

1 1/2 Cups of Organic Shortening

1 Teaspoon of Vanilla Extract

1/4 Teaspoon of Sea Salt

Directions:

In a medium metal mixing bowl, whisk together the eggs and maple sugar. Place the pan on top of a simmering pot of water to create a double boiler. The water should be about 4 inches deep and not able to touch the bowl with the egg slurry in it. Whisk the egg and sugar occasionally for about 6 to 8 minutes until it is hot to the touch. It should be 160ΒΊ degrees. I used a thermometer to test.

Pour the egg and sugar into bowl of a stand mixer fitted with a whip attachment, or you can use a hand-held mixer. Whip on medium-high until you get a beautiful white fluffy meringue. Turn the mixer to low and slowly add the shortening to the meringue one dollop at a time (about a tablespoon) until all the shortening is incorporated into the meringue. Increase the speed back to medium, and beat for 2 to 3 additional minutes. The buttercream should be smooth. Add the vanilla and salt and continue to beat for another 1 to 2 minutes.

It you are not using the buttercream within 30 minutes, refrigerate until you are ready to do so, and then fluff it with the mixer before spreading onto the cake.

Now, get your blackberry syrup and lets frost! Your cake is cooled right?

Grain Free Birthday Spice Cake

To frost the cake. Place a dollop of frosting on your cake stand, and place the first cake round on top of it. This helps keep the cake in place. Spread frosting on the first layer out to the edges. Place the second layer on top, and repeat if you are using a third layer. Place the last layer on the cake and then with an offset spatula frost the sides of the cake as you turn the stand. Now, frost the top of the cake. After the cake is frosted the way you like it, place small spoonfuls of the blackberry syrup artfully around the cake. Make the marbled design by drawing the sharp tip of a knife through the syrup repeatedly from one side to the other and through your syrup dollops to create a marbling effect. Let your inner artist shine! πŸ™‚ Top with the reserved blackberries. Refrigerate the cake until you are ready to serve it.

It’s time to celebrate!!!


Farmhouse Jumbo Molasses Cookies

Molasses has such an earthy, rich flavor, and it has vitamins and minerals in it unlike it’s refined sugar counterpart. I revamped this old family favorite to make it refined sugar free and grain free and bring you a bit of the old fashioned farmhouse feel. The flavor is outstanding in this soft cookie with cinnamon, ginger and cloves! I have tested it on 1-year-olds, teens, and my hubby and tweaked them four times before getting them how I wanted them.

Farmhouse Jumbo Molasses Cookies made with Coconut Flour

Farmhouse Jumbo Molasses Cookies – Grain Free, Refined Sugar Free, Paleo

Here is an article about some of the benefits of blackstrap molasses from Natural Living Ideas – 10 Blackstrap Molasses Benefits That Will Convince You To Get A Jar.

Farmhouse Jumbo Molasses Cookies

Makes 7 – 8 Jumbo Cookies

Preheat the oven to 350ΒΊ degrees. Line two cookie sheets with parchment paper.

Ingredients:

3 Eggs

1/4 Cup of Blackstrap Molasses (I use this kind)

1/4 Cup of Pure Maple Syrup

1/4 Cup of Coconut Oil (soft but not melted)

1/2 Cup of Coconut Flour

1/2 Teaspoon of Pure Vanilla Extract

1/2 Teaspoon of Cider Vinegar

1 Teaspoon of Baking Soda

1/4 Teaspoon of Sea Salt

1 Teaspoon of Cinnamon

1 Teaspoon of Ginger

1/2 Teaspoon of Cloves

4 Teaspoons of Coconut Sugar for the tops of the Cookies

Directions:

In a large bowl with a hand held electric mixer, cream together the eggs and coconut oil. Add the molasses, maple syrup, and vanilla extract. Beat until creamy and combined. In a separate bowl, whisk together the dry ingredients except the coconut sugar. Add half the dry ingredients to the wet and mix until combined. Add the second half of the flour mixture and beat for one minute. Add the apple cider vinegar. This will activate the baking soda. Beat for approximately 30 seconds. Set the cookie dough aside for five minutes and grab the coconut sugar. This allows the coconut flour to absorb the wet ingredients. With a large muffin sized scoop or a 1/4 cup measure, scoop balls of cookie dough onto your parchment lined cookie sheets, spacing them three inches apart. Sprinkle each cookie with 1/2 teaspoon of coconut sugar. With three fingers, gently press down on the cookies to flatten evenly. See photo below. The coconut sugar keeps the dough from sticking to your hands when you press, and it adds a nice crunch to the top.

Pressing Farmhouse Jumbo Molasses Cookies

Bake in your preheated oven for 13 to 15 Minutes just until set. If you over bake them, they will not be as moist as they could be, and who doesn’t like a moist cookie?

Farmhouse Jumbo Molasses Cookies - Gluten Free

Farmhouse Jumbo Molasses Cookies – Gluten Free, Grain Free

Remove the cookies from the oven and cool on the cookie sheets.

Farmhouse Jumbo Molasses Cookies - Dairy and Gluten Free

Farmhouse Jumbo Molasses Cookies – Dairy and Gluten Free Made with Coconut Flour

These keep at room temperature for three days, and they freeze exceptionally well!

Enjoy!

Eat Your Nutrients!


Chicken Pizza Paillards

Chicken Pizza Paillairds

Paillards is a French term for pounded or thinly sliced meat. Paillards are quick cooking and tender. For these Chicken Pizza Paillards, I used Primal Palate’s Super Gyro Seasoning Blend. It is my favorite gluten free seasoning blend ofΒ Himalayan pink salt oregano, marjoram, thyme, and garlic. This is a fabulous, juicy chicken dish! A quick tip I got from Rachel Ray, buy boneless chicken breasts in bulk for savings, and pound them into paillards and freeze between sheets of parchment. Then when you want to make a quick cooking chicken dinner, you can just pull the amount you want out of the freezer. They thaw very quickly!

Chicken Pizza Paillards

Ingredients:

4 Boneless Chicken Breasts

16 Oz. of White Button Mushrooms, Sliced

6 Tablespoons Olive Oil

Pizza Sauce (I used Muir Glen Organic which has no Sugar Added)

Fresh Basil, Chopped

3 Tablespoons of Aged Balsamic Vinegar (my favorite is 18 year old from Fustinis)

Super Gyro Seasoning Blend

Sea Salt

Directions: Preheat your oven to 350Β° degrees F. Pound the chicken breasts to about a half inch thick using a meat pounder, and cover the chicken with plastic wrap when pounding to prevent splatter. Slice the mushrooms, and add them to a cast iron skillet with 3 tablespoons of the olive oil. Sprinkle with a generous double pinch of sea salt, and cook over medium high heat for ten to fifteen minutes until nice and golden brown. When they are golden brown, add in 3 tablespoons of aged balsamic vinegar and cook until it has evaporated and infused into the mushrooms. Set aside.

In a large nonstick, oven-safe skillet, add the last 3 tablespoons of olive oil and heat over medium high heat. Season your pounded chicken generously with Super Gyro Seasoning by Primal Palate on both sides. (A nice even coat. The amount depends on the surface area of your chicken. I like to be generous) Add the seasoned chicken to the hot skillet and cook for 4 minutes a side or until golden brown on each side. Now, pop the chicken into the oven for five minutes, or until the center of the chicken reaches 165Β° degrees. While the chicken is in the oven, heat up the pizza sauce.

Remove the chicken from the oven and top each breast with the hot pizza sauce, 1/4 of the mushrooms and sprinkle with chopped basil.

Enjoy!

Sandra

web-site-chractor-color-corrected

Chicken Pizza Paillards

Pumpkin Seed Pesto

Pumpkin Seed Pesto - Rich in Zinc and Nutrients

Pumpkin Seeds are rich in zinc, magnesium and plant based omega-3s. But, did you know they make a pretty amazing tasting pesto? Well they do! They almost taste cheesy, and they make a very creamy pesto dip!

This recipe is currently my new favorite dip/spread! It’s quick and easy to make!

Pumpkin Seed Pesto

Ingredients:

1 Cup Fresh Basil, lightly packed

3/4 of Olive Oil

1/2 Cup of Raw Pumpkin Seeds (the kind that are shelled, I use these)

1 Clove of Fresh Garlic (or you can use garlic infused olive oil)

1 Tablespoon of Fresh Lemon Juice

1 1/2 Teaspoons of Sea Salt

1 Teaspoon of Aged Balsamic Vinegar

Directions: Blend the ingredients in a high speed blender until smooth and creamy. Store in the refrigerator.

Perfect for serving with an appetizer tray. It also makes a delicious sauce to drizzle on chicken and seafood as well as salad!

Enjoy!

Sandra Shields, Certified Health Coach


Grain Free Peach Cobbler

Grain Free Peach Cobbler on a Spoon

The peaches are fresh, juicy, ripe, and begging to be baked into something with cinnamon and nutmeg. There is nothing like peach season for eating peaches! They are at their most excellent and not to be missed! Peaches are sweet juicy pleasures, but they also are packed with health benefits and a broad range of nutrients!

The fiber in peaches helps keep you regular, they are rich inΒ ascorbic acid and zinc (which also has anti-aging properties) to aid your immune system, rich in vitamin C and flavonoids for healthy skin, and contain the carotenoids lutein and zeaxanthin for eye health.

The batter for the cobbler features coconut flour, pastured eggs and natural maple syrup as the sweetener.

Grain Free Peach Cobbler

Grain Free Peach Cobbler

Preheat your oven to 350Β° degrees.Β Grease a 8″ x 8″ square pan with coconut oil.

Ingredients for Filling:

4 cups of peaches, peeled, pitted and sliced (about 4 peaches)

1/4 Cup of Maple Syrup (I used local)

2 Tablespoons of Lemon Juice (fresh squeezed)

1/2 Teaspoon of Cinnamon

1/4 Teaspoon of Nutmeg

1/8 Teaspoon of Sea Salt

Toss the peaches and filling ingredients together in a bowl, and set aside to let them start releasing some of their juices.

Ingredients for Cobbler Topping:

1/3 Cup of Coconut Flour (I use this brand) scooped and leveled, it makes a big difference with coconut flour how it is measured!

1/3 Cup of Coconut Milk

2 Tablespoons of Melted Coconut Oil

3 Pastured Eggs

1/4 Cup of Applesauce (no sugar added)

1 Teaspoon of Vanilla Extract (gluten free here)

1/2 Teaspoon of Fresh Squeezed Lemon Juice

1/2 Teaspoon of Baking Soda

1/4 Teaspoon of Cinnamon, plus more for sprinkling the top before baking

Directions:

In a medium mixing bowl, add the eggs and beat with an electric hand mixer until frothy. Add your coconut milk and beat. Slowly pour in the melted coconut oil while beating. Add the applesauce, vanilla extract and lemon juice and blend. Sift together the coconut flour, cinnamon and baking soda. Add it to the egg mixture, and mix with the electric mixer for one minute. It will thicken.

After mixing up the cobbler topping, pour your peach filling into the prepared 8″ x 8″ square pan. Dollop the cobbler batter on top as desired and sprinkle with some additional cinnamon, about 1/4 teaspoon, no need to be perfect with this, just a pinch or so though.

Bake in your preheated oven for 30 minutes. The peaches should be bubbling and the cobbler topping golden brown. Remove from the oven, and cool slightly before serving warm. You can also reheat any leftover cobbler quickly in the microwave if you want to eat it warm.

Sliced Peaches in Pan for Grain Free Cobbler

Peach Cobbler Filling

Batter on Peaches for Baking a Grain Free Cobbler

Ready to Bake above.

Serves Six

Enjoy!

Sandra

*Affiliate Link – I receive a very small commission (cents) when you purchase products I recommend through my Amazon links. I use these products myself and never recommend anything I haven’t tried and use regularly. The small commission helps me keep my blog up, so if you have enjoyed my posts and recipes, I appreciate your support. You don’t pay any extra for your products. Thank you.πŸ™‚


Mango Cashew Chicken Salad

Mango Cashew Chicken Dinner Salad

This salad is inspired by one of my favorite salads from Red Mesa Grill in Northern Michigan. I order it every year from their gluten free menu and it is so good, I decided to recreate it at home adding my own spin on it.

Mango Cashew Chicken Summer Salad

The salad has a delicious combination of sweet juicy mango, crunchy cashews, tart cranberries, onion and roasted chicken. The mango dressing is bursting with vitamin C. It is a perfect Summer main dish salad!

Mango Cashew Chicken Salad

Mango Cashew Chicken Salad

Begin with making a marinade for the chicken breasts:

Marinade:

1/4 Cup of Olive Oil

Zest and Juice of 1 Lime

2 Cloves of Smashed Garlic

2 Tablespoons of Apple Cider Vinegar

1/2 Teaspoon of Sea Salt

Whisk the marinade together well. Add 4 boneless, skinless chicken breasts to a gallon zip bag, and pour the marinade over the chicken. Seal the bag, and place it flat in the refrigerator for 3 hours, flipping once halfway through to ensure the chicken is evenly seasoned. You can refrigerate the chicken for up to 24 hours in the marinade.

Now prepare your salad dressing.

Mango Salad Dressing

Mango Salad Dressing:

Ingredients;

1 1/4 Cup of Ripe Mango, diced

1/4 Cup of Good Olive Oil

2 Tablespoons of Fresh Squeezed Lime Juice

2 Tablespoons of Fresh Cilantro

2 Tablespoons of Raw Apple Cider Vinegar (I use this kind)

1 Green Onion, sliced

1 Teaspoon of fine Sea Salt (I like this brand)

Blend the mango and olive oil in a blender until completely smooth and creamy. Add the lime juice, salt and cider vinegar and blend to incorporate. Now, add the fresh scallion and cilantro, and pulse the blender just until you can see tiny bits of scallion and cilantro. You want to be able to see it and not completely incorporate it into the dressing.

Refrigerate the dressing. This will keep 3 days in the refrigerator.

Now to make the salad! πŸ™‚

Mango Cashew Chicken Salad Prep

Mango Cashew Chicken Salad Ingredients:

4 Boneless, Skinless Chicken Breasts

1 – 5 oz. Container of Organic Baby Romaine, washed and spun dry

1/2 Head of Organic Iceberg Lettuce, washed, spun dry and torn into bite-sized pieces

1 Ripe Mango, Diced in to 1 inch pieces

1/2 Cup of Salted or Raw Cashews

1/4 Cup of Apple Juice Sweetened Dried Cranberries (I use this brand)

1/4 Cup of Green Onion, Sliced

1/4 Cup of Red Onion, Finely Diced

Additional Sea Salt for Sprinkling

Directions:

Preheat the oven to 375Β° degrees. In a cast iron skillet, add 2 tablespoons of olive oil and heat on medium-high. Remove the chicken breasts from the marinade, and sprinkle them with additional sea salt, and add them to the pan. Brown the breasts two minutes per side, until golden brown, but not cooked through. Place the chicken on a baking sheet, and place them in the preheated oven. Bake for 20 minutes or just until the chicken reaches 165Β° at the center. Remove the chicken from the oven, and set aside to cool while you prepare the rest of the salad.

Mound the salad greens in a large bowl. Drizzle with a generous amount of Mango Salad Dressing. Sprinkle the mango, cashews, cranberries, green onion and red onion on top. Slice your cooked chicken breasts on a diagonal (they can still be warm) and arrange the breasts on the top of the salad. Sprinkle with some additional sea salt to taste.

Serve!

4 Large Dinner Sized Servings (1 Chicken Breast per person)


1 5 6 7 14