Tag Archives: Gluten Free

Tuscan Herb Spreadable Bean Dip

Tuscan Herb Spreadable Dip

Spreadable dips are perfect for all those Summer vegetables coming to market!

This dip is great year round on carrots, celery, cucumbers and healthy crackers. It is also terrific in a wrap. I have been particularly enjoying this on endive and with tender asparagus spears, and I’ve also been folding tender spring lettuces around it. It’s sooo good and versatile.

Tuscan Herb Spreadable Dip Healthy and Versatile. Vegetarian, Gluten and Dairy Free

Prep Time

10 minutes

Prep Notes

n/a

Cooking Time

n/a

Yields

10 servings

Ingredients

1 15. oz can of White Kidney Beans (aka Cannellini Beans) I use Eden Organic BPA Free

2 Tablespoons of Rice Vinegar

2 Tablespoons of Garlic Infused Olive Oil (or two cloves of minced garlic and EVOO)

2 Tablespoons of Minced Green Onion

1 1/2 Tablespoons of Minced Fresh Parsley

1/2 Tablespoon of Nutritional Yeast

1/2 Teaspoon of Sea Salt

1/4 Teaspoon of Black Pepper

Directions

  1. Combine the can of drained and rinsed beans, vinegar, garlic infused oil, nutritional yeast, sea salt and black pepper in a food processor.
  2. Process until smooth and creamy, scraping the sides of the bowl a couple of times. 
  3. Transfer to a bowl.
  4. Add green onions and parsley, and mix with a spoon.
  5. Taste and adjust seasonings as necessary.
  6. Serve with cut up veggies or chips.

Creamy Garlic and Herb Bean Dip Gluten and Dairy Free

Beans are a versatile protein rich source of fiber and vitamins, and they make a terrific spread! I hope you enjoy making and using this.

Please send me photos of how you are using this. I love to hear from you!

Tuscan Herb Spreadable Bean Dip. A delicious creamy, protein rich vegetarian accompaniment. Gluten Free & Dairy Free

Nutty Chocolate Peanut Butter Crispies

Calling all Chocolate and Peanut Butter Lovers! There is no need to sweat or slave in the kitchen with these no bake bars. You can be in and out in just under 20 minutes without starting your oven.

Nutty Chocolate Crispy Bars

These delicious bars are sweetened with pure Maple Syrup and have natural peanut butter in them along with whole grain brown rice crispies! They also have half the sugar of a traditional crispy treat!

Nutty Chocolate Crispy Bars, Dairy and Gluten Free

In fact, even with the chocolate chips they still contain just about half the amount of sugars that those famous marshmallow treats do. Chocolate and peanut butter are a classic pair, and the nut butter bumps up the nutrition of this bar with protein, plus there are whole grains from the brown rice cereal.

Peanut butter is the bomb in these, but feel free to exchange it for other nut butters if you desire.

Nutty Chocolate Peanut Butter Crispies

Prep Time

5 minutes

Cooking Time

10 minutes

Yields

12 servings

Ingredients

1 Cup of Natural Peanut Butter with just salt added no sugar

1/2 Cup of Pure Maple Syrup

1/2 Cup of Enjoy Life Dark Chocolate Chips or dark chocolate chips of your choice

2 Tablespoons of Coconut Oil, Butter or Ghee

3 Cups of Brown Rice Crispies Cereal (I use Erewhon Brown Rice Cereal)

1/2 Teaspoon of Vanilla Extract

Directions

  1. Grease a square baking dish with a neutral flavored oil (or butter if preferred).
  2. Add the syrup, coconut oil, vanilla and peanut butter to a medium saucepan.
  3. Heat over low heat until creamy and smooth.
  4. Stir in the chocolate chips until they melt.
  5. Remove from heat and stir in rice crispies.
  6. Gently press into your prepared baking dish and allow mixture to set until firm and cool. (about 30 minutes).
  7. Cut into squares and enjoy!

You may have noticed that I am now writing recipes outside of the Paleo template, but you will still see plenty of Paleo friendly recipes. I personally still eat Paleo 80% of the time, but I have developed sensitivities to some of the major Paleo foods used in baking……coconut and almonds. So, I have experimented, had a new food sensitivity lab test, and have found I am doing well with a broader range of healthy choices. All my recipes will continue to be Gluten Free.

Life is a journey, and I hope it is a journey for all who are seeking to better health and happiness!

Food should be a part of the celebration of life, and is meant to be enjoyed. It should help us thrive however, and not hinder our ability to have energy and vitality, as well as longevity. There is a time to celebrate and let go a little, because there is a danger in becoming too rigid beyond what is necessary. However, I have myself been really sick and helped myself greatly through food. Our bio-individuality makes us all unique.

Now go make some delicious, better for you, Nutty Chocolate Peanut Butter Crispies and share them with your friends, kids and family!

XOXO

Sandra

Nutty Chocolate Peanut Butter Crispies! Gluten Free and a Dairy Free Option with Half the Sugar


Creamy Cannellini Bean Salad for your next Backyard BBQ

Cannellini Bean Salad for a Creamy Side or Burger and Sandwich Topper

Cannellini Beans, which are white kidney beans, have to be one of the creamiest beans I have ever had.

The fact that they are white makes them very eye appealing when cooking them with other bright colors like red onion and herbs.

Cannellini Bean Salad Keeping It Real

This Cannellini Bean Salad is reminiscent of a good potato salad. The texture and flavor reminds me of it.

I started making this recipe several months ago, and my kids have been requesting it, so I finally decided it was time to blog it.

Cannellini Bean Salad for your Backyard BBQ's

I always buy my canned beans from Eden Organics, because when beans are not properly prepared, they can be difficult to digest, and I like the way Eden prepares them. I personally don’t react to them. Eden Organics prepares all their beans by first washing and soaking them overnight before pressure cooking them, which thoroughly inactivates the lectins that can cause gas, bloating and difficulties with digestion. They also use BPA Free cans, and their beans contain no additives.

Creamy Cannellini Bean Salad

You can go crazy with this salad by adding it on top of burgers and in sandwiches or just eat it as it was originally intended, as a side. But if you’re like me, you push the boundaries.

I have a new dip I will share soon using Cannellini Beans that is super good too! You gotta love these creamy beans and their versatility!

Beans are healthy when prepared properly and contain plant based protein and fiber along with vitamins, minerals, folic acid, potassium, and zinc. Their complex carbs also provide crash free energy.

Creamy Cannellini Bean Salad

1 Can of Eden Organics Cannellini Beans, drained and rinsed

1/3 Cup of Diced Red Onion

1/3 Cup of Diced Celery

1/4 Cup of Good Mayo (I use this brand)

1 Tablespoon of Apple Cider Vinegar

1 Tablespoon of Yellow Mustard

1 Tablespoon of Fresh Lemon Juice

1/4 Teaspoon of Dried Dill

1/4 Teaspoon of Dried Parsley

1/4 Teaspoon of Sea Salt

1/4 Teaspoon of Black Pepper

Directions:

Place Cannellini Beans into a medium bowl and very roughly mash them with a fork. You only want them to be partially mashed. But you can play with this to make them to your liking. Add the diced onion and celery and toss.

In a separate bowl whisk together the remaining ingredients for the dressing. Fold the dressing into the beans, onion and celery. Refrigerate for one hour. This salad will last three days in the refrigerator.

Creamy Cannellini Bean Salad for your next Backyard BBQ - Keeping It Real. This recipe is Dairy Free and is Naturally Gluten Free and Vegetarian

*This post has affiliate links in it. I receive a very small commission if you purchase through my links. The small commission helps cover the cost of maintaining this blog. Thanks! 🙂

Chocolate Nut Butter Cups

These rich little powerhouses of goodness are a great treat to have on hand! Just one of these is enough to satisfy a sweet tooth. You can offer these decadent cups to those who are gluten free, dairy free, health conscious or vegan.

Chocolate Nut Butter Cups - Raw Chocolate, Dairy and Gluten Free

As a chocolate lover, as most girls are, these are chocolate fudge creamy goodness! With raw cacao, cashew butter, pecans and coconut oil at the top of the list, there is a lot of healthy ingredients you can feel good about, and no refined sugar!

Chocolate Nut Butter Cups Healthier Snacking

Keep these in the freezer or refrigerator. I like the firmness the freezer gives them, you choose.

Nut Butter Cups No Refined Sugar Raw Cacao

Prep Time

30 minutes

Prep Notes

These are a lower sugar treat that has healthy fats and Superfood Raw Cacao Powder in them. They are a good choice when you want something sweet.

Cooking Time

60 minutes

Yields

Makes 24

Ingredients

For the Chocolate Portion:

1 Cup of Raw Cacao Powder

6 Tablespoons of Coconut Milk

5 Tablespoons of Coconut Oil

1/4 Cup of Almond or Cashew Butter

2 Tablespoons of Maple Syrup or Raw Honey

1 Teaspoon of Vanilla

3/4 Teaspoon of fine Sea Salt

For the Filling:

1 Cup of Raw Pecans

3 Tablespoons of Maple Syrup or Raw Honey

1/2 Teaspoon of Vanilla Extract

a pinch of Sea Salt

Directions

  1. Place Mini Muffin Cup liners in a 24 count Mini Muffin pan
  2. In a Medium bowl with an electric mixer, mix together all the chocolate ingredients, and set aside.
  3. In a food processor, grind the raw pecans until they are a fine crumb consistency. Add in the honey, vanilla and salt, and pulse until it holds together when you squeeze it.
  4. Place 1 teaspoon of chocolate mixture in the bottom of each muffin cup, and press flat and evenly with your fingers.
  5. Scoop a scant teaspoon of pecan filling onto each muffin cup and press flat and evenly to cover the chocolate bottom.
  6. Finely, add the remaining chocolate mixture to the tops of each chocolate butter cup and press evenly. It will be a scant teaspoon for each. It’s okay if they are not perfectly covered. They are pretty that way.
  7. Freeze for 30 minutes.

Notes

Store in the Freezer or Refrigerator in a sealed container.

Chocolate Nut Butter Cups! These are creamy and delicious with ingredients you can feel good about. Dairy Free, Gluten Free, Paleo, Vegan

Scrumptious Strawberry Mango Fruit Roll Ups

Fruit Roll Ups 4

Make some of these Scrumptious Strawberry, Mango fruit roll ups and store them in an airtight container for a quick, sweet and chewy, all natural snack.

Fruit Roll Ups 2

I make these in a food dehydrator and slice them into strips that are then rolled up in parchment paper and tied with a string. They are sweet and a little tart.

Fruit Rolls Ups 6

My kids love these packed in their lunches or as a grab and go snack. Clean and simple deliciousness!

Fruit Roll Up 1

Scrumptious Strawberry Mango Fruit Roll Ups

Ingredients:

2 Pints of Fresh Organic Strawberries

2 Ripe Mangoes

2 Tablespoons of Raw Honey

1 Tablespoon of Fresh Squeezed Lemon Juice

1 Tablespoon of Gelatin

2 Tablespoons of Hot Water

A Pinch of Sea Salt

Directions:

Clean and hull the strawberries and place them in a high speed blender. Clean, peel and pit the mangoes and add them to the blender with the strawberries. Add the honey, lemon juice and salt. Blend until pureed. Now you will add the gelatin. Heat 2 tablespoons of water in your microwave until very hot. Whisk in the gelatin until it is foamy. Pour this into the blender with the strawberry mango mixture and blend until smooth and incorporated.

Set out six dehydrator trays (my dehydrator is an Excalibur) and line them with non-stick drying sheets (like these). Pour the fruit roll up mixture evenly onto six sheets. Pick up the sheets and swirl by tipping them to spread then out into 8″ circles.

Dehydrate at 135° degrees for approximately 18 hours, or until they are no longer tacky in the center but not crispy. They should still be pliable.

Remove the fruit roll ups from the dehydrator and cool. After they are cool, using kitchen scissors or a sharp knife, slice each roll up into strips. Cut parchment the same width as the fruit strips and roll them up with the parchment. Tie with a string. Place them in a sealed container and store at room temperature.

\Scrumptious Strawberry Mango Fruit Roll Ups


Honey Lavender Macaroons

Spring always gets me thinking of the lavender fields!

Honey Lavender Macaroons Gluten Free

I have to say that lavender is one of my favorite perennials and scents. Have you ever walked through a lavender field? I visit a lavender farm at least once a year, and the smell of the lavender is heady! It is also lovely in baking when used subtly to enhance other flavors like honey or lemon.

Here is a picture I snapped last Summer when I was visiting a lavender farm in Northern Michigan! Heady! This is where I get my culinary lavender, but you can also find it on Amazon.

lavendar-fields

Honey Lavender Macaroons Gluten, Dairy and Egg Free

Today I am making a cookie that is just lovely for Springtime, and it has local honey and culinary lavender in the recipe!

Honey Lavender Spring Macaroons

When using lavender for baking, choose culinary lavender. While almost all lavender can be used in cooking, culinary lavender is the sweetest.

Honey Lavender Macaroons Egg Free

Honey Lavender Macaroons

Preheat your oven to 325° Degrees F.

Ingredients:

1 1/2 Cups of Finely Shredded Coconut (Unsweetened like this)

1/2 Cup of Coconut Butter (softened a few seconds in the microwave)

1/3 Cup of Honey

2 Tablespoons of Coconut Flour

2 Tablespoons of Gelatin

2 Tablespoons of Coconut Milk

1 Teaspoon of Culinary Lavender, Crushed (I used a mortar and pestle)

1/4 Teaspoon of Sea Salt

1/4 Teaspoon of Baking Soda

A pinch of Vanilla Bean Powder (or 1/4 teaspoon of Vanilla Extract if not making AIP)

Directions:

With an electric hand held mixer, beat together the coconut butter and honey until creamy. Add the coconut milk and beat. Beat in the shredded coconut. Sift together the crushed lavender, coconut flour, gelatin, baking soda and salt. Beat into the macaroon dough until completely incorporated. The dough will be stiff.

With a tablespoon cookie scoop, scoop the macaroons and place them on a parchment lined baking sheet.

Bake in your preheated oven for 10 minutes, or until the tips of the coconut are turning a golden brown. Remove from the oven, and cool completely. Enjoy!

Makes 16

Honey Lavender Macaroons are so light and delicious for Spring! These are Gluten, Grain, Dairy and Egg Free and AIP Paleo!

*This post has affiliate links in it. I receive a very small commission if you purchase through my links. The small commission helps cover the cost of maintaining this blog. Thanks! 🙂


Chocolate Covered Banana Pops 3 Ways! Chocolate Raspberry, Toasted Coconut and Pecan!

Banana Pops on a tray and napkins
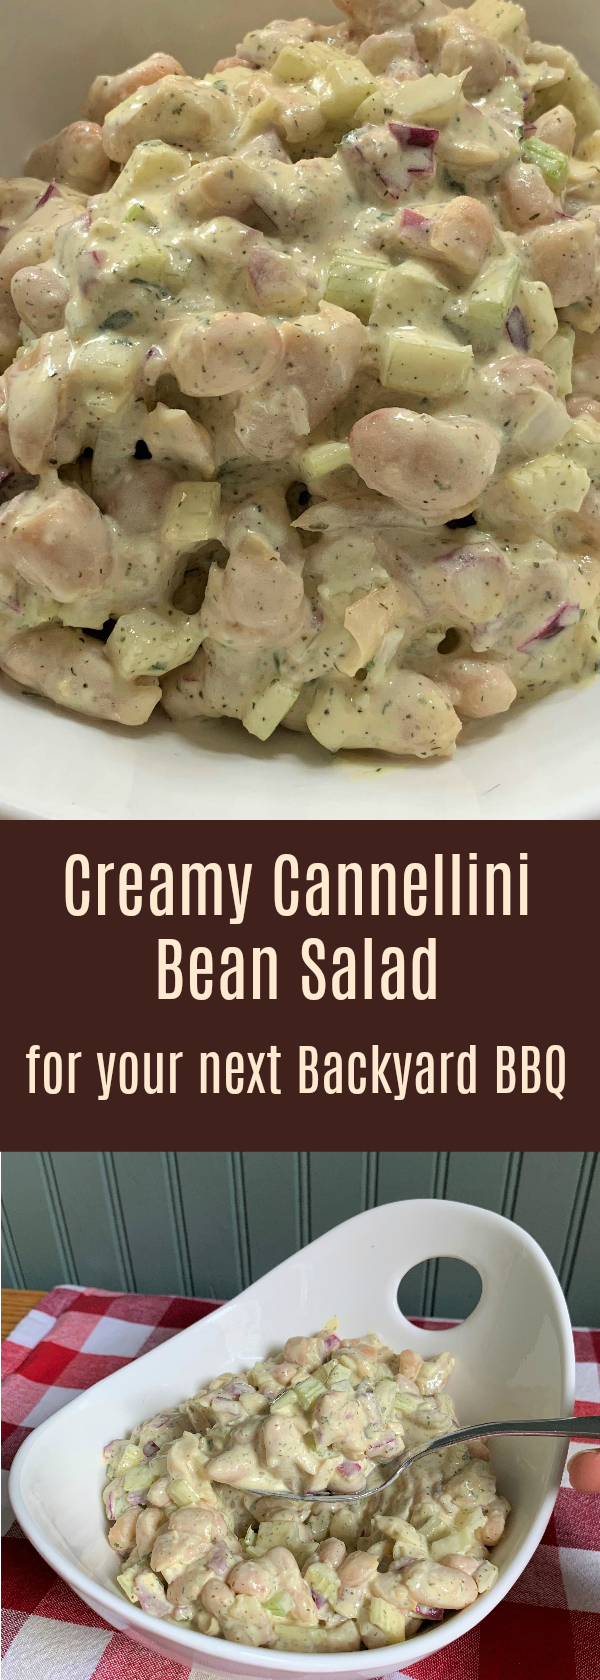
Banana Pops are a delicious healthy treat that you can make at home! They are beautiful and perfect for cravings! Seriously good!

Chocolate Covered Banana Pops on a stick

Kids love these too. Roll them in their favorite toppings, and if they are picky, make them plain dipped chocolate.

Yummy Yummy Banana Pops

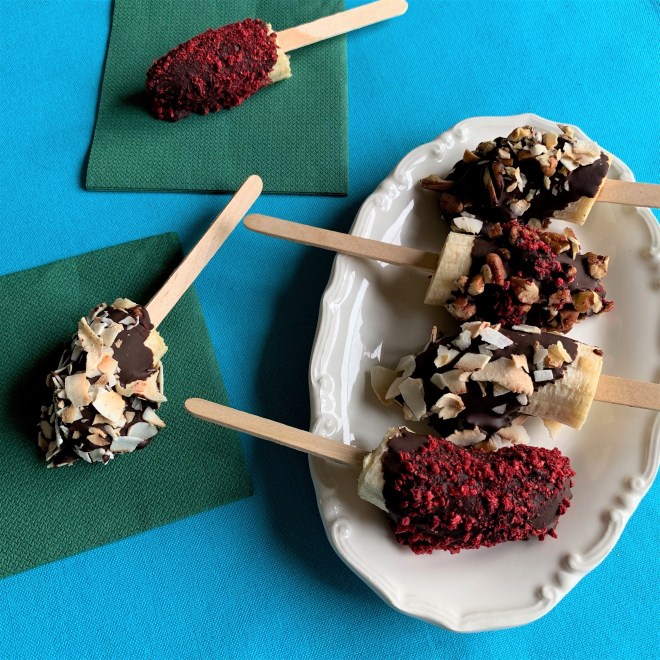
There is a vast amount of toppings that you can roll these in, so go with your favorites. But I have to say, these three varieties are Very, Very delicious.

Chocolate Dipped Banana Pops on a cookie sheet

The raspberry has that tart flavor that contrasts beautifully with the dark chocolate cashew butter coating.

Raspberry Banana Pop

The toasted coconut is crunchy and delightful on the outside. Yum!

Chocolate Banana Pop with Toasted Coconut

If you love nuts on your hot fudge sundaes or in your ice cream, then the pecan version is yours!

I also combined the pecans and raspberries and pecans and coconut in some of the banana pops!

Yummy Yummy Banana Pops

Why not make a variety batch to please everyone?

Banana Pops 5

Super simple, fun and easy to make, you can definitely include the kids in making these!

Chocolate Covered Banana Pops 3 Ways

Ingredients:

5 yellow bananas (not too ripe, yellow with no brown spots)

9 oz. of Dark Chocolate Chips (I used this allergy free kind)

1/3 Cup of Cashew Butter (I used this Maple Sweetened brand)

1/2 Teaspoon of Pure Vanilla Extract

2/3 Cup of Toasted Unsweetened Coconut Flakes (like these)

2/3 Cup of Crushed Freeze Dried Raspberries (I used this organic brand)

2/3 Cup of Chopped Pecans

Popsicle Sticks

Directions:

Slice your bananas into equal thirds, and insert a Popsicle stick halfway into one end. Prepare a parchment lined baking sheet or two.

If you bought pre-toasted coconut flakes, crush them slightly with your hands, and place them onto a salad sized plate. If you would like to toast your own. Place unsweetened coconut flakes onto a cookie sheet, and toast them in a 350° oven for ten minutes, stirring once. Cool then crush.

Blitz your freeze dried raspberries in a mini food processor, or put them in a ziplock bag and crush them with a rolling pin.

Chop your pecans. Put all your toppings on individual salad plates in a row.

Melt the Chocolate Chips, Cashew Butter and Vanilla Extract together in a double broiler, stirring to combine.

After the chocolate mixture has melted and is stirred until creamy, set the pan in a row like this: bananas, melted chocolate, toppings, parchment lined cookie sheet.

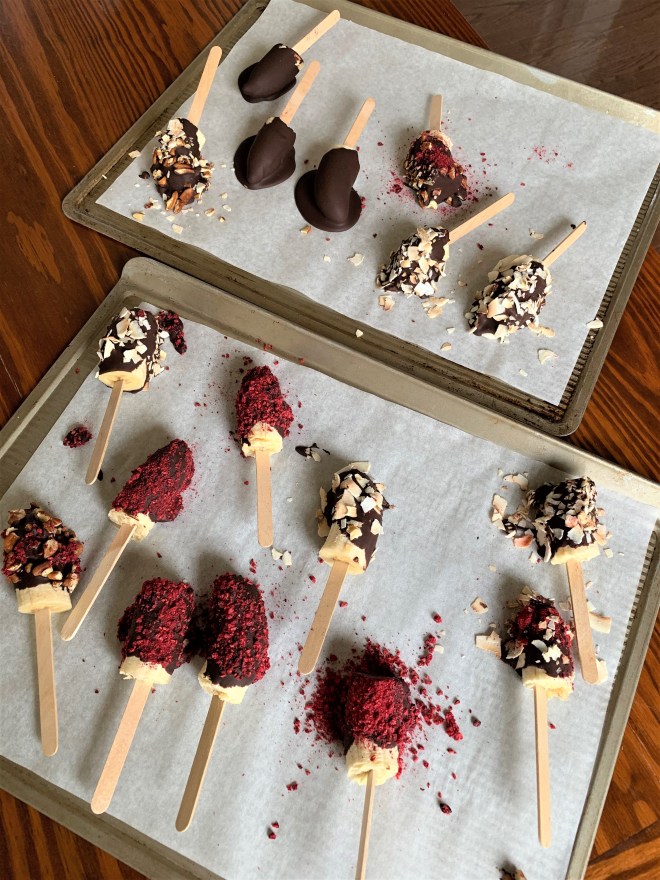
Dip your bananas 3/4 of the way into the melted chocolate. Let the excess drip off. Then, roll in the topping of your choice. Set the dipped and rolled bananas on the parchment lined cookie sheet.

When all your bananas are dipped, place them into the freezer for one hour. They are ready to eat. Store the bananas in an airtight container in the freezer.

Makes 15 Banana Pops

Chocolate Covered Banana Pops 3 Ways! A healthy frozen treat with melted dark chocolate and cashew butter. These are dipped and rolled in toppings. Dairy and Gluten Free!

*This post has affiliate links in it. I receive a very small commission if you purchase through my links. The small commission helps cover the cost of maintaining this blog. Thanks! 🙂


Sweet Potato Toast Three Ways!

Sweet Potato Toast Three Ways

You can make a Large Batch of Sweet Potato Toast for dinner, tapas or appetizers with three different themes! What a way to pack in nutrients in a super delicious and gorgeous, eye appealing way! It’s like appetizers for dinner!!! Who wouldn’t love that?

Theses are quite simple to make. You don’t have to get your toaster out and stand there watching it batch after batch! I don’t really have time for that, and I’m sure you don’t either. You toast these in the oven! It works like a dream!

This recipe uses two medium sweet potatoes and toppings that add crunch, sweet and savory! Deliciousness!!!!

Sweet Potato Toast Three Ways, Dairy, Gluten and Grain Free for Tapas, Appetizers and a Fun Dinner

Sweet Potato Toast 3 Ways

2 Medium Sweet Potatoes (skin on)

1/4 Cup of Olive Oil

1 Ripe Mango

1 Avocado

Mayo (I used Avocado Oil Mayo)

Ranch Dressing (I used my SCD LowFodmap Recipe)

Apple Butter

1 Roasted Salmon Filet

Pumpkin Seeds (I used sprouted)

Fresh Basil

Green Olives, Sliced

Sea Salt

Pepper

Directions:

Preheat your oven to 400° degrees F. Scrub the sweet potatoes and slice lengthwise 1/2 inch thick leaving the skin on (the skin is very nutritious and holds the sweet potato toast together).

Lay the sweet potato toasts onto a parchment lined, rimmed baking sheet and brush with olive oil front and back. Sprinkle them with sea salt and pepper to taste. Roast the sweet potatoes for 40 minutes total, flipping them half way through.

In the same oven, roast a salmon filet brushed with olive oil, salt and pepper for 15 minutes, or until done.

Remove the sweet potatoes and salmon from the oven, and place on a cooling rack to cool. Now prepare your toppings.

Avocado Sweet Potato Toast – Spread mayo on first, then top with sliced avocado, sprinkle with sea salt, pepper and fresh torn basil.

Avocado Sweet Potato Toast

Mango Sweet Potato Toast – Spread apple butter on the sweet potato toast, then top with sliced mango and sprinkle with pumpkin seeds.

Mango Sweet Potato Toast

Salmon Sweet Potato Toast – Spread ranch dressing on the sweet potato toast, top with flaked salmon, sliced olive and scallions and a pinch of salt and pepper.

Salmon Sweet Potato Toast

I like to put these on a big cutting board in the middle of the table and let people choose!

Makes about 12 toasts – 4 of each kind

Have fun!

Make Sweet Potato Toast easily in your oven with three different toppings! Delicious for Tapas, Appetizers and a Fun Dinner!

Hidden Fruit and Veggie Chocolate Muffins Your Toddler Will Love!

While so many are obsessed with Keto lately, some of us are still just trying to get a toddler to eat their veggies!

fruitandveggiemuffinsinabasket

These Hidden Fruit and Veggie Muffins appeal to all ages, but if you are trying to get a toddler to eat more veggies, and his palate is just not there yet, these taste like regular ole chocolate muffins! They are quite nutritious and low in added sugar.

chocolatefruitandveggiemuffinscenter

My 2 year old Grandson, Theodore, gobbles these up happily! Sometimes he even eats two at a time!

theoeatingchocolatemuffin

Such a happy face!!! toddlerapproved

Hidden Fruit and Veggie Chocolate Muffins

Preheat your oven to 350° F.  Line a muffin pan with muffin liners.

Ingredients:

3 Eggs

1 15 oz. Can of Butternut Squash (I use Farmer’s Market Organic which is readily available in most grocery stores)

1/2 Cup of Diced Zucchini

1/2 Cup of Fresh or Frozen Blueberries (thawed)

1/2 Cup of Coconut Flour

1/4 Cup of Cacao Powder (I used this kind)

1/4 Cup of Avocado Oil or Olive Oil

1/4 Cup of Pure Maple Syrup

1 Teaspoon of Vanilla Extract

1 Teaspoon of Baking Powder (Here’s my DIY Corn Free Baking Powder Recipe)

1 Teaspoon of Cinnamon

1/2 Teaspoon of Sea Salt

1/2 Teaspoon of Baking Soda

Directions: It is so simple because we are using a food processor with a blade attachment. Add your eggs, diced zucchini, butternut squash and blueberries to the food processor and process until smooth. Add all the remaining ingredients and process for one minute. Scrape down the sides of the bowl, and process another 30 seconds.

Fill your muffin cups evenly. I like to use a muffin scoop. Bake in your preheated oven for 35 minutes, or until a toothpick inserted into the center of a muffin comes out clean.

Makes 12 Muffins

chocolatefruitandveggiemuffins4

thesemuffinsarechocolatelyandyourtoddlerwouldneverguessheiseatingfruitandveggies21glutenfree2cdairyfree2cgrainfree

*This post has affiliate links in it. I receive a very small commission if you purchase through my links. The small commission helps cover the cost of maintaining this blog. Thanks! 🙂


Immune Boosting Smoothie!

cold busting smoothie

You’ve washed your hands like crazy and practiced prevention to avoid a cold. but here it is! You got one anyway!

What now? I know you want it to go away, like yesterday!!!

Here’s an immune boosting smoothie you can make every day while you have a virus, or for prevention, to boost your immune system and assist in making your cold as short as possible! Each ingredient serves a purpose.

Immune Boosting Smoothie

Ingredients:

1 Large Orange (Vitamin C)

1 Cup of Frozen Mango (Vitamin C)

1 Cup of Brewed and Cooled Chamomile Tea (Soothes Sore Throats)

1 Tablespoon of Fresh Lemon Juice (Vitamin C)

2 Tablespoon of Unsweetened Coconut Flakes (Fiber)

1 Teaspoon of Chia Seeds (Fiber and Omega 3)

1/8 Teaspoon of Cinnamon (anti-bacterial & anti-inflammatory)

1 Teaspoon of Black Elderberry Syrup (I use this) (immune boosting, antioxidants)

1 Teaspoon of Raw Honey (antibacterial, helps relieve sore throats and coughs)

Directions:

Blend all the ingredients together, except the elderberry syrup, in a blender on high. Pour into a glass. Drizzle the elderberry syrup on top. You can add some additional mango on top if you want to.

In addition, while you have a cold, make sure you get enough rest, stay hydrated, sip warm liquids (chamomile tea helps soothe a sore throat), add moisture to the air, and use an over the counter saline nasal spray.

light and yummy, every ingredient in this smoothie serves a purpose! dairy free and gluten free.

*This post has affiliate links in it. I receive a very small commission if you purchase through my links. The small commission helps cover the cost of maintaining this blog. Thanks! 🙂

1 5 6 7 26