Tag Archives: SCD

Very Vanilla Truffles

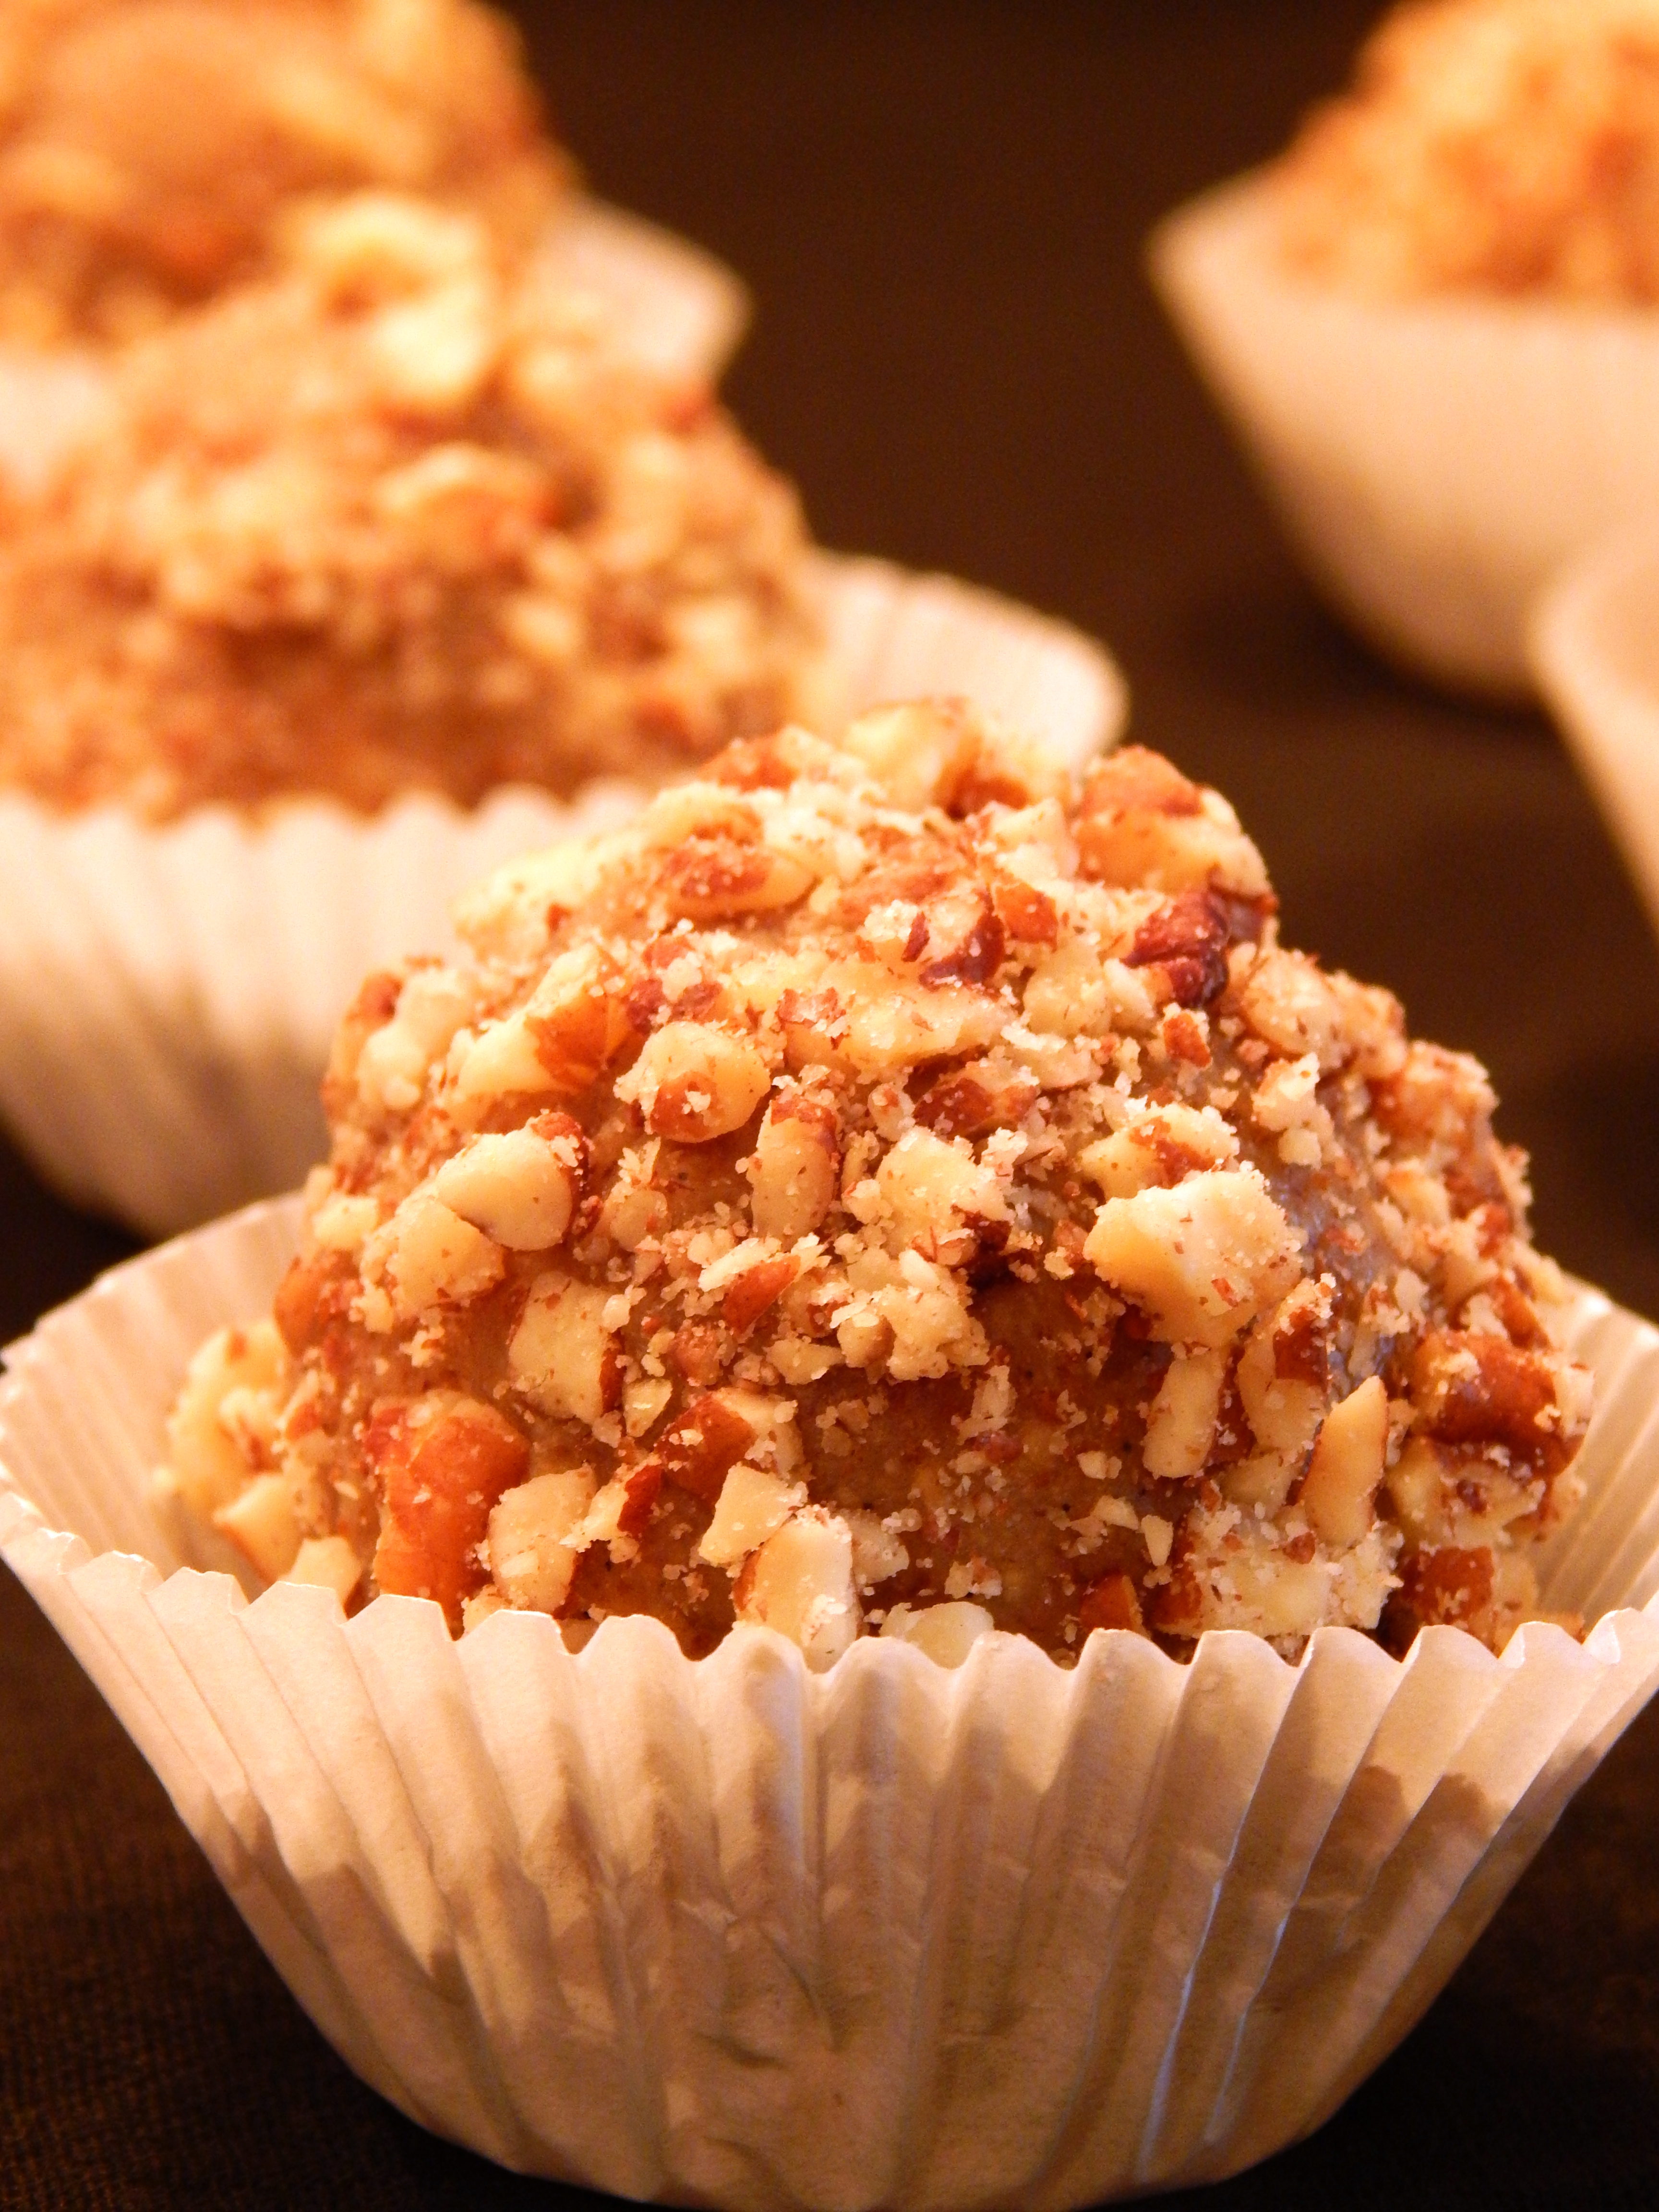
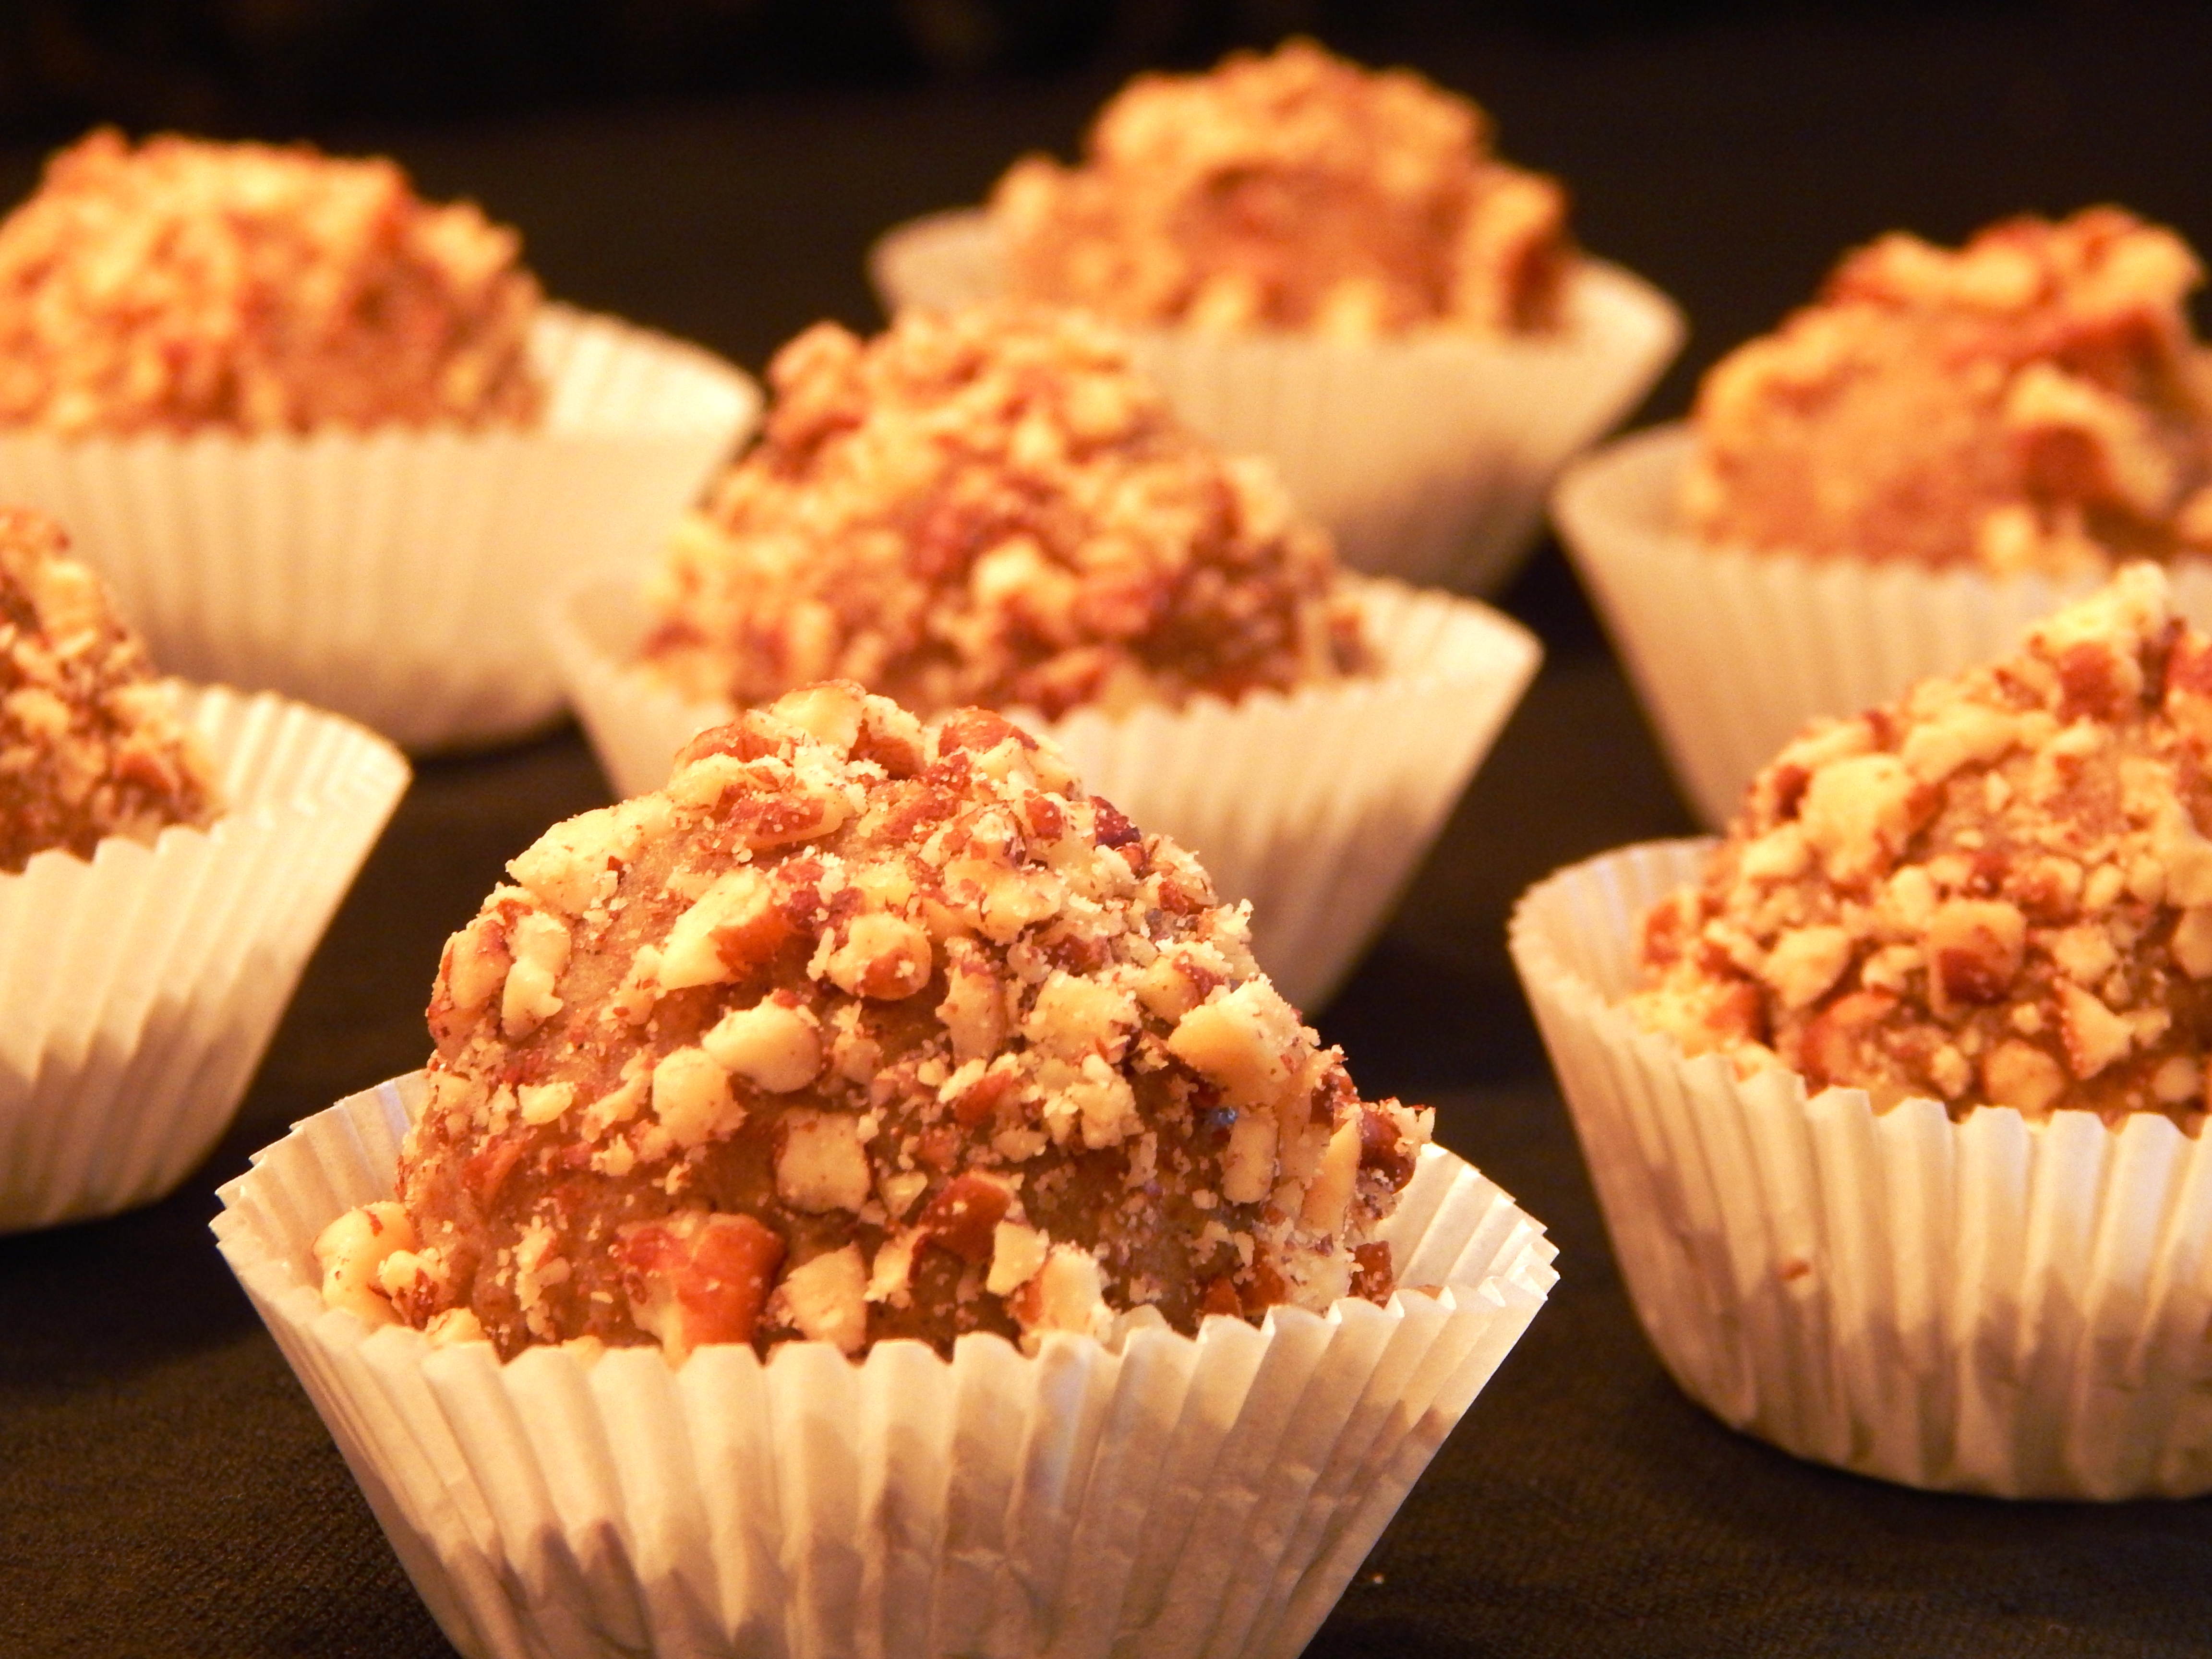
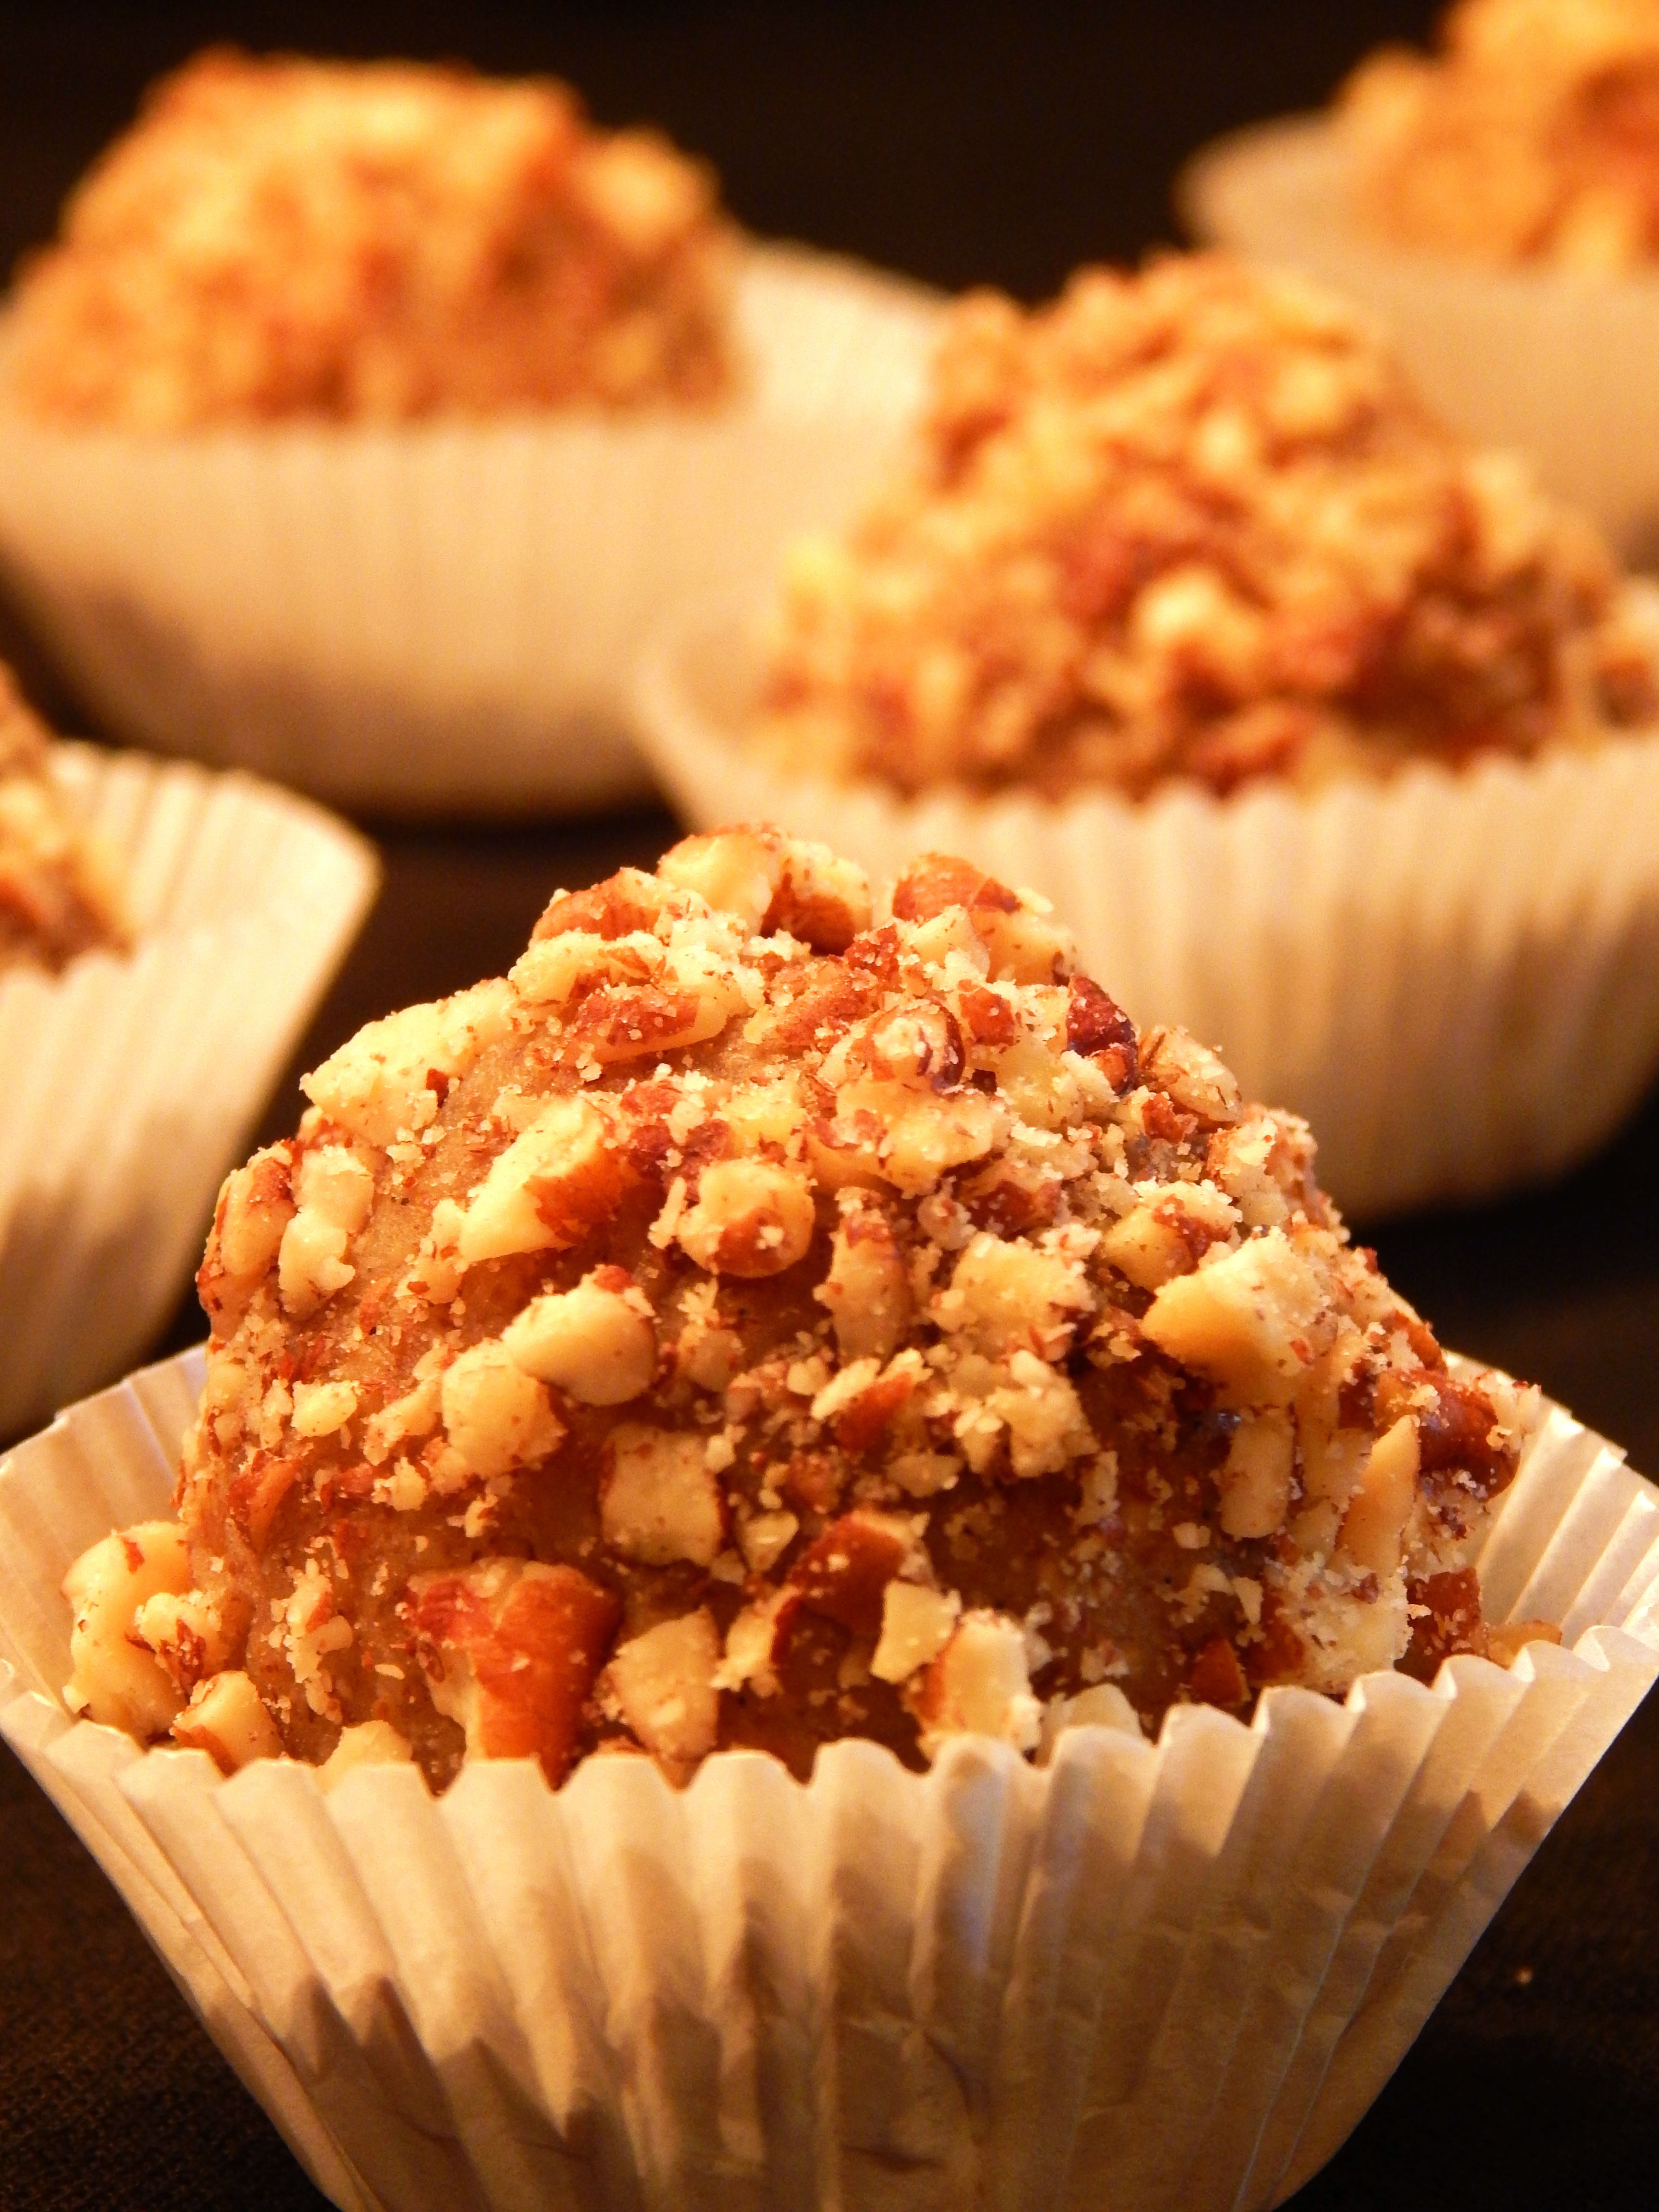
Truffles are such a treat for holidays! These truffles have just the right creamy mouth feel when you bite into them, with a little bit of salty and sweet and a hint of rum, which raises them to a whole new level of delicious! The cocoa butter melds perfectly with the almond butter to give you the creaminess everyone desires in a truffle. I love them as a special treat, and I think you will too. They are beautiful to give as gifts in mini muffin papers and then placed in a decorative tin, and equally enticing served on a pretty tray at a party. So, lets get to it! They aren’t difficult, but they are fancy!

Very Vanilla Truffles

Very Vanilla Truffles

Very Vanilla Truffles

Ingredients:

1/2 Cup Cocao Butter (chopped)

1/2 Cup  Almond Butter (no sugar added)

1/4 Cup Clear Honey

1 Vanilla Bean (split and seeds removed then pod discarded)

1 Tablespoon Light Rum

1 Teaspoon Vanilla Extract (SCD Legal no additives)

1/4 Teaspoon Himalayan Pink Salt

1/4 Cup Toasted Pecans, finely chopped for rolling the truffles

Preheat your oven 350º degrees. Place the pecans on a baking sheet and toast in the oven for five minutes until golden brown. Set aside to cool.

In a double broiler (You can also use a saucepan and a metal bowl for this to substitute as a double broiler) place approximately 2 inches of water and bring the water to a simmer. In the top part of your double broiler or a metal bowl that will fit on the saucepan without touching the water below, place the almond butter, cocoa butter, honey, vanilla bean and Himalayan Pink Salt. Put the bowl of ingredients over the simmering water and stir with a wire whisk to melt and incorporate the mixture thoroughly. When the cocoa butter is melted and the ingredients well combined, remove from the water and stir in the rum and vanilla extract. It will be quite liquid at this point. Refrigerate the truffle filling in the refrigerator for 1 1/2 to 2 hours until it becomes firm enough to scoop and roll into balls, but not too firm. Meanwhile, finely chop your cooled pecans. I use a Mini Ninja Express Chop for this because it is fast and easy to clean up. When the filling is set enough to roll, scoop the filling with a tablespoon cookie scoop, roll into balls and then roll into the finely chopped pecans. Put them in mini muffin cups and keep in the refrigerator. These will keep for at least two weeks.

Very Vanilla Truffles

Very Vanilla Truffles

Very Vanilla Truffles

Very Vanilla Truffles

These truffles are pretty, delicious treats!

Eat Your Nutrients!

Eat Your Nutrients!

Homemade Raspberry Vinegar

Raspberry Vinegar is one of my favorite ways to make a salad dressing. It is colorful and is one of my favorite fruits. Store bought raspberry vinegar is not allowed on the SCD diet because of added sugar, but this one is! It is made with real raspberries and red wine vinegar and is simple and fresh tasting with just two ingredients! Raspberries are loaded with Vitamin C and are an excellent source of Flavanoids and other vitamins. So here we go! The color is gorgeous!

Homemade Raspberry Wine Vinegar

Homemade Raspberry Wine Vinegar

Ingredients:

12 ounces of fresh raspberries

1/2 Cup Red Wine Vinegar

Directions:

Place the fresh raspberries half at a time in a fine meshed sieve like this one. Hold the sieve over a bowl and press the raspberries with a spatula releasing the juice into the bowl and keeping the seeds and flesh in the sieve. Discard the seeds and pulp. Whisk in a half cup of Red Wine Vinegar into the raspberry juice (there should be half a cup of juice). Shake and store in the refrigerator to use as needed. That’s it! Now, if you love Raspberry Vinaigrette as much as I do, check out my recipe for Real Raspberry Vinaigrette here.

Eat Your Nutrients!

Eat Your Nutrients!

Real Raspberry Vinaigrette

I have been really missing raspberry vinaigrette for my salads since starting the SCD, Low FodMap Diet.  Here is a recipe for Real Raspberry Vinaigrette that had me wondering why I waited so long to try it. The seeds are removed from the raspberries using a fine meshed sieve to make the raspberry vinegar, recipe here, making the raspberries much easier on the digestion. Raspberries are loaded with Vitamin C and Flavanoids as well as other vitamins. This is a fresh, delicious salad dressing with an extraordinary color. It has good fat and lots of flavor! You will really enjoy this delicious dressing on a variety of salads!

Real Raspberry Vinaigrette

Real Raspberry Vinaigrette

Ingredients:

1/2 Cup Olive Oil

1/2 Cup Homemade Raspberry Wine Vinegar (recipe here)

1/4 Cup Clear Honey

2 teaspoons Djon Mustard (garlic free such as Annie’s)

1/4 teaspoon dried oregano

1/4 teaspoon black pepper

1/4 teaspoon Himalayan Pink Salt

Directions:

In a shaker (I use these and love them!) add all the dressing ingredients and shake well! Store in refrigerator. Makes 1 cup of dressing.

Real Raspberry Vinaigrette

Real Raspberry Vinaigrette


Eat Your Nutrients!

Eat Your Nutrients!

Pumpkin Vanilla Bean Pie (Paleo, SCD, Low FodMap)

You can be proud to bring this Pumpkin Vanilla Bean Pie to any gathering!  My husband, Doug, loves this recipe! It is extra special because of the vanilla bean and light rum in the filling, and the crust is just the right thickness. I played with the recipe quite a lot until I perfected it, and it is a winner!

Festive SCD Paleo Pumpkin Vanilla Bean Tart

Holiday Pumpkin Vanilla Bean Pie (Paleo, SCD, GAPS)

Ingredients:

Crust:

2 1/4 Cups Superfine Almond Flour

3 Tablespoons Organic Shortening

1 Pastured Egg

3/4 Teaspoon Himalayan Pink Salt

Pumpkin Filling:

1 Can SCD Legal Pumpkin

1/2 Cup Clear Honey

1 Vanilla Bean

3 Pastured Eggs

1/2 Cup Full Fat Coconut Milk (No Additives)

2 Tablespoons Light Rum (I used Bacardi)

1 Teaspoon Cinnamon

1 Teaspoon Ginger

1/4 Teaspoon Cloves

1/4 Teaspoon Allspice

1/8 Teaspoon Nutmeg

1/4 Teaspoon Himalayan Pink Salt

Directions:

Preheat your oven 350º degrees.

CRUST:

Grease the insides of a pie pan or 11 inch springform tart pan.  In a medium bowl, add the almond flour and shortening. Work the shortening into the almond flour with a fork and finish off by using your fingers until it is crumbly and well dispersed. Add a lightly whisked egg and the salt and stir with a fork until it forms a ball. Reserve 1/4 cup of the pie crust to decorate the top, and press the rest of the crust evenly onto just the bottom of the pan. Roll the 1/4 cup of crust between two pieces of parchment or plastic wrap to 1/4 inch thickness and cut out shapes of your choice with a small cookie cutter. Place the shapes on a parchment lined baking sheet. Bake the shapes for 5 minutes, the crust for 8 minutes in the oven, remove and cool while you prepare the filling.

FILLING:

Warm the honey in the microwave for 30 seconds in a small bowl. Split the vanilla bean lengthwise and scrape out the seeds with a small spoon. Whisk the vanilla bean seeds into the warmed honey. In a large bowl whisk together your pumpkin and coconut milk, add the honey and vanilla bean seed mixture. Whisk in the eggs and rum until fully incorporated. Finally, whisk in the spices and salt.

Place your pan on a rimmed cookie sheet to protect again spills, and pour the filling into the tart crust. Carefully place in the oven and bake for 45 minutes. Remove from the oven, top with your pie crust cutouts and chill for four hours before serving.

Festive Pumpkin Vanilla Bean Tart (Paleo, SCD)

Holiday Pumpkin Vanilla Bean Pie (Paleo, SCD, GAPS)

Serves 8

A delicious holiday dessert!

Pumpkin Tart

Eat Your Nutrients!

Eat Your Nutrients!

Spicy Zucchini Sticks

Sides are some people’s favorite part of the meal. I like to have a lot of veggie sides for dinner so I can load up on my vegetables and get a variety of nutrients. As an added bonus, there are lots of leftover vegetables for breakfast and lunch, so I am cooking vegetables once a day, but eating them at every meal.

These Spicy Zucchini Sticks are a perfect side for burger or taco night. They are fast and have just the right amount of heat. I am serving them tonight with Messy Jessie’s.

Spicy Zucchini Sticks

Spicy Zucchini Sticks

SPICY ZUCCHINI STICKS

Ingredients:

4 Medium Zucchini

3/4 Cup Superfine Almond Flour

2 Tablespoons Garlic Olive Oil

1 Teaspoon Black Pepper

1/2 Teaspoon Himalayan Pink Salt

1 Teaspoon Smoked Paprika

1/2 Teaspoon Chipotle Powder (No Garlic Added)

1/2 Teaspoon Turmeric

Directions:

Preheat oven 350º degrees. Wash the zucchini and slice into quarters lengthwise. Lay in a single layer on a parchment lined baking sheet, and brush with garlic olive oil. Set aside. In a small bowl mix together the superfine almond flour, black pepper, Himalayan pink salt, smoked paprika, chipotle powder and turmeric. Coat the zucchini sticks with the almond flour mixture by sprinkling over the zucchini and tossing a bit with your hands. Making sure they are in a single layer, bake in your preheated over 35 to 40 minutes until golden brown. They are delicious with SCD Low FodMap BBQ Sauce.

Eat Your Nutrients!

Eat Your Nutrients!

Asian Shrimp Egg Custard w/ Scallion Oil Drizzle

Do you like Chinese Steamed Egg Custard?  When we were in China to adopt our beautiful daughters, we had the best savory egg custards! Our girls were babies, and they loved this delicate silky food. The nannies gave it to the children regularly as part of their daily meals, and I learned how to make it at home, so they could continue to enjoy it.  I changed up this recipe of traditional Chinese Egg Custard by baking them and incorporating Coconut Milk and Macadamia Nut Oil, although there are so many variations depending on the province you are visiting.  This recipe is one the family asks for regularly, and it is easy and kid friendly, but looks and tastes fancy enough to serve as an appetizer at a dinner party or festive occasion. Adults love it too! It is nutritious with two eggs per serving, shrimp and good fat.

Asian Inspired Shrimp Egg Custard with Scallion Oil Drizzle

Asian Shrimp Egg Custard with Scallion Oil Drizzle

Asian Shrimp Egg Custard with Scallion Oil Drizzle

Ingredients:

8 Eggs

32 shelled and deveined small shrimp, steamed

1 1/2 Cups Bone Broth or Chicken Stock

1/2 Cup Coconut Milk, Full Fat SCD Legal no Additives

3/4 Teaspoon Himalayan Pink Salt

Pinch of White Pepper

Duck Fat for Greasing the Ramekins

For the Scallion Oil:

2 fresh scallions green parts only, sliced

1/2 Cup Macadamia Nut Oil or Olive Oil

1/2 teaspoon Himalayan Pink Salt

Directions:

Preheat Oven 350º degrees. Grease 4 Ramekins with Duck Fat, set aside. To make your Scallion Oil, place sliced scallions, macadamia oil and 1/2 teaspoon Himalayan Pink Salt in a small food processor and blend until emulsified with a few bits of green scallion flecks, set aside.

In a large bowl whisk together your 8 eggs, bone broth, coconut milk, Himalayan Pink Salt and a pinch of white pepper.  Stir in 3 Tablespoons of scallion oil and whisk again. Pour evenly into the four ramekins. Place 5 shrimp in the center part of each ramekin. They will sink, that is good! Place ramekins in a roasting pan or a pan with sides, and pour boiling water into the pan so it comes halfway up the sides of the ramekins. Bake 350º degrees for 25 to 30 minutes, just until set but still slightly jiggly in the middle. Remove from oven and top with three shrimp artfully arranged and drizzle each with 2 teaspoons of scallion oil. They should cool for about 5 to 10 minutes before serving so you don’t burn your tongue.

Served 4

Asian Shrimp Egg Custard with Scallion Oil Drizzle is a perfect addition to your Chinese menu or party! Delicious starter or for lunch or breakfast! Paleo, Gluten Free, Dairy Free.

Eat Your Nutrients!

Eat Your Nutrients!


Weeknight Tacos SCD, Low FodMap, Paleo

You don’t have to give up tacos when eating SCD Low FodMap.  Here is a delicious taco that uses butter lettuce “shells”. It is an easy weeknight meal!

SCD Low FodMap Tacos

Weeknight Tacos SCD, Low FodMap, Paleo

Weeknight Tacos, SCD Low FodMap Paleo

Ingredients:

1 Pound of Ground Grassfed Beef

1 Pound of Ground Pork

1 Large Green Bell Pepper

1/2 Cup Green Onion, sliced (green parts only)

2 Tablespoons Garlic Infused Olive Oil

1 Cup Tomato Puree, SCD Legal

1/3 of a Fresh Serrano Chili Pepper, Minced

1 Teaspoon Himalayan Pink Salt

1/2 Teaspoon Black Pepper

1 Tablespoon Ground Cumin

2 Teaspoons Smoked Paprika

1 Teaspoon Ground Ancho Chili Pepper

1 Teaspoon Ground Oregano

1 Teaspoon Ground Chipotle Powder

1/8 Teaspoon Cayanne Pepper

1 Head of washed Butter Lettuce, Cleaned and Separated

Directions:

Finely chop the Green Pepper, slice your green onion tops thinly and mince your Serrano Chili Pepper. Mix the rest of your spices together in a small bowl and set aside. Add 2 Tablespoons of Garlic Olive Oil to a large sautee pan. Turn your burner to medium high, when olive oil is warmed, add your pork and grass fed beef to the pan and sprinkle with the Himalayan Pink Salt and Pepper. Brown for about ten minutes, breaking up the meat, then add both your peppers and the green onion. Continue to cook for another 5 minutes or until tender. Add the seasoning you mixed and set aside to your meat mixture and cook for one minute stirring to coat evenly. Then, add your tomato puree, bring up to a boil.  When it is boiling, reduce heat to low and simmer until reduced and thick.  This takes about 5 minutes. Serve with butter lettuce shells.

Eat Your Nutrients!

Eat Your Nutrients!


Chai Love You! – Individual Chai Spice Creamer

Chai Love You Beverage Drop Ins

Chai Love You –  Individual Chai Spice Creamer

If you think the smell of  Chai is a warming, comforting aroma like I do,  these individual frozen creamers are just what you need for your cup!  I am really loving the convenience of these individual creamers that are frozen to stay fresh! Right now I have Pumpkin Spice and Chai in my freezer so I can have whatever flavor I am in the mood for in my coffee and tea.  I have even popped them in my morning smoothies with great results! Chai is like a warm, loving hug! I have been reading the book The Power of Intention by Wayne Dryer, and one really important insight I like in the book is choosing to see the good in others and letting go of the negative thoughts that surface in your mind, replacing them with something you see positive about people.  It really has been broadening my view and opening me up more positive intention throughout the day.

Chai Love You – Individual Chai Spice Creamers

Ingredients:

1/2 Cup Coconut Oil

1/4 Cup Clear Honey

1 1/2 Cups Full Fat Coconut Milk (no additives, I like this kind)

1 Tablespoon Pure Vanilla Extract

1 Tablespoon Cinnamon

1 1/2 Teaspoons Ground Cardamom

3/4 Teaspoon Cloves

Directions:  Line a twelve cup muffin pan with natural or foil muffin cup liners.  Melt the coconut oil in a medium bowl in the microwave or on the stovetop.  Whisk in the remaining ingredients until thoroughly blended and divide evenly between the muffin cups. Place the muffin pan in the freezer and freeze solid. After about four hours you can remove the Chai Spice Creamers from the pan and store in an airtight container in the freezer.  To use, add to your favorite hot beverage and whisk.

Eat Your Nutrients!

Eat Your Nutrients!

Shepherd’s Pie, SCD, Low FodMap, Gluten Free

As the weather gets colder and the day light hours get shorter, one pot meals are even more appealing. The definition of comfort food changes with the seasons.  Shepherd’s pie is right up there on the top of the warming winter casserole list!

English Cottage Pie

Shepherd’s Pie

This recipe is Low FodMap, SCD legal, Paleo and Dairy Free.  It has a creamy celeriac root topping and a savory meat and vegetable filling.  I love that it can be made ahead and then put in the oven before dinner. It is on the table for a hungry family in a hurry, especially on the extra busy days of piano lessons and after school activities, or a busy day at work.  It tastes even better the next day, is leftover friendly, and you are getting lots of veggies in this meal. Here is what you need.

Shepherd’s Pie

Ingredients for the Filling:

1 Pound of Grassfed Ground Beef

1 Pound of Ground Bison

2 Cups of Sliced Green Onions (Green Parts Only)

2 Tablespoons Garlic Infused Olive Oil

2 Cups Finely Diced Carrots

2 Medium Fennel Bulbs, Finely Diced

1/4 Cup Tomato Paste (SCD Approved) (See this link for an explanation on legal tomato paste)

1 1/2 Teaspoons Himalayan Pink Salt

1 1/2 Teaspoons Black Pepper

1 Teaspoon Thyme

1 Teaspoon Parsley, plus a little extra for sprinkling on the top

2 Teaspoons Tarragon, crushed

1/4 Teaspoon Rosemary, crushed

 Ingredients for the Topping:

1 Large Celeriac Root (or 2 small)

1/2 Cup Full Fat Coconut Milk

1/4 Teaspoon Himalayan Pink Salt

1/4 Teaspoon Black Pepper

Directions:

Preheat Oven 425º degrees.

Using a large, heavy enameled cast iron pan (I used a 5 quart), add your garlic infused olive oil to the pan and warm over medium-high heat.  Add all your chopped vegetables, and sprinkle with 1/2 teaspoon of Himalayan Pink Salt and a 1/2 teaspoon black pepper. Cook for 5 minutes until softened, stirring occasionally.  Add your ground meat and sprinkle with 1 teaspoon of Himalayan Pink Salt, 1 teaspoon of black pepper and the herbs.  Sautee breaking up the meat until thoroughly cooked and starting to carmelize on the bottom of the pan.  Stir in the tomato paste, then level the filling out on the bottom of the pan and set aside.

Meanwhile, peel and cube your celeriac root and place in a medium saucepan, then cover with water abut 2 inches above the celeriac root. Bring to a boil on the stovetop, then turn to down to simmer.  When fork tender, this takes about 20 minutes, drain off the water, and place the celeriac root, coconut milk, 1/4 teaspoon Himalayan Pink Salt, and 1/4 teaspoon of pepper in a food processor and process until creamy.  Spread the mashed celeriac in an even layer on top the the Cottage Pie Filling. Sprinkle with a little pepper and a sprinkle of dried parsley flakes.

At this point, you can cover and refrigerate or bake right away.  If refrigerated, allow ten to fifteen more minutes to bake in the oven.  Bake 35 minutes (50 if refrigerated) in the oven uncovered, until the top is starting to brown. Remove from oven and serve. 6 – 8 Servings

English Cottage Pie

Shepherd’s Pie

Eat Your Nutrients!

Eat Your Nutrients!

Pumpkin Creme Brulee

Pumpkin Creme Brulee

Pumpkin Creme Brulee

If you like creme brulee, you are going to love this seasonal recipe for Pumpkin Creme Brulee!  If you have missed creme brulee because you are dairy free, this recipe is no compromise. It is delicious and creamy, a perfect Autumn dessert! Creme Brulee is an easy fancy dessert, but it is also comfort food, it is prepared in advance, chilled and finished off minutes before serving.  I haven’t met anyone yet who doesn’t love it. You are getting the nutritional benefits of egg yolks, pumpkin and good fat in this dessert.

Pumpkin Creme Brulee

Ingredients:

1 Large Pastured Egg

4 Large Pastured Egg Yolks

1/2 Cup Pumpkin Puree

1/4 Cup Clear Honey

1 Can Full Fat Coconut Milk, No Additives

1 Tablespoon Pure Vanilla Extract

2 Teaspoons Pumpkin Pie Spice, Organic Gluten Free 

1/4 Teaspoon Himalayan Pink Salt

4 Teaspoons Clear Honey for the Tops of Creme Brulee

Directions:

Grease 4 ramekins with organic palm shortening or coconut oil. Directions: Preheat your oven 325º degrees.  In a small bowl, whisk together your egg and yolks, honey and vanilla extract. Set aside. In a medium, heavy pot, add your coconut milk, pumpkin puree, pumpkin pie spice and salt. Over medium heat, scald your coconut milk mixture.  When the milk mixture is scalded, slowly add a cup of the scalded milk to your egg mixture whisking constantly. Now, pour your egg yolk mixture slowly back into the remaining scalded milk in the pot, whisking as you do so. (This is done slowly to emulsify and not cook the eggs.)

Pour the custard into the four ramekins, dividing evenly. Place the ramekins in a baking pan that has at least 3 inch sides.  Pour boiling water into the pan so it comes half way up the sides of the ramekins.  Bake 25 to 30 minutes until custard is almost set but still a little soft in the center. It is important not to over bake.  Cool in the refrigerator for 4 hours, or up to two days, covered.

When ready to serve, remove creme brulee from the refrigerator, place a teaspoon of warmed honey on each creme brulee and caramelize the honey with a blow torch or place under your oven broiler for 2 to 3 minutes watching carefully. I used a kitchen blow torch, and it creates a thick delicious topping.  It will not reach the crunchy stage like when using sugar, but it is unique and really decadent.  Sprinkle with a dusting of cinnamon. Serve!

Makes 4 Creme Brulee


Eat Your Nutrients!

Eat Your Nutrients!


1 10 11 12 15