Tag Archives: Gluten Free

Spatchcocked Rosemary Lime Roasted Chicken

Spatchcocked chicken is a pretty way to cook a whole chicken, but even better is, it is moister everywhere, and you won’t dry out the breast while waiting for the slower thighs to be cooked through.

Spatchcocked Rosemary Lime Chicken

Spatchcocked Rosemary Lime Roasted Chicken


Although to the eye, the chicken looks fancy and difficult, it really isn’t at all.  I like to prepare my chicken several hours before roasting it, and put in in the refrigerator uncovered so it can rest in the rub right on the baking sheet and absorb the flavors. This also allows the skin to dry out when exposed to air, so it is extra crispy!!!

Spatchcocked Rosemary Lime Roasted Chicken

Ingredients:

1 – 5 to 6 pound whole chicken

Zest of 2 Limes

3 Tablespoons of Olive Oil

1 Tablespoon of Sea Salt

1/2 Teaspoon of Black Pepper

1 1/4 Teaspoon of Crushed Rosemary

1 1/2 Teaspoon Ground Ginger

Directions: Mix the olive oil and seasonings together for your Rosemary Lime Rub and set aside.

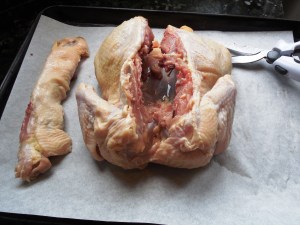
Now let’s spatchcock the chicken. It takes a little elbow grease, but trust me, it is easier than it looks! Much easier than cutting up a whole chicken! You will need a sharp knife or poultry scissors.

Remove Backbone

Place the chicken on a prepared baking sheet. Turn the chicken over onto its back, and starting on one side of the back bone, cute through the back. Now, do the same thing on the other side, and remove the backbone completely from the chicken. (You can use the backbone and giblets to make stock.)

Backbone Removed

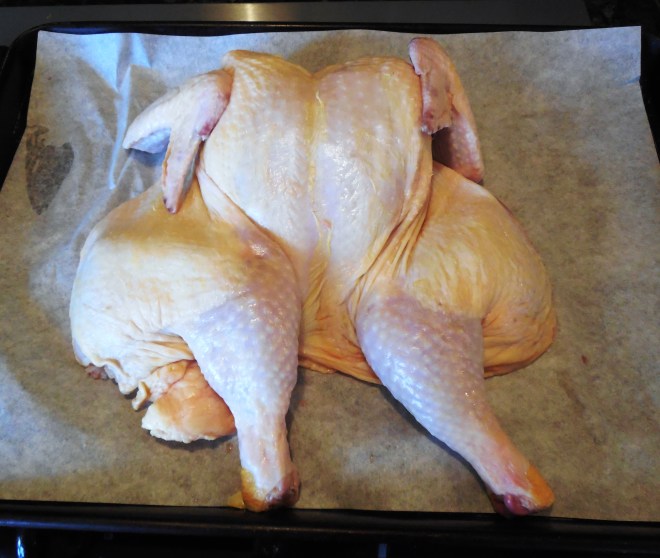
That was the most difficult part. Turn the chicken over so the breasts face up, and with the palms of your hands, flatten the chicken by pressing on the breast area and splaying out the legs. It should look like this.

Spatchcocked Whole Chicken

Rub the chicken all over front and back with the Rosemary Lime Rub.


Place the chicken uncovered in the refrigerator a few hours, or as long as overnight. This step before roasting makes the chicken skin very crispy! You can skip it if you don’t have time, or you want chicken right away.

When you are ready to roast your chicken, Preheat the oven to 325º degrees and roast the chicken for one hour.

Test the thigh to make sure it has reached 165º degrees. Remove from the oven, and let the chicken sit for ten minutes to retain the juices before carving.

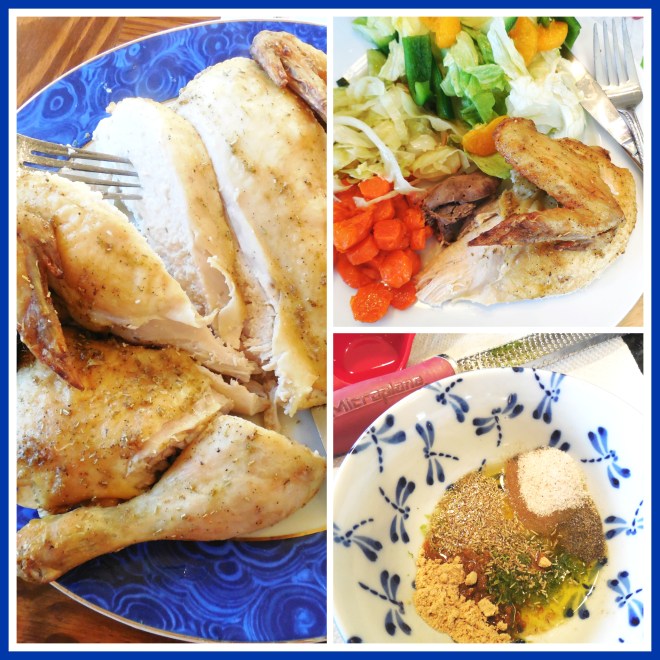
Enjoy this juicy recipe!

Eat Your Nutrients!

Eat Your Nutrients!


Fresh Basil, Chive and Dill Herb Sauce

Sauces are one of my favorite ways to elevate the flavor of anything!

This sauce is a savory one that can be used in many different ways. I use it as a dip for crackers or raw vegetables, drizzle it on meat or fish after it is cooked, sautée it with vegetables, and use it as a marinade before grilling. It also is a delicious way to dress a salad by thinning it with a little more lemon juice.

Fresh Basil, Chive and Dill Sauce

Fresh Basil, Chive and Dill Sauce


When I have sauces handy, it is going to be a good week in the eating department, even if I don’t have a lot of time to spend cooking! What I mean by this is, it makes it super easy to elevate meals from boring to spectacular. Sometimes on the weekends, I spend a Saturday morning making sauces to use for the next couple weeks. I like to freeze half of them, so I can pull them out of the freezer when I need them. There are 21 other recipes for sauces and dressings to choose from under the Sauce section in my Recipe Index.

Fresh Basil, Chive and Dill Sauce over Pork Tenderloin

Fresh Basil, Chive and Dill Sauce over Pork Tenderloin


This sauce utilizes three different herbs that gives it a Mediterranean flare and lots of beneficial nutrients. I am always taking into consideration the benefits as well as flavor of recipes. 🙂 Herbs are generally under-used in cooking, and really bump up flavor and nutrition.

This recipe makes 1 1/4 cups. I like to pour it into two jars, one for the fridge and one for the freezer.

Fresh Basil, Chive and Dill Herb Sauce

Ingredients:

3  Packages of Fresh Basil (3/4 oz.)

1 Package of Fresh Dill (3/4 oz.)

1 Package of Fresh Chives (3/4 oz.)

1/2 Cup Raw Pecans

6 Tablespoons Garlic Infused Olive Oil

6 Tablespoons Extra Virgin Olive Oil

(or 12 Tablespoons of Olive Oil and 2 Fresh Garlic Cloves if not following Low FodMap Diet)

1 Tablespoon Fresh Squeezed Lemon Juice

1 Teaspoon of Sea Salt

1 Teaspoon Ground Black Pepper

Ready to Blend Ingredients for Sauce!

Ready to Blend Ingredients for Sauce!


Simply put all the ingredients into a blender, and blend on high until smooth!

Now, how will you use your fresh herb sauce? I would love to hear your ideas!

Versatile Herb Sauce as a Dip with Crackers!

Versatile Herb Sauce as a Dip with Crackers!


Bacon Scallion Grain Free Crackers

Bacon and Scallion Grain Free Crackers

Bacon and Scallion Grain Free Crackers


Good Morning! Are you as excited about Spring and “springing ahead” as I am? Today the sun is shining after some very wintry weather and many “no school” days for the kids.

This weekend is birthday weekend at our house. Three of my daughters have birthdays consecutively starting Sunday.

I have this really good cracker recipe that includes bacon and chives that would be great as an appetizer for any get together. It doesn’t go crazy on the bacon, just two tablespoons in the batch really imparts a bacon flavor to the crackers.

Whether or not you are eating with food restrictions, this cracker should appeal to everyone.  I am always looking to create recipes that I can feed to company, that I can eat too, and uses real ingredients.

You can cut these crackers into fancy shapes, or just use a pizza cutter to cut them into squares or rectangles. They are intended to be bite size, so if using a cookie cutter, use accordingly. 🙂

Baked Bacon and Scallion Almond Flour Crackers

Baked Bacon and Scallion Almond Flour Crackers


Bacon Scallion Grain Free Crackers

1 1/2 Cups of Superfine Almond Flour

1/4 Cup Scallions, Green Parts Only (finely minced)

2 Tablespoons of Fresh Squeezed Lime Juice

2 Tablespoons of Crispy Cooked Bacon, crumbled (use sugar free bacon if eating SCD Low FodMap)

2 Tablespoons of Olive Oil

1 Teaspoon Sea Salt

1/4 Teaspoon of Baking Soda

Directions: Preheat your oven to 350º degrees.

In a medium bowl, whisk together the dry ingredients with a fork, including the bacon and scallions. Add the lime juice and olive oil and whisk again with a fork until the dough holds together. You can add a bit more lime juice if needed.

Bacon and Scallion Cracker Dough

Bacon and Scallion Cracker Dough


Form the cracker dough into a ball, and place it on a parchment lined baking sheet.

Between two pieces of parchment or plastic wrap, from into a rectangle. Then, roll the dough with a rolling pin into an approximate 8″ x 11″ rectangle.


Bacon and Scallion Cracker Dough Ready to Roll

Bacon and Scallion Cracker Dough Ready to Roll


Ready to Cut

Ready to Cut


Now you can cut out the shapes, I used a small heart shaped cutter, or using a pizza wheel, cut the dough into squares or rectangles about an inch and a half in size.

Ready to Go Into the Oven

Ready to Go Into the Oven


Bake in a preheated oven for 12 to 20 minutes. This a a wide range, but I have found it really depends on the thickness of the cracker. So keep an eye on them, and bake them until brown but not over brown. Cool completely on the baking sheet to allow them to crisp up.

Baked Bacon and Scallion Almond Flour Crackers

Baked Bacon and Scallion Almond Flour Crackers


Enjoy these delicious little crackers as an appetizer, or with whatever your heart desires!

Makes approximately 40 bite size crackers.

Very Low FodMap Serving Size is 4 crackers.

Eat Your Nutrients!

Eat Your Nutrients!


Easy Pineapple One Bowl Muffins

One of my favorite cakes in the 80’s was pineapple upside down cake. Crushed pineapple was really popular to use in baking, and added lots of moisture to the recipe.  Hummingbird cake, pineapple upside down cake, and dump cakes are three that come to mind. I loved pineapple upside down cake growing up, and I thought why not try a muffin with a few simple ingredients that can be made fast, grain free and low fodmap……….I had a craving! 🙂

So, if you like pineapple, here is a recipe that is simple, fast, and a pleasure to put together, that I think you will love! It makes an even dozen, and the muffins have a beautiful crumb. They start to brown on the tops as they are finishing off, for a truly delicious muffin that is not overly sweet.

Easy Pineapple One Bowl Muffins

Easy Pineapple One Bowl Muffins


Easy Pineapple One Bowl Muffins

Directions: Preheat your oven to 350º degrees. Line a twelve cup muffin pan with paper liners and set aside.

Ingredients:

1 14 oz. can of Native Forest Crushed Pineapple (or one without additives)

2 Eggs

1/4 Cup Clear Honey (Clover Honey is Lower in FodMaps)

1 1/2 Tablespoons Ground Ginger

1 Teaspoon Pure Vanilla Extract

1 1/2 Cups Superfine Almond Flour

1/2 Teaspoon Sea Salt

1/4 Teaspoon Baking Soda

Okay, this is really, really simple, and I love it! Put the ingredients in a bowl in the order listed above, and using a hand held mixer, mix until completely blended. Scoop evenly into the muffin liners. I used a muffin scoop. Bake for 30 minutes in your preheated oven. They will be starting to brown on the top, and when gently pressed, the tops will spring back when done. Remove from the oven and cool on a wire rack.

Pineapple Dump Muffins Batter

The Batter is Ready to Scoop!

Ready to Go Into the Oven

Muffins Ready to Bake Above.

That’s it!

Makes 12 – an even dozen!

Have a great day!

Eat Your Nutrients!

Eat Your Nutrients!

No Bake Peppermint Ice Caps

Ready for a yummy no bake recipe? Try these little two bite no bakes using mini muffin cups! Little hands can help make them.

They are ready in a jiffy!

No Bake Peppermint Ice Caps Collage

No Bake Peppermint Ice Caps

Directions: Line a mini muffin pan with 18 mini muffin papers.

Bottom Layer Ingredients:

1/2 Cup Coconut Butter, (Softened in the Microwave for 30 seconds)

1/4 Cup Carob Powder

2 Tablespoons Maple Sugar

2 Tablespoons Coconut Milk

2 Tablespoons Coconut Oil, Melted

1 Teaspoon Vanilla Extract, Alcohol Free for AIP

Blend the ingredients together with a hand-held electric mixer. Using a teaspoon cookie scoop, scoop and roll the mixture into balls. Then, press into the bottom of each mini muffin cup. If the mixture is soft at this point, freeze for 20 minutes before proceeding so you can press the top layer evenly onto the bottom. This will depend on how much you soften your coconut butter.

Top Layer:

1/2 Cup Coconut Butter (Warmed in the microwave for 30 seconds)

1 Tablespoon of Maple Sugar

1/8 Teaspoon of Peppermint Extract, Alcohol Free for AIP I use this

Blend together with a hand-held electric mixer. Scoop into scant 1 teaspoon balls and roll between your hands. Press onto the top of the bottom layer, and gently pat to the edges of the mini muffin cup.

Refrigerate for 1 hour. Serve.

Store in the refrigerator, or at room temperature.

Make 18

This recipe is part of the Phoenix Helix AIP Recipe Roundtable Roundup here!

Paleo AIP Recipe Roundtable


Thin and Chewy Maple Sugar Cookies

Thin, Chewy Cookies are one of my favorites! I like all kinds of textures in cookies…..Cakey, Crunchy, Thick, Thin, Puffy…..those are just some of the variety of textures cookies can have. Then there is the shape! When you think about it, cookie possibilities are endless, thus the huge number of cookbooks dedicated to cookies alone.

Really, the types of cookies you choose to make, when in the mood, also depends on what kind of time you want to put into them and the level of creativity you are feeling. These cookies are fast and satisfying, pretty, chewy, and sweet with maple sugar and honey. The honey makes them chewy!

Thin and Chewy Maple Sugar Cookies

The Thin & Chewy Maple Sugar Cookies also have coconut oil in them, for some good fat, and I used tigernut flour, which is one of my new favorites! Tigernut flour contains some protein, fiber, and resistant starch making it a natural prebiotic to feed good gut flora. It also gives baked items stability and structure. It is not a nut at all! It is an ancient root vegetable! You can find it here.

Thin & Chewy Maple Sugar Cookies

Preheat your oven to 350º degrees.

Ingredients:

1/2 Cup Tapioca Flour

1/2 Cup Tigernut Flour

1/4 Cup Maple Sugar, plus extra for rolling

1 Tablespoon Arrowroot Flour

1/2 Teaspoon Baking Powder (corn and aluminum free recipe here at Whole New Mom)

1/4 Teaspoon Baking Soda

1/4 Teaspoon Sea Salt

1/4 Cup Honey

1/4 Cup Coconut Oil (gently melted if solid)

1 Tsp. Vanilla Extract (alcohol free for AIP Paleo)

Directions: Mix together the dry ingredients in a medium bowl with a whisk.

With an electric hand-held mixer, beat in the coconut oil until crumbly. Add the honey and vanilla and blend thoroughly. Scoop balls of dough onto a parchement lined baking sheet with a tablespoon cookie scoop. Roll the balls between your hands and then into extra maple sugar to coat. Space 2 generous inches apart onto two cookie sheets lined with parchment.

Bake in your preheated oven 11 to 14 minutes until golden. They will spread, so leave space between the cookies.

Thin and Chewy Maple Sugar Cookies on Baking Tray

Cool completely before removing from cookie sheet.

Thin and Chewy Maple Sugar Cookies

Thin and Chewy Maple Sugar Cookies

*felt ornaments in the photo hand sewn by me! 🙂

This recipe is not recommended for those with SIBO. This recipe was part of Phoenix Helix AIP Recipe Rountable #195 here.

Paleo AIP Recipe Roundtable

Thin and Chewy AIP Paleo Maple Sugar Cookies! Delicious!!!

Iced Orange Sweet Rolls

‘Tis the Season when I want to enjoy a treat! These rolls are purely indulgent and reminiscent of carefree days, my Mother’s baking, and sharing a decadent breakfast on a cold winter’s day.

Coconut Orange Sweet Rolls Ready to Eat

Times have changed for me since then. Who knew I would grow up and have food intolerances. But as hard as it was in the beginning to transition to a new way of eating, after almost four years of eating gluten free and then a grain free, Paleo diet, I never would have imagined food in it’s true form is what I have come to crave, what tastes really good to me, and is what makes me feel so great! These rolls satisfy all my indulgence dreams, and as a previous artisan bread baker, they are a great creative outlet. I adore handling dough……I know a little weird, but it is art therapy to me! 🙂

Orange Iced Sweet Rolls AIP Paleo Coconut Flour

I love this recipe, and I hope you do too! 🙂 It is a hit with my children for sure!

Iced Orange Sweet Rolls

Preheat the oven to 350º degrees. Lay out a parchment lined baking sheet.

The Bun Dough Ingredients:

1/2 Cup of Tapioca Flour

1/2 Cup of Tigernut Flour (Read More about Tigernut Flour in this article by Lauren of Empowered Sustenance)

1/2 Cup of Coconut Flour

1/2 Cup of Applesauce (No Sugar Added)

1/4 Cup of Clear Honey

1/4 Cup of Fresh Squeezed Orange Juice

1/4 Cup of Organic Shortening

1/4 Teaspoon of Sea Salt

1/2 Teaspoon of Cream of Tartar

1/4 Teaspoon Baking Soda

Directions: In a food processor, add all the dry ingredients. (Tapioca, Tigernut, Coconut Flours, Salt, Cream of Tartar and Baking Soda). Pulse a few times to blend. Add the shortening and pulse to get pea sized pieces in the flour. Add the wet ingredients and process until completely combined and coming together in a ball. Remove from the food processor and form a ball with the dough. Lay the dough out between to pieces of cookie sheet sized parchment paper, and roll into a rectangle until the dough is 1/2 inch thick.

Filling Ingredients:

1 Cup of Medjool Dates, Soaked for ten minutes in warm water and pits removed

1/4 Cup of Fresh Squeezed Orange Juice

1/4 Teaspoon of Orange Zest

1/8 Teaspoon of Salt

1/2 Teaspoon Pure Vanilla Extract (No Alcohol for AIP Friendly)

1/8 Teaspoon Sea Salt

Pulse all the ingredients together in the same food processor you made the dough in. No need to wash the processor. Spread the filling to within a quarter inch of the prepared, rolled dough.

Coconut Orange Sweet Roll Dough Spread with Filling

Coconut Orange Sweet Roll Dough Spread with Filling


Taking the edges of the parchment as a guide, roll up the buns on the long side. It should look like this.

Ready to Slice Coconut Orange Sweet Rolls

Ready to Slice Coconut Orange Sweet Rolls


Slice the buns into twelve even pieces with a serrated knife.

Place on your prepared, parchment lined baking sheet. Like this:

Coconut Orange Sweet Rolls Ready to Bake

Bake in your preheated oven for 18 minutes, until the buns are starting to brown.

Remove from the oven and cool completely before frosting. Icing Recipe Below!

Coconut Orange Sweet Rolls Ready to Frost

Sweet Coconut Orange Rolls Icing

Ingredients:

1/2 Cup Coconut Butter

2 Tablespoons of Honey

2 Teaspoons of Tapioca Flour

1/8 Teaspoon of Sea Salt

With a hand held mixer, mix all the ingredients until creamy. Spread it on the cooled rolls. They are ready!

Coconut Orange Sweet Rolls Inside Frosted

Iced Orange Sweet Rolls are the perfect treat! Paleo, AIP and Gluten Free

Makes 12 Rolls.

Eat Your Nutrients!

Eat Your Nutrients!


Baked Proscuitto Topped Tilapia with Parsnip, Leek, Celeriac Mash

Are you looking to get more seafood into your weekly meals? Here is a flavorful, moist, and easy way to make fish that is pretty enough to serve for company, and fast enough to make for a weeknight meal!

Proscuitto Topped, Baked Tilapia

Baked Proscuitto Topped Tilapia with Parsnip, Leek, Celeriac Mash


I like to serve the fish on top of a mound of Parslied Parsnip, Leek, Celeriac Mash. They go perfectly together! Find the recipe below!

Baked Proscuitto Topped Talapia

Ingredients:

9 Talapia Filets

3 Oz. Proscuitto (I used this one with just pork and sea salt in the ingredients)

3 Tablespoons Extra Virgin Olive Oil

1 Teaspoon Sea Salt

1 Teaspoon Garlic Powder

1 Teaspoon Parsley

Preheat the oven to 350º degrees. On two parchment lined cookie sheets, lay out the filets. Brush them with olive oil top and bottom. Mix the sea salt, garlic powder and parsley together in a small bowl, and rub all over the fish top and bottom. Lay one thin piece of proscuitto on top of each seasoned fish filet. Bake in the preheated oven for 12 minutes or until the thickest part of the fish reaches 145º degrees.

Place the fish atop Parslied Parsnip, Leek, Celeriac Mash,  (recipe below) or serve with your favorite sides.


Proscuitto Topped, Baked Tilapia

Baked Proscuitto Topped Tilapia with Parslied Parsnip, Leek, Celeriac Mash


Parslied Parsnip, Leek, Celeriac Mash

Ingredients:

2 Large Parsnips

2 Leeks

1 Celeriac Root

2 Scallions, diced

1 Cup Bone Broth or Chicken Broth

1/4 Cup Coconut Milk (Full Fat no additives. I use this brand.)

2 Tablespoons of Extra Virgin Olive Oil

1 Teaspoon Sea Salt

1 Teaspoon Parsley, plus more for garnishing

Directions:

Peel and Large Dice the Parsnips, Leeks, Celeriac Root and Scallions. Add Olive oil to a heavy, 5 1/2 quart, coated cast iron pan. I used this one, which I can’t live without! 🙂 Add the vegetables and sea salt, and sautee over medium high heat, uncovered, for five minutes, stirring occasionally. Add the broth, and bring to a boil. Reduce the heat to a simmer. Cover and cook the vegetables for 15 minutes until fork tender.

Scoop the vegetables and broth hot into a food processor. Add the parsley and coconut milk, and puree until smooth. Place in a serving bowl, and sprinkle with additional dried parsley.

I suggest getting the vegetable mash started first, and then prepping the fish and baking it. Everything will then be ready at the same time for serving.

Yum! Delicious!

Eat Your Nutrients!

Eat Your Nutrients!

Paleo Pizzelle Cookies

I am delighted to have created a Grain Free version of one of my favorite cookies…..Pizzelles!

Pizzelle Cookies Paleo Style!

Pizzelle Cookies Paleo Style!


The first time I had these was when I was a child, and I was not gluten free. We had a neighbor from Italy, and his mother came over from “the old country” for a visit and brought her pizzelle maker with her. I was wowed by the cookie! They are delicately crispy and have an intricate pattern. I had never had anything like them, and my own mother started making them every year for the holidays.

Every year at Christmas since having to give up grains, I have missed these cookies! Whether you are gluten and grain free or not, I think you will love them! You do need a special pizzelle maker that you can find here. But it is a great addition to you kitchen if you love cookies!

Paleo Pizzelle Cookies

Preheat your pizzelle maker by plugging it in while you mix up the cookies.

Ingredients:

1 1/2 Cups Super Fine Almond Flour

1/4 Cup Tapioca Starch

1/4 Cup Maple Sugar

2 Tablespoons Arrowroot Flour

2 Tablespoons of Organic Shortening

1/2 Teaspoon Ground Anise (Omit for a Vanilla Pizzelle)

2 Eggs

1/2 Teaspoon Vanilla Extract

1/4 Teaspoon Sea Salt

Directions: Mix the almond flour, tapioca starch, maple sugar, arrowroot, anise and sea salt together in a medium bowl with a whisk. In a seperate bowl whisk together the eggs, melted shortening and vanilla extract. With an hand held electric mixer, blend the wet ingredients into the dry until it holds together and is thoroughly blended.

With a tablespoon cookie scoop, scoop balls of dough onto the pizelle maker, like this:

Pizzelle Cookie Dough Ready to Press

Pizzelle Cookie Dough Ready to Press


Close the hot pizzelle maker, and press the dough firmly to spread it. Set a timer for two minutes, when the timer is done open the press gently, and remove the cookies with the tines of a fork to loosen them from the press carefully. If the press doesn’t easily open, wait a few more seconds. Cool on a wire rack, and repeat until all the cookies are made.

Pizzelle Cookie Ready to Remove from Press

Pizzelle Cookie Ready to Remove from Press

Makes to 16 Pizzelle Cookies

Paleo Pizzelle Cookies

Paleo Pizzelle Cookies


Plate of Pizzelle Cookies

Plate of Pizzelle Cookies

Paleo Pizzelles Grain Free Italian Cookies. Crispy and Delicious.

How to Make Chocolate Cherry Energy Balls Demonstration

It’s the day before Thanksgiving! I am busy in the kitchen all day, what about you?

Today I am sharing a video demonstration of my recipe for Chocolate Cherry Energy Balls that will bust your sugar cravings and add nourishment and energy to your day without adding those holiday pounds! Happy Thanksgiving!

Blessings to you and your family!

1 15 16 17 26