Treats

Carrot Cake Quick Loaf – Grain Free

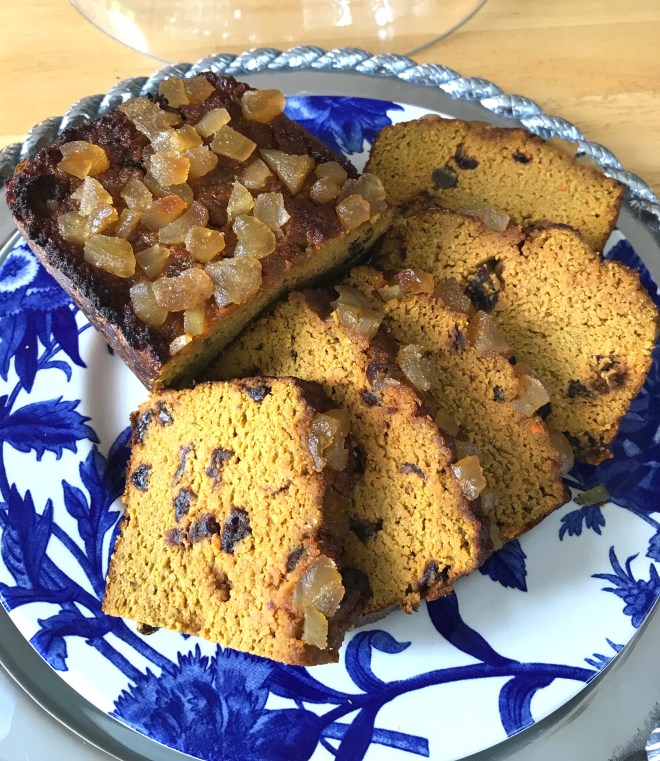
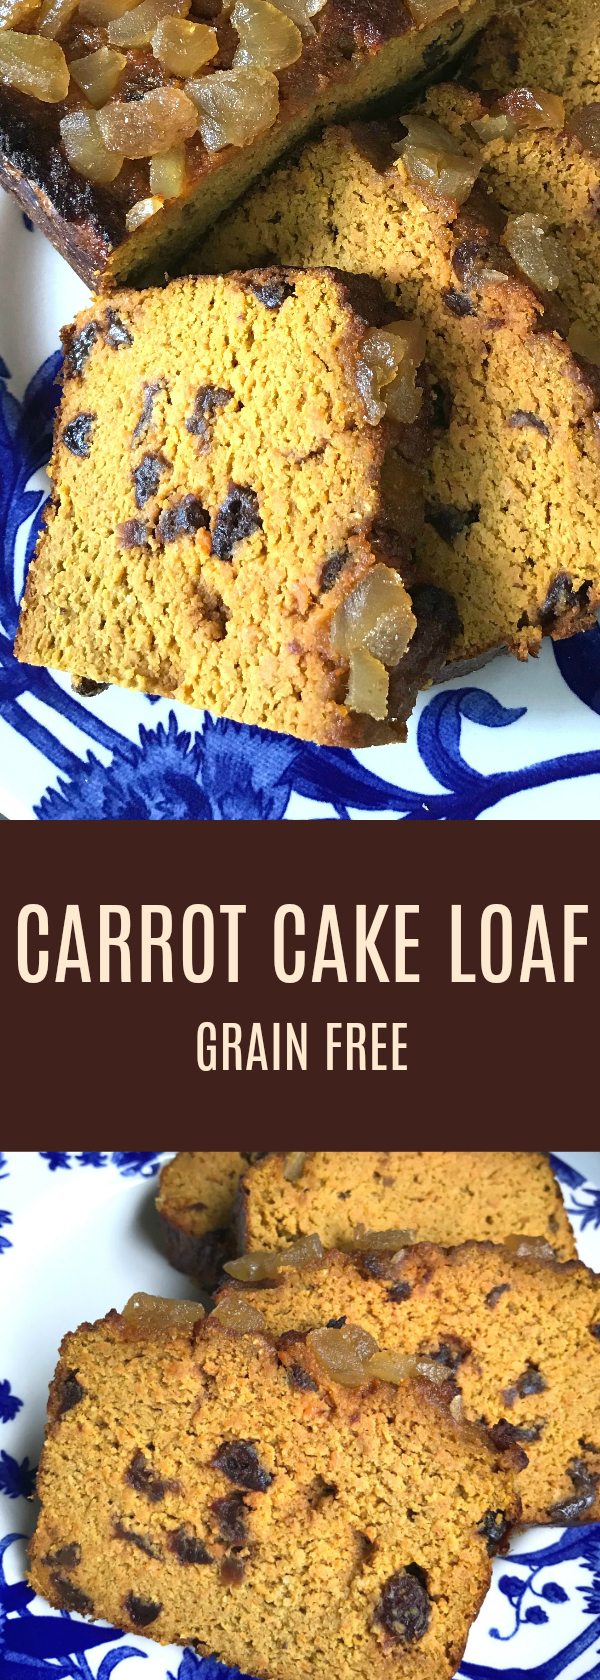
Moist and delicious Carrot Cake Quick Bread? Yes, please! This quick bread recipe is grain and dairy free and lower in carbs. It has chopped crystallized ginger sprinkled on the top, raisins in the batter, and is sweetened with pure maple syrup! There are plenty of carrots and the warm spices of classic carrot cake! I like to snuggle up with a piece of this and a good book or my favorite Netflix series!

Carrot Cake Quick Loaf

The batter blends up quickly in a food processor, so there is no need to grate the carrots, which can be tedious. Line your baking pan with parchment to lift the loaf right out of the pan and have an easy clean up!

Carrot Cake Quick Bread Loaf

sliced carrot cake loaf

Carrot Cake Loaf

Preheat your oven to 325º degrees. Grease a 5″ x 7″ Loaf Pan and line it with parchment. I like to cut a piece to fit the long sides of the pan with some extra over the edges so I can simply lift it out of the pan. See photo below.

Ingredients:

3 Cups of Chopped Raw Carrots

6 Eggs

1/2 Cup plus 2 Tablespoons of Coconut Flour, scooped and leveled (I use this brand)

1/4 Cup of Apple Butter

1/2 Cup of Raisins

1/3 Cup of Avocado or Coconut Oil

1/4 Cup of Pure Maple Syrup

1 Teaspoon of Pure Vanilla Extract

2 Teaspoons of Cinnamon

1/2 Teaspoon of Ground Ginger

1/4 Teaspoon of Mace or Nutmeg

1/4 Teaspoon of Sea Salt

1/2 Teaspoon of Baking Soda

1/4 Cup of Candied Ginger, Chopped (omit for very strict Paleo as there is a bit of sugar here)

Directions:

Using a food processor with a blade, chop the carrots, processing until they are a crumble consistency. Add the eggs and blend until pureed with the carrots. Add the Coconut Flour and remaining ingredients, except the crystallized ginger for the top, and process for about two minutes, scraping the sides of the bowl a couple times with a rubber spatula. The coconut flour will start absorbing the liquid and be a nice cake-like batter. With a rubber spatula, scrape all the batter into your prepared loaf pan, and rap the pan on your counter a couple times to level the batter somewhat. Take your crystallized ginger and sprinkle it on the top of the batter. Bake in the oven for 1 hour 30 minutes keeping a close eye on the bread at the end. It is done when the loaf springs back in the center when touched with your finger.

Remove from the oven, and cool for ten minutes in the pan. Then, remove the loaf from the pan and cool completely on a wire rack before slicing.

Enjoy!

Grain Free Carrot Cake Loaf - Grain Free with Raisins, Maple Syrup and Crystalized Ginger! Paleo, Gluten and Dairy Free

Blueberry Lemon FroYo

Blueberry Lemon FroYo

Fro Yo is one of Summer’s simple pleasures! It has the frozen sensation and creaminess of ice cream, but has the benefit of being healthier, with more protein and probiotics to promote good gut micro flora. Why not take it up a notch further by making your own healthier version with less sugar and more real food goodness like fruit, pure honey, cinnamon and fresh Greek yogurt which is packed with calcium and protein? Here is an easy and super delicious recipe! Feel free to mix up the fruit you use.

Lemon Blueberry Fro Yo, Gut Healthy, No Refined Sugar, Real Ingredients Frozen Yogurt

BLUEBERRY LEMON FROYO

Ingredients:

3 Cups of Greek Yogurt (24 Hour Homemade Yogurt for SCD)

3 Cups of Frozen Blueberries

1/4 Cup of Honey

2 Tablespoons of Fresh Squeezed Lemon Juice

1 Tablespoon of Pure Vanilla Extract

1/2 Teaspoon of Ground Cinnamon

In a food processor, add all the ingredients and pulse, then blend until you have a smooth consistency with most of the blueberry smooth and creamy. Taste to make sure the sweetness is to your liking.

Place your FroYo base into an electric ice cream maker, and churn as directed on your machine. I used this one, and it took 30 minutes.

The FroYo is best eaten immediately, but you can freeze any leftovers in a sealed container, and let it thaw on your counter until soft enough to scoop.

Cookies and Fro Yo

You can find the recipe for the Cashew Lemon Cookies pictured here. 🙂


Grain Free Skillet Monster Cookie!

Grain Free Skillet Monster Cookie - Party Fun!

Fun Food is great for entertaining, and what is more fun that a giant monster cookie made in a cast iron skillet? Make it for your kids and their friends, but don’t forget the adults! They like to have fun too!

Skillet Monster Cookie (Paleo) - Fun Crowd Pleaser

Grain Free Skillet Monster Cookie

Preheat Oven 350º degrees F.

Ingredients:

2 Pastured Eggs

1/2 Cup of Coconut Flour (I Use This)

1/4 Cup of Pure Maple Syrup

1/2 Cup of Ghee, Butter (softened) or Olive Oil, plus 1 Tablespoon for Greasing the Pan

1 Teaspoon of Pure Vanilla Extract (Like This Gluten Free Brand)

1/2 Teaspoon of Sea Salt

1/2 Teaspoon of Baking Soda

1/3 Cup of Dried Cranberries

1/3 Cup of Dried Raisins

1/3 Cup of Raw Pecans

1/3 Cup of Dark Chocolate Chips (I use Enjoy Life)

Party Skillet Monster Cookie - Grain Free Delicious and Fun!

Directions:

In an 8″ Cast Iron Skillet, melt the Ghee or Butter and brush up the sides of the pan. If using olive oil just brush around the bottom and sides of the pan.

In a large mixing bowl, beat your eggs and Ghee, Butter or Olive Oil until creamy with a mixer. Add the maple syrup and vanilla and mix thoroughly. Sift together the coconut flour, salt and baking soda. Put the cookie dough into the greased skillet, and spread it evenly to the edges. Now, sprinkle the cranberries, raisins, pecans and chocolate chips on the top and press into the dough evenly.

Place the skillet into the preheated oven, and bake for 20 to 25 minutes, or until the edges are golden brown. Remove from the oven and what fun!….A beautiful, decadent skillet cookie! Great for a party or cookout!!!

For extra decadence, top the skillet cookie while still warm with coconut milk ice cream, like this recipe!

Crowd Pleasing Giant Cookie in a Skillet! Grain Free, Paleo with a Dairy Free Option!

Blueberry Pumpkin Seed Biscotti

Blueberry Pumpkin Seed Biscotti - Paleo, Gluten Free

Here’s a brand new delectable cookie recipe using dried blueberries and crunchy sprouted pumpkin seeds! The result is a vanilla blueberry crunchy cookie you will love! They are crumbly and delicate, so handle with care. Bonus! They are starch free!

Blueberry Pumpkin Seed Biscotti Grain, Dairy and Nut Free

Blueberry Pumpkin Seed Biscotti

Ingredients:

2 Eggs

1/2 Cup of Coconut Flour

1/4 Cup of Olive Oil

1/4 Cup of Maple Syrup

1 Teaspoon of Pure Vanilla Extract

1/4 Teaspoon of Baking Soda

1/4 Teaspoon of Fine Sea Salt

1/3 Cup of Dried Blueberries (I used these)

1/3 Cup of Sprouted Pumpkin Seeds (like these) Regular pumpkin seeds will give you different results than sprouted.

Directions:

Preheat your oven to 350º degrees F.

In a medium bowl, beat the eggs with a hand held mixer. Then add the olive oil, maple syrup and vanilla extract to incorporate. Sift together the Coconut Flour, Baking Soda and Salt. Add it to the liquid ingredients, and blend until incorporated. Finally, beat in the dried blueberries and pumpkin seeds.

Scoop the cookie batter onto a parchment lined cookie sheet, and using the sides of the parchment. Shape it into a rectangle measuring approximately 12″ x 4″ x 1″ high. Alternatively, you can shape it with slightly damp hands. This keeps the dough from sticking to your hands.

Blueberry Pumpkin Seed Biscotti - Grain, Dairy, Nut Free

Bake in your preheated oven for 18 to 20 minutes, or until the edges are starting to brown.

Remove from the oven and cool on the sheet for one hour. Reduce your oven’s heat to 325° degrees. Place the cooled cookie log onto a cutting board, and with a serrated knife, carefully slice the log on a diagonal, cutting the cookies into long rectangles about 1 inch thick each.

Place the cut side down back onto the parchment paper, and bake 5 minutes per side. After the first 5 minutes, take the cookies out of the oven and flip them over to the other cut side. Take care not to over brown, as all ovens are slightly different. Remove the biscotti from the oven and cool completely.

Store in an airtight container after cooling. Enjoy!

Makes 12

Blueberry Biscotti - Nut Free


Blueberry Coconut Balls – Nut Free, Paleo, SCD

Dried Blueberry Coconut Balls - Paleo

I love healthy snack balls! They are fun to pop in when you have a craving, or need something small to tide you over before a meal, or are having a snack attack and want it to be good for you, and taste like it isn’t. 🙂

Coconut Blueberry Balls - Healthy Snacking - Grain Free

Blueberry Coconut Balls for Healthy Snack Attacks

Here’s a recipe for Blueberry Coconut Snack Balls that fits the bill perfectly!

Blueberry Coconut Snack Balls

Ingredients:

1/3 Cup of Coconut Flour

1/3 Cup of Dried Blueberries (I used these)

1/4 Cup of Avocado Oil or Coconut Oil

2 Tablespoons of Honey

1 Tablespoon of Ground Flax

1 Teaspoon of Lemon Juice

1/4 Teaspoon of Sea Salt

1/4 Teaspoon of Ground Cinnamon

1 Cup of Toasted Coconut, Pulverized (I used Dang Coconut Chips that are already toasted, but you can toast your own.)

Directions:

In a medium bowl, add the coconut flour, flax, and salt. Mix with a whisk. In a separate bowl whisk together the honey, oil, vanilla and lemon juice. If using coconut oil, melt it just until runny. Add the liquid ingredients to the dry, and blend with a hand held mixer. Fold in the dried blueberries.

Place your toasted coconut in a mini food processor or use a mortise and pestle to pulverize the coconut flakes.

Now, scoop the dough into seven tablespoon sized balls, and roll in the pulverized toasted coconut.

Refrigerate and enjoy!

These Delicious Healthy Snack Balls Are Gluten, Nut and Dairy Free! Paleo and SCD

web-site-chractor-color-corrected


Chocolate Chip Cookie Dough Balls

Valentine’s Day is coming up soon, and these are a perfect chocolate indulgence if you looooooove chocolate chip cookie dough or chocolate chip cookies like me! They are enrobed in their own little portion size packages of dark chocolate. The recipe is egg free, so no need to be concerned about eating raw egg. They are also free of dairy, nuts, and gluten!

Chocolate Chip Cookie Dough Bites Dairy Free, Nut Free

You can package these in a pretty little container for gift giving, store them in the freezer, refrigerator or at room temperature. I like them cold. It just depends on how firm you want them. They will be quite firm in the freezer, less firm in the refrigerator and have a soft interior at room temperature.

Chocolate Chip Cookie Dough Balls - Dairy Free


Chocolate Chip Cookie Dough Balls

Ingredients for Cookie Dough:

1/3 Cup of Coconut Flour (scooped)

1/4 Cup of Avocado Oil

2 Tablespoons of Maple Syrup

1 Teaspoon of Vanilla Extract

1 Tablespoon of Ground Flax

1 Tablespoon of Grass Fed Gelatin

1 Teaspoon of Fresh Lemon Juice

1/4 Teaspoon of Baking Soda

1/4 Teaspoon of Sea Salt

1/3 Cup of Enjoy Life Mini Chocolate Chips

Directions: Sift together the Coconut Flour, Flax, Gelatin, Baking Soda and Sea Salt. In a separate bowl whisk together the Avocado Oil, Maple Syrup, Vanilla and Lemon Juice. Add the liquid ingredients to the dry, and mix with a hand held electric mixer until your dough is well combined. Stir in the Mini Chocolate Chips.

With a tablespoon sized cookie scoop, scoop the dough into round balls with flat bottoms onto a parchment lined baking sheet. Place the dough balls in the freezer for at least an hour.

Chocolate Exterior:

1 Cup of Enjoy Life Dark Chocolate Chips

When you are ready to dip the balls in chocolate, melt the chocolate chips over simmering water in a double broiler stirring constantly until all the chips are melted. (I make my own by taking a small saucepan and filling it with an inch of water and putting the chocolate chips into a metal mixing bowl that will fit on top of the saucepan and not touch the water.)

When the chocolate is smooth, dip each ball, one at a time, into the melted chocolate with two forks, coating it quickly. Then, place it back on the parchment lined cookie sheet.

Refrigerate until the chocolate is set, about half an hour.

Makes 9

Chocolate Chip Cookie Dough Balls Perfect for Valentines Day

A Decadent Chocolate Treat for Valentines Day or Special Occasion! These are delicious and free of major allergens.


Best Grain Free Graham Cracker’s Ever!


The Best Graham Crackers Paleo Egg Free

Oh my goodness, do I love a good, crunchy graham cracker! Since going gluten free and mostly grain free, a good graham with clean ingredients has been hard to find, and the other recipes I have tried either fall apart, don’t taste amazing or are too soft and wouldn’t hold up to toppings or s’mores.

The Best Grain Free Grahams Ever!

These I literally had to put out of my sight in order to keep myself from munching on them every time I came into the kitchen. If you are a fan of the Sandlot Movie, like I am, (It’s an all time family favorite), you know Smalls would never settle for a whimpy gram to stuff his face. Watch the scene here:

These grahams are delicious in every way……texture, flavor, sturdiness….. and you can make them any size you want. They also happen to be egg free. I have been testing them for several months, and never was completely satisfied until this week when I was in a hurry and whipped together some while making dinner on a busy night, because we needed some Grahams in the house. They turned out great! Since I wasn’t actually in “testing” mode, I didn’t write it down until after they were done, and turned out so well. So, the next day, I retested them with honey instead of maple syrup. They turned out tasty with the honey, but you have to watch them carefully so they don’t burn. I again tested them using maple syrup, and they were s’more worthy! The maple syrup version is my favorite. It gives the grahams a true graham flavor and doesn’t over brown. These graham crackers can be enjoyed year-round. They are great for packing in lunches sandwiched with some nut butter and good quality fruit spread, and they are so, so s’more worthy! So campfire season, watch out, because Everyone should have good grahams!

Everyone Deserves a Good Graham

The Best Grain Free Graham Crackers Ever!

Preheat your oven to 350° degrees F.

Ingredients:

1 Cup of Coconut Flour (I used this brand) scooped and leveled

2 Teaspoons of Ground Cinnamon

2 Tablespoons of Ground Flax Seed

2 Tablespoons of Grass Fed Gelatin (I used Vital Proteins)

1/2 Teaspoon of Baking Soda

1/4 Teaspoon of Sea Salt

1/2 Cup of Avocado Oil (it is heart healthy and has high smoke point)

1/4 Cup of Pure Maple Syrup (You can substitute honey for SCD compliant, but watch carefully to prevent over browning)

4 Teaspoons of Pure Vanilla Extract

1/2 Teaspoon of Lemon Juice

Directions:

In a medium bowl, whisk together the coconut flour, cinnamon, flax and baking soda. Then, in another bowl, whisk together the liquid ingredients which are vanilla, avocado oil, maple syrup and lemon juice. Add the liquid to the dry ingredients, and beat with a hand held mixer for one minute. Sprinkle the gelatin over the top, and beat again until it is completely incorporated.

Form the dough into a ball, and place between two sheets of parchment paper. Flatten the ball with your hands, starting to form a rectangle. With a rolling pin, roll the dough out into a rectangle to fit a cookie sheet pan. The parchment paper should still be sandwiching the dough. This prevents your rolling pin from sticking. The dough should be about 1/4″ thick. Remove the top piece of parchment. With a fork’s tines, poke holes all over the dough, then use a pizza wheel to score vertical and horizontal lines making the graham crackers the size you like. Place the parchment with the rolled out grahams onto a cookie sheet. Bake in the oven for 8 to 10 minutes. They don’t take long. I recommend checking at eight minutes. When the edges are starting to turn golden brown, they are done. Remove them from the oven and cool completely on the cookie sheet before breaking them apart at the score marks.

How do you like to eat your grahams?

web-site-chractor-color-corrected


Holiday Eggnog Thumbprint Cookies – Paleo – Nut and Egg Free

Delicious Paleo Eggnog Cookies (1)

I started loving Eggnog when I was around 12. It seems to me that either you love eggnog, or you hate it. I think maybe it has something to do with the nutmeg, but I’m really not sure why. To me it is a creamy delicious holiday drink to be partaken of while decorating the tree or on Christmas Eve hopefully spiked with rum. 🙂

Here is a recipe for Eggnog Cookies that you can make quite easily. They are pretty, and there is no piping involved, so you can leave your decorating bag in the cupboard for another time. I used mace when making these cookies. Mace is the lacy outside of the nutmeg shell, and nutmeg is the seed inside. Mace is slightly more pungent than nutmeg, and both work beautifully in this cookie, so use what you like.

These cookies are grain, dairy, egg and nut free, and a great cookie to make when you have friends and family with food sensitivities and allergies like myself.

Eggnog Cookies - Egg, Nut and Dairy Free (2)

Holiday Eggnog Thumbprint Cookies

Preheat the oven to 350º degrees F. Lay out a parchment lined cookie sheet.

Ingredients:

1/2 Cup of Coconut Flour

1/4 Cup of Coconut Butter

1/4 Cup of Maple Syrup

1/4 Cup of Olive Oil

1/2 Cup of Full Fat Coconut Milk

1 Tablespoon of Gelatin (I use this kind)

1 Tablespoon of White Rum

1 Teaspoon of Pure Vanilla Extract

1/4 Teaspoon of Baking Soda

1/4 Teaspoon of Sea Salt

1/4 Teaspoon of Mace or Nutmeg

16 Teaspoons of  Coconut Butter for the Thumbprints after baking.

Directions:

Whisk together the Coconut Flour, Baking Soda, Sea Salt, Mace and Gelatin in a mixing  bowl. In another medium microwave safe bowl, add the coconut butter, maple syrup, olive oil, vanilla and rum. Warm the liquid mixture in the microwave for 30 seconds, then with a hand held electric mixer, beat until smooth and creamy. If the coconut butter isn’t softened enough, microwave another 30 seconds. Add the liquid mixture to the dry and beat with your electric mixture until you get a soft crumb consistency. This next step will activate the gelatin and make a natural egg replacement. Place the coconut milk in a microwave safe glass measure. Microwave to a boil, but be careful not to boil it over. This is different depending on the power of your microwave, but about one minute to one minute thirty seconds. You can also do this on your stove top. Now with your mixer running, pour in the coconut milk, beating as you go until the milk is all incorporated, and you have a nice dough. With a tablespoon scoop, scoop the cookie dough onto your parchment lined cookie sheet. Press a thumbprint into the center of each cookie, and bake for 10 to 12 minutes until just turning golden brown on the edges. Remove from the oven. Melt 16 teaspoons of Coconut Butter in the microwave, and with a teaspoon, pour the coconut butter one teaspoon each into the indentations of the cookies while they are still warm. Sprinkle with a little additional mace or nutmeg. Cool completely.

Makes 16 cookies


Holiday Eggnog Cookies - Nut and Egg Free


Grain Free Apple Tart

This is one of the desserts I am making for Thanksgiving this year. I love the warmth of the spices in apple desserts. It’s no surprise how popular apple pie scented candles are, and an apple tart baking in the oven makes the whole house smell amazing! I make a homemade non-toxic air freshener on my stove top with apples, oranges, cloves and a cinnamon stick. Here’s how if you want to do this……smells wonderful!

Apple Tart - Grain Free

I use coconut butter, maple sugar and cinnamon in the crust, which is similar to a sugar cookie crust. The apples are sweetened with maple sugar and apple butter. Because there is no top crust on this tart, I found tenting the pie while baking holds in the moisture and makes the apples retain their juiciness.

Apple Pie Tart Pin

Grain Free Apple Tart

Preheat your oven to 350° F and line an 8″ tart pan with parchment. I used a ceramic one, a pie pan will work as well. I have also made this recipe in a square metal baking pan.

Crust:

1/2 Cup of Coconut Flour

1/2 Cup of Coconut Butter

1 Egg

1/3 Cup of Maple Sugar

1/2 Teaspoon of Vanilla Extract

1/2 Teaspoon of Ground Cinnamon

1/4 Teaspoon of Sea Salt

In a food processor, process the crust ingredients until it is crumbly and blended well. Pour the crumbly mixture into the prepared pan, and press firmly and evenly with your fingers to form the crust. Bake in your preheated oven for 15 minutes. Remove from the oven and set aside.

Apple Filling

I used Cortland apples in this recipe. You can use any tart apple or combination of apples that are good for pies including McIntosh or Granny Smith.

Ingredients:

6 Cups of Tart Apples, peeled, cored and sliced 1/2″

1/4 Cup of Apple Butter, I use this clean brand, just apples and juice

1/4 Cup of Maple Sugar plus 1 Tablespoon for the top

2 Tablespoons of Lemon Juice

2 Tablespoons of Olive Oil or Coconut Oil, melted

1/2 Teaspoon of Ground Cinnamon

1/4 Teaspoon of Allspice

1/4 Teaspoon of Cardamom

1/4 Teaspoon of Ginger

1/8 Teaspoon of Nutmeg or Mace

1/8 Teaspoon of Sea Salt

Toss the apples with the lemon juice. Then, add in the maple sugar, spices and salt, and toss to coat evenly. Finally add the apple butter and olive oil or melted coconut oil and toss. Spread the apples evenly on top of the crust. Cover the pan with aluminum foil and seal the edges. Bake in your preheated oven for 60 minutes. Remove from the oven, and pierce an apple slice with a fork to make sure it is tender. Then, sprinkle the apples with the remaining one tablespoon of maple sugar, and bake uncovered an additional 10 minutes. Remove from the oven and cool.

This tart is great as is, but I do believe I will be adding my recipe for coconut whipped cream to embellish the top on turkey day! The recipe is here for that.

Coconut Milk Whipped Cream

Chocolate Chip Cranberry Orange Biscotti

Biscotti is my all time favorite cookie! They just go so well with coffee. I like to munch on biscotti when I play cards with friends. What’s your favorite card game? Mine is Euchre. I hope you still take time to play cards if you enjoy it! It seems harder to find the time anymore, but always leaves me feeling happy and connected. Here’s a great recipe for a cookie with holiday flavors, but you can enjoy it anytime of year.

Chocolate Chip Cranberry Orange Biscotti On a Plate with a Pug Mug - Grain Free

It is made grain free with coconut flour and has heart healthy olive oil in it.

Chocolate Chip Cranberry Orange Biscotti

Note: If you are eating strict SCD Low FodMap, substitute chopped pecans or walnuts for the chocolate chips.

Ingredients:

1/2 Cup of Coconut Flour, scooped and leveled

2 Eggs

1/4 Cup of Olive Oil

1/4 Cup of Honey

1/3 Cup of Enjoy Life Dark Chocolate Chips (here is the link for Amazon, but they are available at many grocery stores as well)

1/4 Cup of Apple Juice Sweetened Dried Cranberries (I use these)

Zest of one Organic Orange

1 Teaspoon of Vanilla Extract

1/4 Teaspoon of Baking Soda

1/4 Teaspoon of Sea Salt

Directions: Preheat your oven to 350°F.

In a medium mixing bowl, add the eggs, honey, vanilla, orange zest and olive oil. Beat with a hand held mixer for one minute. Sift together the coconut flour, baking soda and salt, then add it to the wet mixture. Beat for two minutes until the batter begins to thicken. Then, fold in the cranberries and chocolate chips, distributing evenly. Let set for 5 minutes to thicken. Coconut is very absorbent.

Scoop the cookie batter onto a parchment lined cookie sheet, an offset spatula, shape it into a rectangle measuring approximately 12″ x 4″ x 1″ high. Alternatively, you can shape it with slightly damp hands. This keeps the dough from sticking to your hands.

Chocolate Chip Cranberry Orange Biscotti Dough

Chocolate Chip, Cranberry Orange Biscotti Dough Log

Bake in your preheated oven for 18 to 20 minutes, or until the edges are starting to brown.

Baked Biscotti Log

Remove from the oven and cool on the sheet for one hour. Reduce your oven’s heat to 325° degrees. Place the cooled cookie log onto a cutting board, and with a serrated knife, carefully slice the log on a diagonal, cutting the cookies into long rectangles about 1 inch thick each.

Biscotti Ready For Second Bake
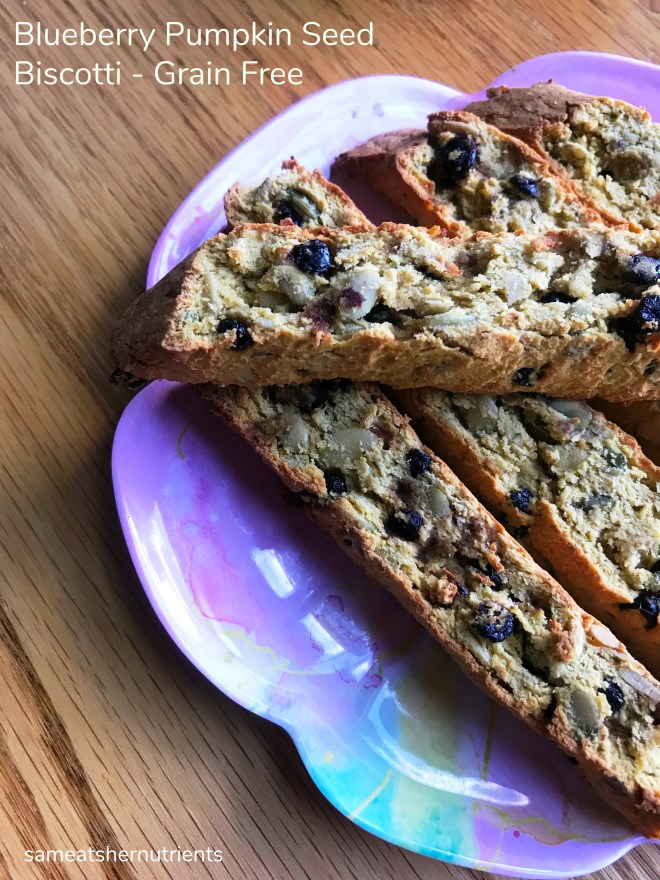
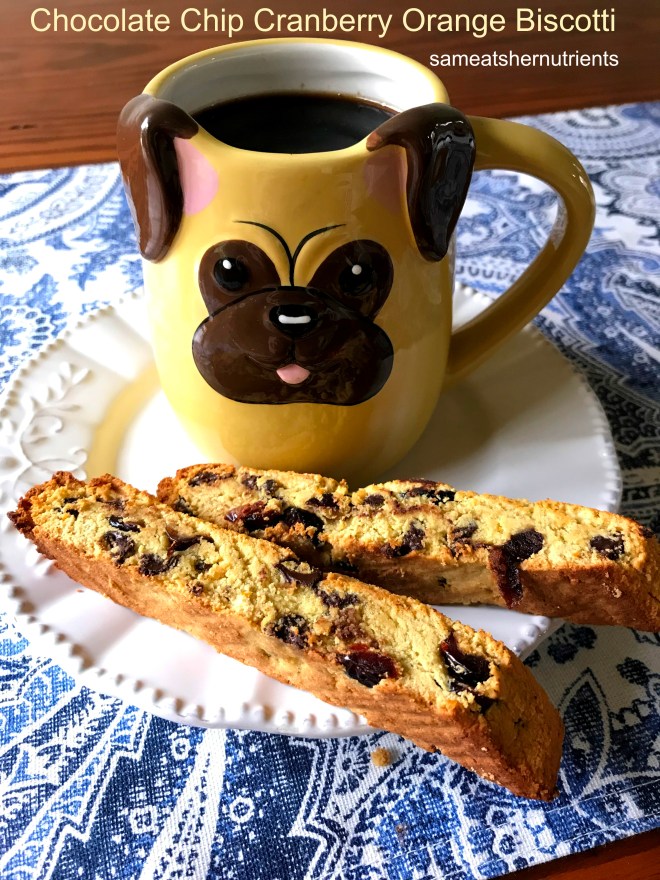
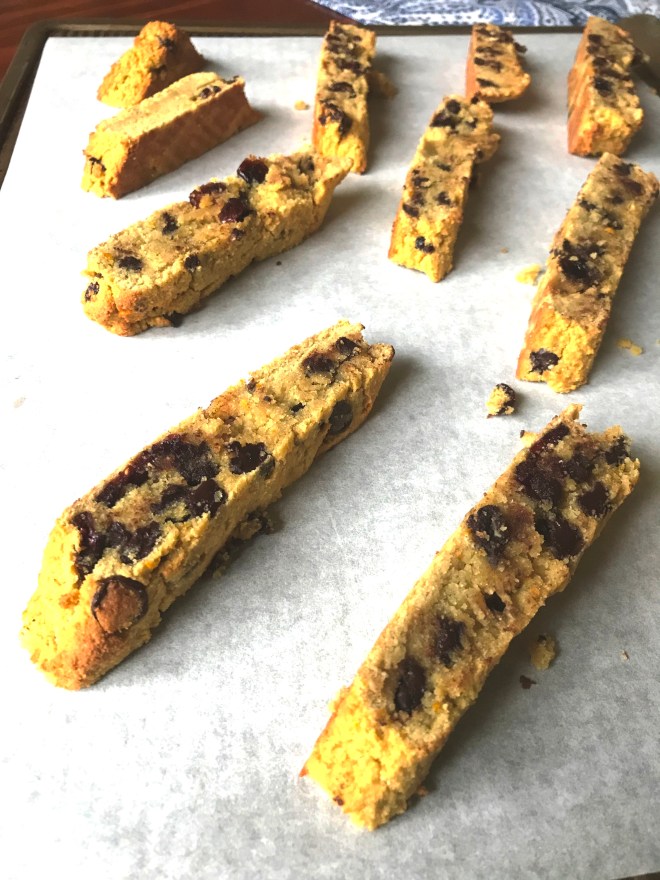
Place the cut side down back onto the parchment paper, and bake 3 minutes per side. After the first 3 minutes, take the cookies out of the oven and flip them over to the other cut side. Take care not to over brown, as all ovens are slightly different. Remove the biscotti from the oven and cool completely.

Chocolate Chip, Cranberry Orange Biscotti Paleo

Store in an airtight container after cooling. Enjoy!

Chocolate Chip Cranberry Orange Biscotti - Grain Free and Paleo