Treats

Blueberry, Dark Chocolate Chip, Pecan Quick Mug Muffin

Quick Muffin 6

Is there ever a season when we don’t need something quick in the kitchen? I don’t think so from my experience. Even in the Summer when the kids are out of school, the pace can be fast, and we have to purposefully carve out time to slow things down.

Quick Muffin 7

Our time Up North is winding down, and it has been so fun, relaxing and refreshing. Lots of quality time, but I’m feeling tired. Because even a vacation, or even especially a vacation, can make you tired.

Quick Muffin 3

During the last few days, I am running out of time to bake, and also not replenishing things like muffins that I don’t want to take with me traveling home.

Quick Muffin 5

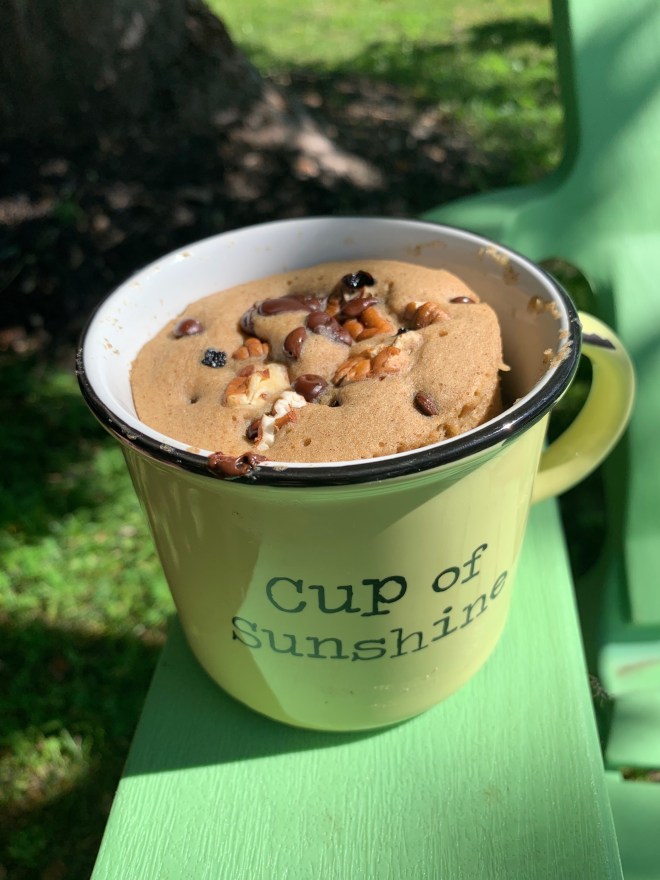
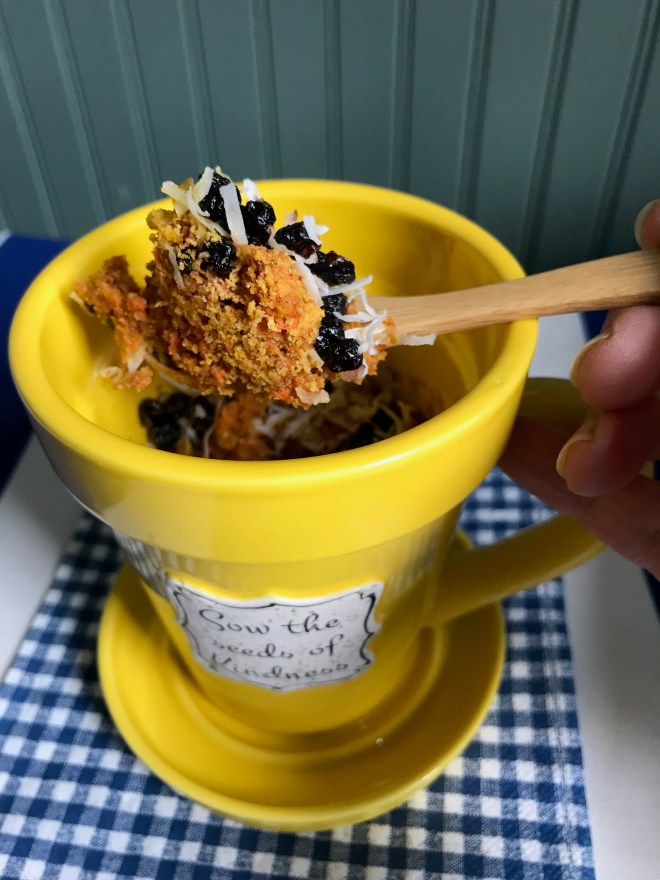
So, I’ve made a new recipe for a quick 2 minute mug muffin. No big batch, just enough for two servings. Half for now, half for later, or to share all at once. It’s big enough for two.

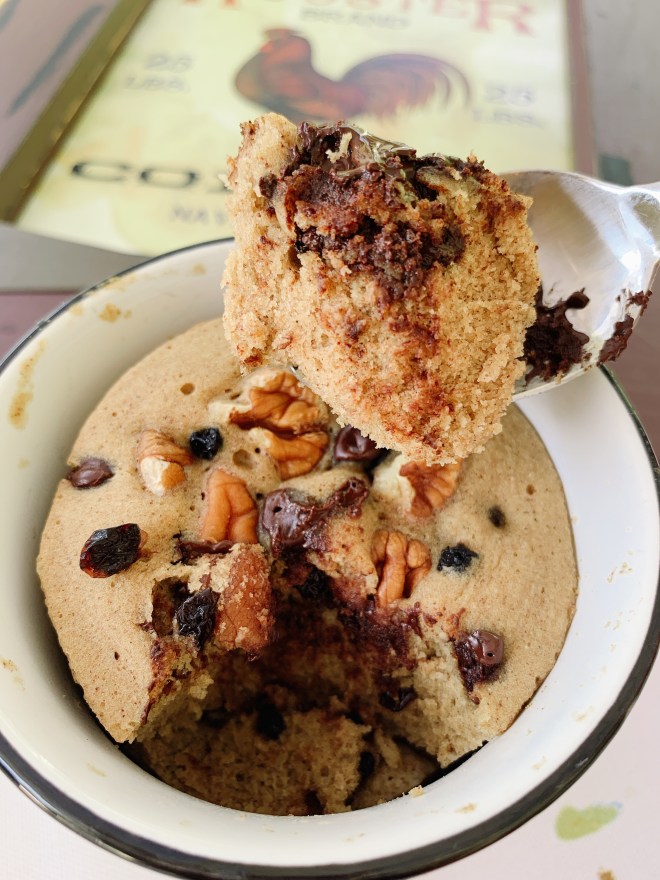
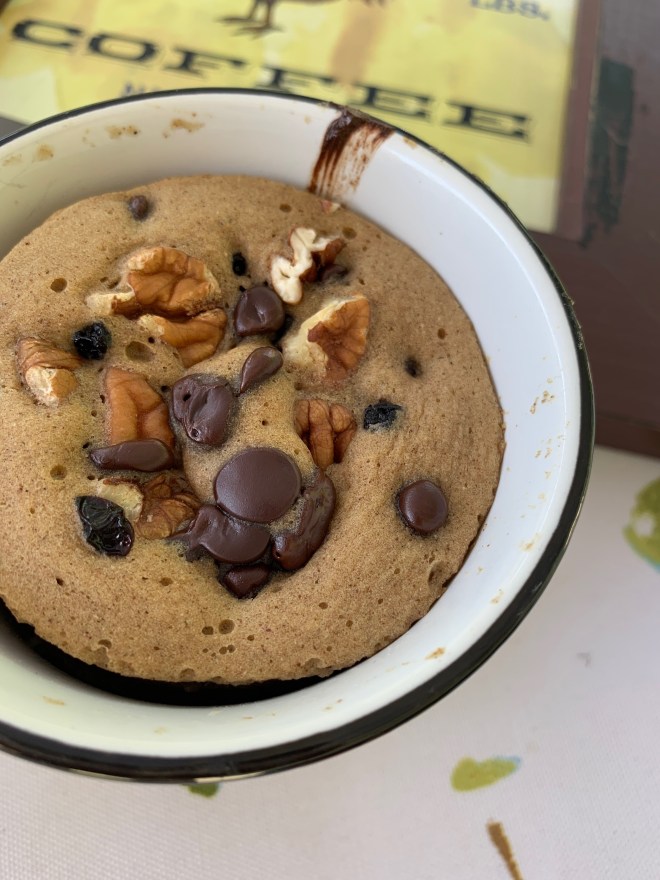
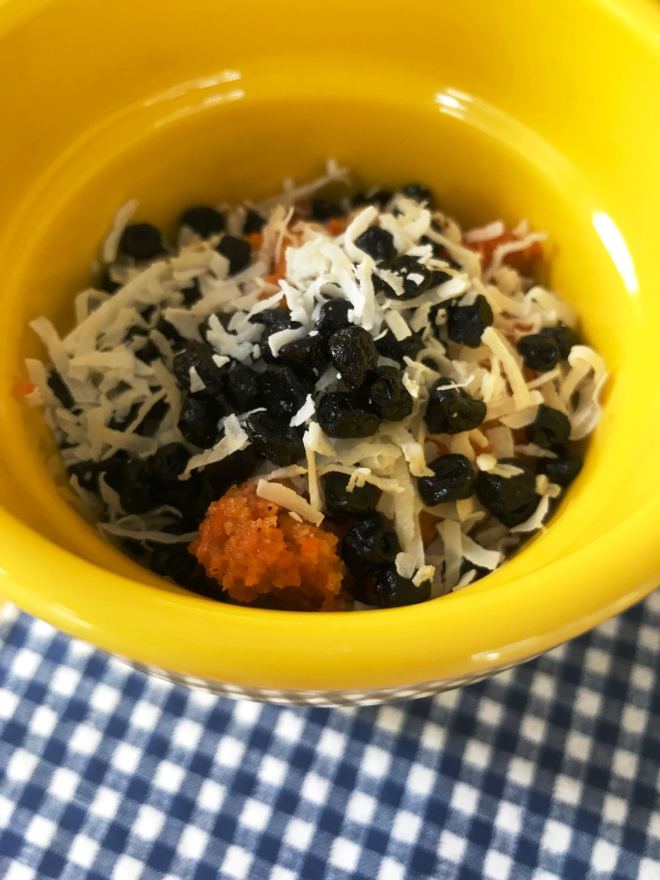
This one has dried blueberries, pecans and dark chocolate chips in it, and I used a combination of Banana and Quinoa flour, and sweetened it healthfully with applesauce and maple syrup.

Quick Muffin Batter in Mug

Blueberry, Dark Chocolate Chip, Pecan Mug Muffin

You will need one 16 oz. Microwave Safe Mug

Ingredients:

1 Egg

1/4 Cup of No Sugar Added Applesauce

1/4 Cup of Quinoa Flour

2 Tablespoons of Banana Flour

1 Tablespoon of Olive Oil

2 Tablespoons of Pure Maple Syrup

1/4 Teaspoon of Vanilla Extract

1/4 Teaspoon of Ground Cinnamon

1/8 Teaspoon of Baking Soda

A Pinch of Salt

1 Tablespoon of Dark Chocolate Chips

1 Tablespoon of Dried Blueberries

1 Tablespoon of Chopped Pecans

Directions:

Whisk together the egg, applesauce, maple syrup, olive oil and vanilla extract in a medium sized bowl. Add the remaining ingredients, except the chocolate chips, blueberries and chopped pecans. Whisk vigorously until smooth. Add a Tablespoon each of Dark Chocolate Chips, Blueberries and Chopped Pecans. Pour the batter into a 16 oz. microwave safe mug. (It should be half full). Sprinkle with additional chocolate chips, blueberries and pecans if desired.

Microwave on high for 2 to 2 1/2 minutes until cooked through and the muffin springs back to the touch. The first time you make this start at two minutes, and if needed go 30 seconds more. After that you will know your microwave time requirements for this muffin. Microwaves vary. This muffin Puffs Up Huge above the rim of the mug when microwaving. It will shrink back down level with the cup when it is cooled. There are no worries of it spilling over. Kids will enjoy watching this process, at least mine do. 🙂

Cool a little bit before eating this. It is good warm or cooled. 🙂

Serves 2

THISIS~1


Make Your Own Blueberry Pineapple Fruit Roll Ups!

Blueberry Pineapple Fruit Roll Ups Gluten Free Refined Sugar Free

Blueberry Pineapple Fruit Roll Ups! Does that sound tempting? These fruit roll ups have concentrated blueberry and pineapple flavor with  just real, whole fruit and a little pure maple syrup! Why would you want to make your own fruit roll ups? Here’s a few reasons. Feel free to comment with more.

~ If you like to pick your own fruit flavors

~ You just want a few simple ingredients that taste great and are real.

~ They are a sweet whole fruit snack.

~ There are no added sugars, juices or oils.

~ No added color, just the real deal.

~ You are a DIY’er

~ You like to see the smile on faces when they see you made some.

~ You think, what’s the big deal?….blend it, pour it and forget it ’til they are done, and they are delicious!

~ You show your love through making special treats.

~ You are looking for healthier snack alternatives without processed sugar.

Blueberry Pineapple Fruit Roll Ups

Here’s how you make them. It is simple and direct. The biggest part is cutting them into strips and rolling them up at the end.

Blueberry Pineapple Fruit Roll Ups No Refined Sugar

You will need a food dehydrator for this recipe. The hands on time is fairly short. They dehydrate for 18 hours, and you need do nothing while that is happening!

DIY Blueberry Pineapple Fruit Roll Ups

Cooking Time

20 Minutes to prep them, then hands off time…….Dehydrate approximately 18 hours at 135 degrees F.

Yields

25 to 30 Roll Ups

Ingredients

2 Pints of Fresh Blueberries

2 Cups of Fresh Pineapple

2 Tablespoons of Pure Maple Syrup

1 Tablespoon of Fresh Squeezed Lemon Juice

1 Tablespoon of Quality Gelatin

2 Tablespoons of Hot Water

Directions

Clean the blueberries with a fresh cool water rinse and place them in a high speed blender. Chop the fresh pineapple into chunks, and add it to the blender with the blueberries. Add the maple syrup and lemon juice. Blend until pureed. Now you will add the gelatin. Heat 2 tablespoons of water in your microwave until very hot. Whisk the gelatin into the hot water until it is foamy. Pour this into the blender with the blueberry pineapple mixture, and blend until smooth and incorporated.

Set out six dehydrator trays (my dehydrator is an Excalibur) and line them with non-stick drying sheets that go with your brand of dehydrator). Pour the fruit roll up mixture evenly onto six sheets. Pick up the sheets and swirl by tipping them to spread then out into 8″ circles.

Dehydrate at 135° degrees for approximately 18 hours, or until they are no longer tacky in the center but not crispy. They should still be pliable.

Remove the fruit roll ups from the dehydrator and cool. After they are cool, using kitchen scissors or a sharp knife, slice each roll up into strips. Cut parchment the same width as the fruit strips and roll them up with the parchment. Tie with a string. Place them in a sealed container and store at room temperature.

Blueberry Pineapple Fruit Roll Ups that you can make yourself with Whole Fruit, No Added Colors and No Refined Sugar

Chocolate Nut Butter Cups

These rich little powerhouses of goodness are a great treat to have on hand! Just one of these is enough to satisfy a sweet tooth. You can offer these decadent cups to those who are gluten free, dairy free, health conscious or vegan.

Chocolate Nut Butter Cups - Raw Chocolate, Dairy and Gluten Free

As a chocolate lover, as most girls are, these are chocolate fudge creamy goodness! With raw cacao, cashew butter, pecans and coconut oil at the top of the list, there is a lot of healthy ingredients you can feel good about, and no refined sugar!

Chocolate Nut Butter Cups Healthier Snacking

Keep these in the freezer or refrigerator. I like the firmness the freezer gives them, you choose.

Nut Butter Cups No Refined Sugar Raw Cacao

Prep Time

30 minutes

Prep Notes

These are a lower sugar treat that has healthy fats and Superfood Raw Cacao Powder in them. They are a good choice when you want something sweet.

Cooking Time

60 minutes

Yields

Makes 24

Ingredients

For the Chocolate Portion:

1 Cup of Raw Cacao Powder

6 Tablespoons of Coconut Milk

5 Tablespoons of Coconut Oil

1/4 Cup of Almond or Cashew Butter

2 Tablespoons of Maple Syrup or Raw Honey

1 Teaspoon of Vanilla

3/4 Teaspoon of fine Sea Salt

For the Filling:

1 Cup of Raw Pecans

3 Tablespoons of Maple Syrup or Raw Honey

1/2 Teaspoon of Vanilla Extract

a pinch of Sea Salt

Directions

  1. Place Mini Muffin Cup liners in a 24 count Mini Muffin pan
  2. In a Medium bowl with an electric mixer, mix together all the chocolate ingredients, and set aside.
  3. In a food processor, grind the raw pecans until they are a fine crumb consistency. Add in the honey, vanilla and salt, and pulse until it holds together when you squeeze it.
  4. Place 1 teaspoon of chocolate mixture in the bottom of each muffin cup, and press flat and evenly with your fingers.
  5. Scoop a scant teaspoon of pecan filling onto each muffin cup and press flat and evenly to cover the chocolate bottom.
  6. Finely, add the remaining chocolate mixture to the tops of each chocolate butter cup and press evenly. It will be a scant teaspoon for each. It’s okay if they are not perfectly covered. They are pretty that way.
  7. Freeze for 30 minutes.

Notes

Store in the Freezer or Refrigerator in a sealed container.

Chocolate Nut Butter Cups! These are creamy and delicious with ingredients you can feel good about. Dairy Free, Gluten Free, Paleo, Vegan

Chocolate Covered Banana Pops 3 Ways! Chocolate Raspberry, Toasted Coconut and Pecan!

Banana Pops on a tray and napkins
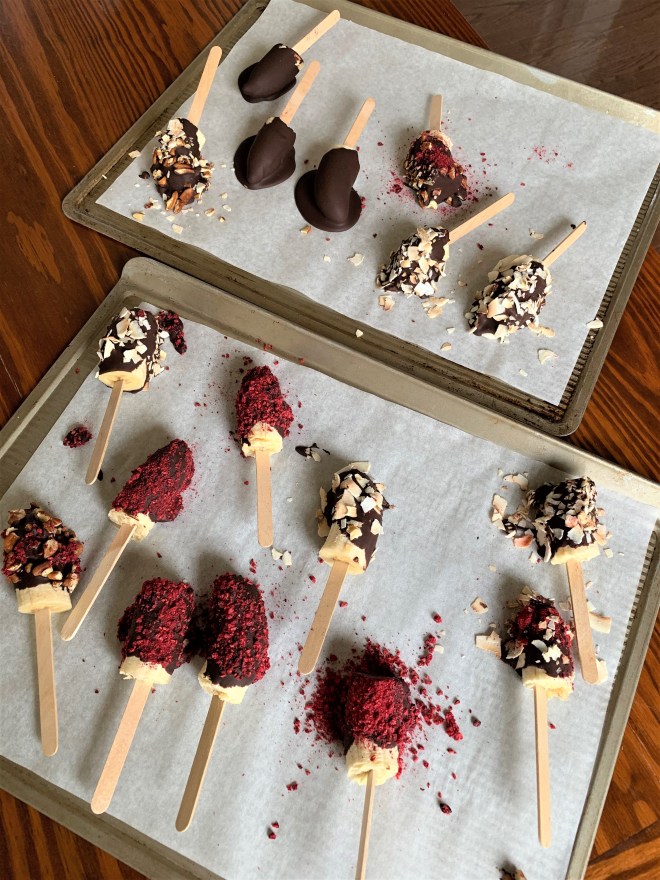
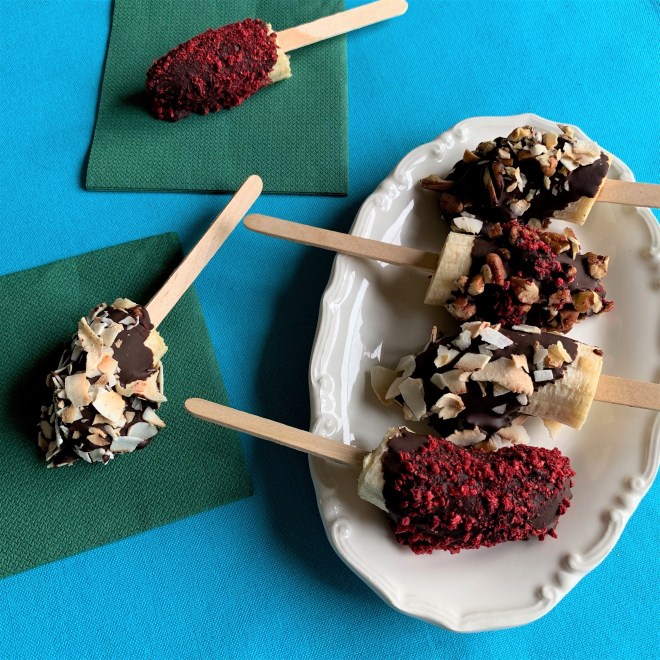
Banana Pops are a delicious healthy treat that you can make at home! They are beautiful and perfect for cravings! Seriously good!

Chocolate Covered Banana Pops on a stick

Kids love these too. Roll them in their favorite toppings, and if they are picky, make them plain dipped chocolate.

Yummy Yummy Banana Pops

There is a vast amount of toppings that you can roll these in, so go with your favorites. But I have to say, these three varieties are Very, Very delicious.

Chocolate Dipped Banana Pops on a cookie sheet

The raspberry has that tart flavor that contrasts beautifully with the dark chocolate cashew butter coating.

Raspberry Banana Pop

The toasted coconut is crunchy and delightful on the outside. Yum!

Chocolate Banana Pop with Toasted Coconut

If you love nuts on your hot fudge sundaes or in your ice cream, then the pecan version is yours!

I also combined the pecans and raspberries and pecans and coconut in some of the banana pops!

Yummy Yummy Banana Pops

Why not make a variety batch to please everyone?

Banana Pops 5

Super simple, fun and easy to make, you can definitely include the kids in making these!

Chocolate Covered Banana Pops 3 Ways

Ingredients:

5 yellow bananas (not too ripe, yellow with no brown spots)

9 oz. of Dark Chocolate Chips (I used this allergy free kind)

1/3 Cup of Cashew Butter (I used this Maple Sweetened brand)

1/2 Teaspoon of Pure Vanilla Extract

2/3 Cup of Toasted Unsweetened Coconut Flakes (like these)

2/3 Cup of Crushed Freeze Dried Raspberries (I used this organic brand)

2/3 Cup of Chopped Pecans

Popsicle Sticks

Directions:

Slice your bananas into equal thirds, and insert a Popsicle stick halfway into one end. Prepare a parchment lined baking sheet or two.

If you bought pre-toasted coconut flakes, crush them slightly with your hands, and place them onto a salad sized plate. If you would like to toast your own. Place unsweetened coconut flakes onto a cookie sheet, and toast them in a 350° oven for ten minutes, stirring once. Cool then crush.

Blitz your freeze dried raspberries in a mini food processor, or put them in a ziplock bag and crush them with a rolling pin.

Chop your pecans. Put all your toppings on individual salad plates in a row.

Melt the Chocolate Chips, Cashew Butter and Vanilla Extract together in a double broiler, stirring to combine.

After the chocolate mixture has melted and is stirred until creamy, set the pan in a row like this: bananas, melted chocolate, toppings, parchment lined cookie sheet.

Dip your bananas 3/4 of the way into the melted chocolate. Let the excess drip off. Then, roll in the topping of your choice. Set the dipped and rolled bananas on the parchment lined cookie sheet.

When all your bananas are dipped, place them into the freezer for one hour. They are ready to eat. Store the bananas in an airtight container in the freezer.

Makes 15 Banana Pops

Chocolate Covered Banana Pops 3 Ways! A healthy frozen treat with melted dark chocolate and cashew butter. These are dipped and rolled in toppings. Dairy and Gluten Free!

*This post has affiliate links in it. I receive a very small commission if you purchase through my links. The small commission helps cover the cost of maintaining this blog. Thanks! 🙂


Chocolate Cherry Valentine Hearts

chocolate cherry hearts gluten free dairy free
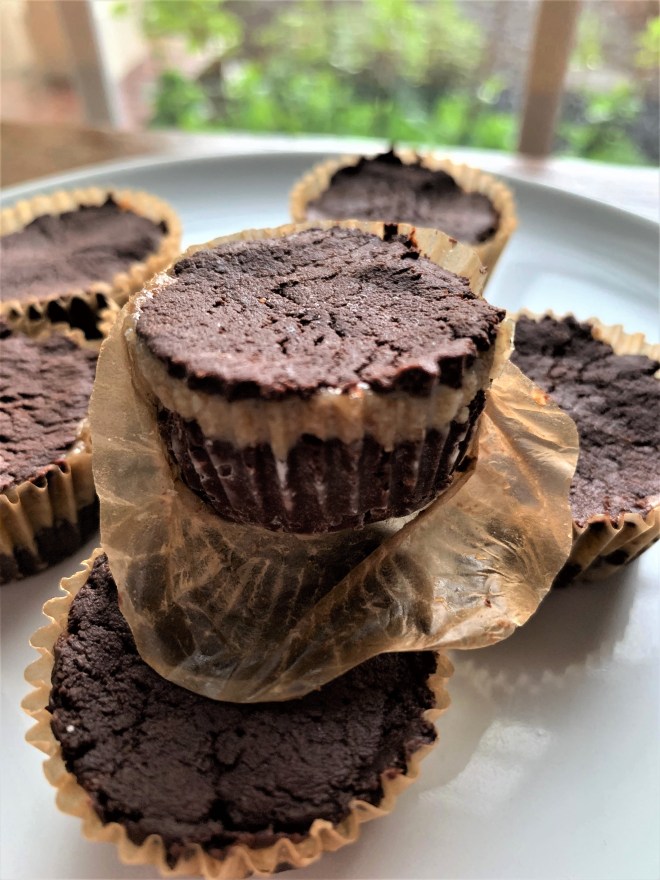
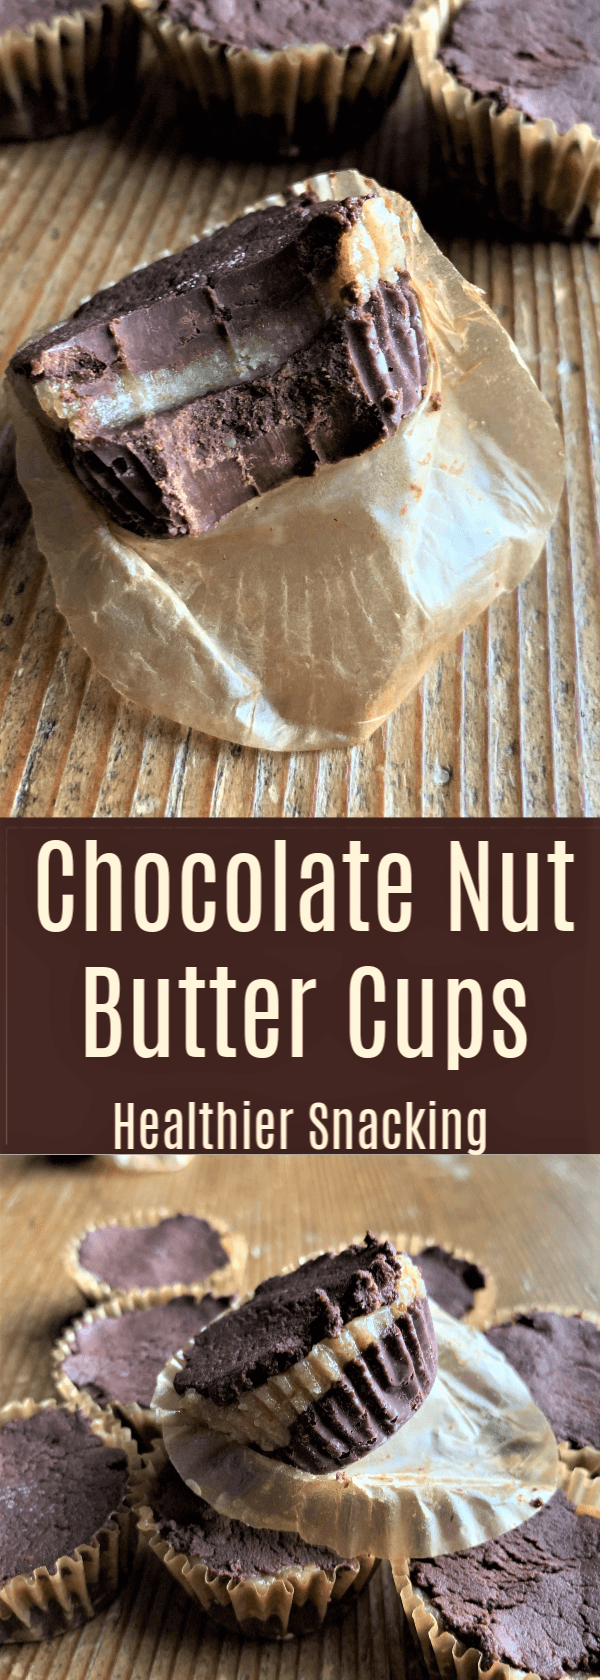
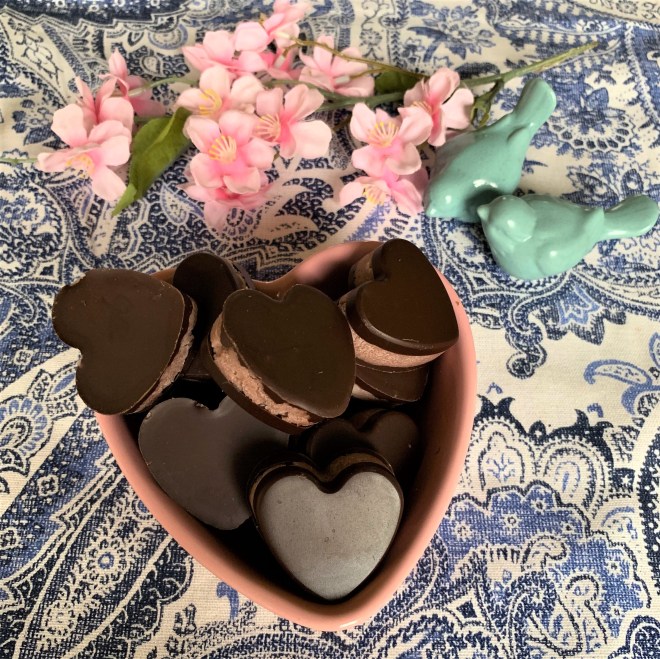
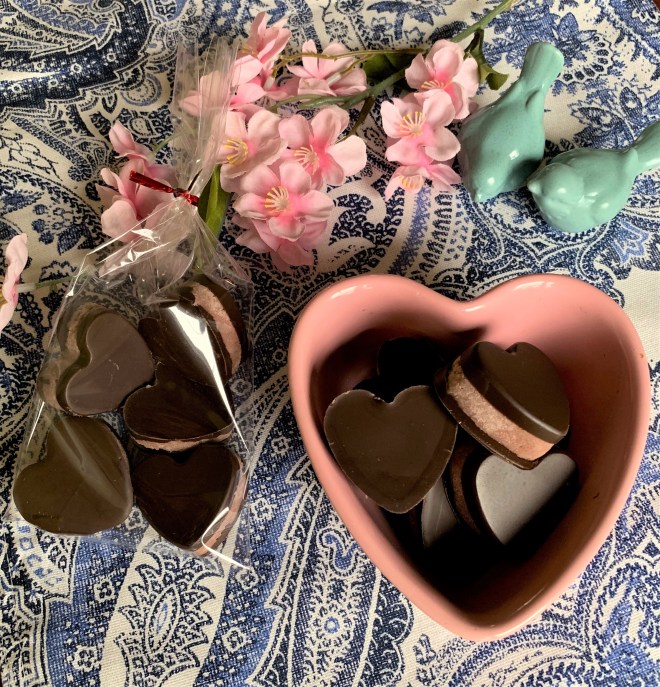
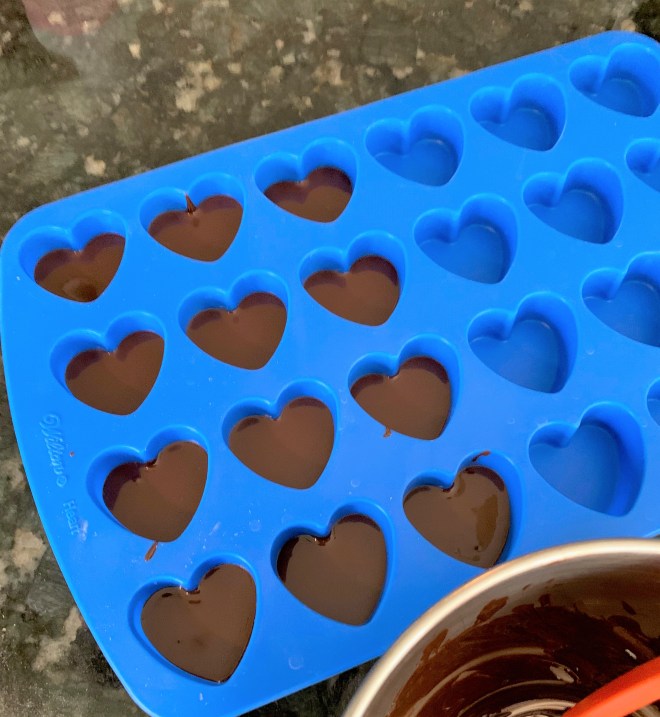
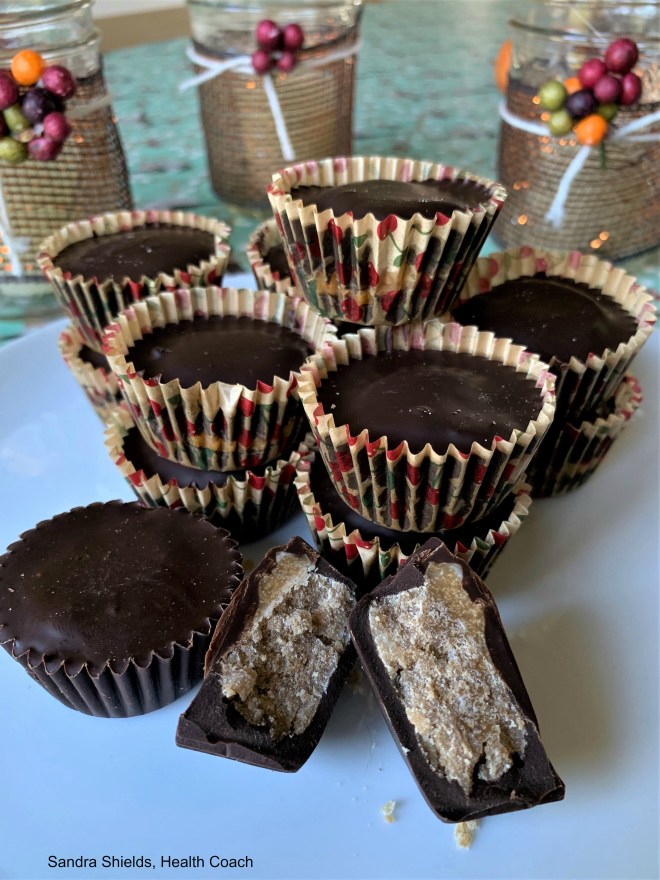
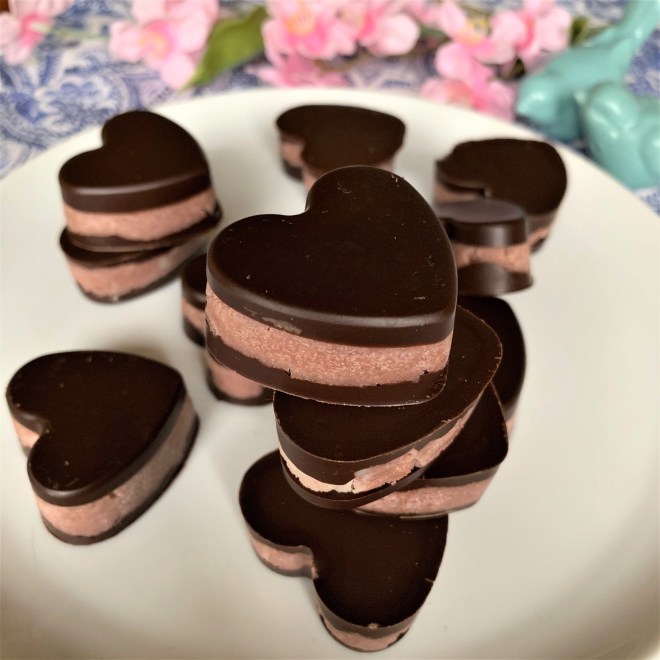
These gorgeous chocolate candies are pretty easy, and use just three delicious ingredients. Plus, they are gluten and dairy free! They package well for gifts too!
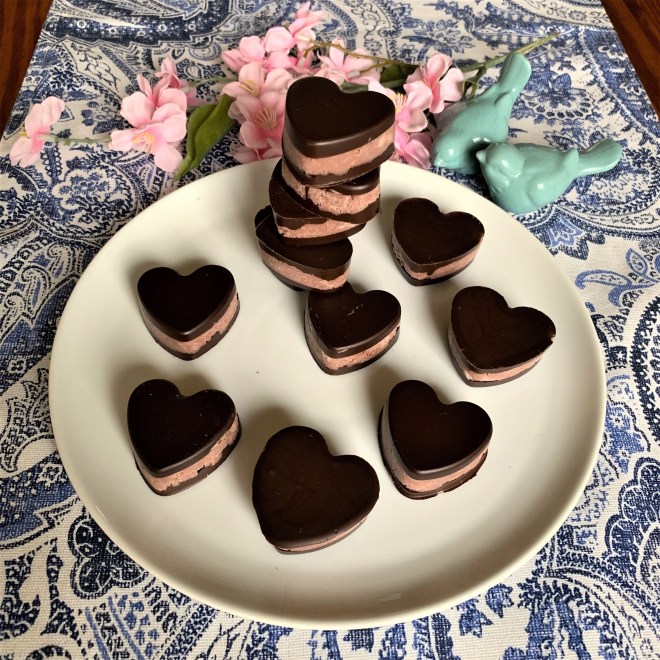
I think coconut butter is divine in candy, because it gives you that melt in your mouth feel. Who am I kidding, I can eat it straight off the spoon! In this recipe I combined it with cherry concentrate for the candy centers and layered it between dark chocolate.

chocolate cherry valentine hearts

I used a silicon candy mold to make the heart shapes (here). Mini muffin cups will work also, but the mold was inexpensive and can be used for baking too!

chocolate cherry valentine hearts to make yourself

These are perfect for Valentines Day, but I wouldn’t say no to them any time. You can even use different shaped molds depending on the season or occasion!!!

packaged chocolate cherry valentine hearts

Here’s a photo of the mold as I was making the candy. This is the first layer.

wilton mold

Chocolate Cherry Valentine Hearts

Ingredients:

1 Cup of Dark Chocolate Chips, divided (I used Enjoy Life)

1/2 Cup of Coconut Butter

2 Tablespoons of Cherry Concentrate (I used this organic brand)

Directions:

In a double boiler, place 1/2 cup of dark chocolate chips, and melt them stirring slowly.

Put a teaspoon of melted chocolate in the bottom of twelve heart molds, and put the mold on a cookie sheet. Tap the cookie sheet vigorously on the counter, so the melted chocolate spreads over the bottom of the hearts evenly. Put the mold in the refrigerator for ten minutes to set the chocolate.

Measure your coconut butter into a small microwave safe bowl that is big enough to use a hand held mixer in later. Melt the coconut butter in ten second increments, stirring in between until soft. Using a hand held mixer, and beat in the cherry concentrate.

Remove the candy mold from the refrigerator, and form the cherry filling into teaspoon sized balls. I use a teaspoon scoop to make this easy, and I scoop and roll them between my hands. Place a ball in each heart mold on top of the chocolate and press down to evenly cover the heart.

Melt the remaining 1/2 cup of dark chocolate chips, and spoon it evenly over the tops of the cherry filling. Vigorously tap the pan on the counter to flatten the melted chocolate and help it spread evenly. Refrigerate for ten minutes to set.

Makes 12 Heart Candies

diy chocolate cherry valentine hearts. these easy candies are great for gift giving and are dairy and gluten free!

*This post has affiliate links in it. I receive a very small commission if you purchase through my links. The small commission helps cover the cost of maintaining this blog. Thanks! 🙂

Chocolate Mocha Cups

‘Tis the Season for something yummy! I love these Mocha Cups because they are lower in sugar And really delicious! Chocolate and Coffee treats are one of my favorite combinations! These have a creamy coffee coconut cream center enrobed in delicious dark chocolate! They are a healthier treat for special occasions. Plus with just six ingredients they couldn’t be easier to make. They are also free of nuts, dairy and soy!Chocolate Mocha Cups Dairy Free Gluten Free Delicious

Chocolate Mocha Cups

Ingredients:

1 cup of Enjoy Life Dark Chocolate Chips

1/2 Cup of Coconut Butter

1 Tablespoon of Coconut Milk

2 Teaspoons of Instant Coffee Crystals (I used these)

1/4 Teaspoon of Pure Vanilla Extract

Pinch of Sea Salt

Directions:

Place 14 mini muffin liners into a mini muffin pan.

Heat the coconut milk in a small bowl in the microwave until simmering, then stir in the coffee crystals until dissolved. Measure the coconut butter into a medium bowl and soften slightly in the microwave in ten second increments until you can stir it easily with a fork. Note: If you overheat the coconut butter it will freeze up. Whisk the coffee and coconut milk mixture into the coconut butter with a fork. Stir in 1/4 teaspoon of vanilla and a pinch of sea salt. Make 14 teaspoon sized balls with the coconut butter mixture, and set aside.

In a double broiler on the stove melt your chocolate chips over simmering water. (I do this by placing a small saucepan with an inch of water on the stove, then creating a double broiler with a stainless steel bowl on top with the chocolate chips in it.) Make sure the water doesn’t touch the bottom of the bowl. Melt the chocolate stirring with a fork.

Place a teaspoon of chocolate in the bottom of each mini muffin cup. Rap the tin on counter to spread the chocolate evenly in the bottom of the cups. Place a prepared coconut cream mocha ball in each cup, and flatten it slightly with your fingertip. Spoon the remaining melted chocolate over the balls to make the cups. Rap the tin on the counter to make nice, flat chocolate tops. Refrigerate until set, about 20 minutes.

Makes 14 Cups

Dairy Free Nut Free Chocolate Mocha Cups

Apple Maple Coffee Cake with Maple Glaze

Apple Maple Coffee Cake with Maple Glaze Paleo

I’m sitting in my kitchen this morning listening to the rain pour down outside. It is really pleasing and cheerful after such a long hot and humid spell. It feels so refreshing after the oppressive heat. The air is cooler and more invigorating. I am envisioning everything getting washed fresh to bring in the new season.

Apple Maple Cake Grain Free Moist and Delicious

Because it is September, and the apples are in season, my mind always wanders to baked apples, warm cinnamon, cloves and spices.

What better way to welcome in the cooler weather than a coffee cake filled with delicious softly baked apples.

Whole Apple Maple Coffee Cake - Whole top View

Ming always gets frisky in the cooler weather, so we will be doing more outside walks. In the heat she just plops down and refuses to budge. Fawn pugs do have a double coat, which must be terribly hot. I can only imagine if I were wearing not one, but two coats in the hot weather, what I would do. Here she is in her beautiful new collar and leash from Pack Leashes. We always get her a brand new spiffy collar after Summer, and I found this company recently that donates 4 pounds of dog food to a no kill shelter with every purchase, plus their leashes are guaranteed for life! Gotta love that! You can get 20% off your purchase from me when shopping with them by using the code MINGANDLILY at checkout.

ming

I’ve recently been busy in my sewing room making quilts. In this case they are two panda quilts, one is finished, and I am almost done with the second. I’ve been sewing since I was in middle school. I made one of my prom dresses in high school, then when my husband and I bought our first home, I made window treatments, pillows, table runners and other home decor. When we had our little girls, I sewed them dresses and Halloween costumes and stuffed animals. Then a nice women in our town introduced me to quilting, and I found a whole new avenue that I really loved. Two years ago I opened an Etsy Shop, Porcupine Craft Studio.  You can visit if here: Right now I have many different bags available, and my daughter Jessica makes greeting cards using quilling art. The quilts will go in the shop in the next couple weeks. I find time to sew in the evenings, and I  find it relaxing and an enjoyable creative outlet.

Here’s my latest quilt.

Apple Maple c

Back to the Apple Maple Coffee Cake! It is perfect for a rainy day or a sunny autumn day. This recipe is grain free, dairy free and nut free. I topped it with a creamy coconut butter maple frosting which is spread over the baked apple top. The cake is baked with the apples in the bottom, which makes them perfectly soft.

Apple Maple Coffee Cake with Maple Glaze

Preheat the oven to 350º degrees F.

Ingredients for the Cake:

3 Cups of Peeled, Cored and Sliced Apples

1/2 Cup of Maple Sugar

1/2 Cup Plus 2 Tablespoons of Coconut Flour

6 Pastured Eggs

1/4 Cup of Organic Shortening 

1/4 Cup of Coconut Butter

1 Tablespoon of Pure Vanilla Extract

1 Tablespoon of Fresh Lemon Juice

1 1/2 Teaspoon of Baking Soda

2 Teaspoons of Ground Cinnamon

1/4 Teaspoon of Nutmeg

1/4 Teaspoon of Ginger

1/4 Teaspoon of Allspice

1/8 Teaspoon of Cloves

1/4 Teaspoon of fine Sea Salt

Ingredients for the Maple Glaze:

1/2 Cup of Coconut Butter 

2 Tablespoons of Real Maple Syrup

Directions:

Grease an 8″ spring form or cake pan with organic shortening. Draw a round circle on parchment paper using the bottom of the cake pan as a template. Cut out the circle and place it in the bottom of the greased pan.

Place the peeled, sliced apples in the bottom of the pan in concentric circles starting on the outside and working your way in.

apples

In a food processor, add six eggs and the maple sugar. Process until creamy. Add the lemon juice, vanilla extract, coconut butter (soften the coconut butter just slightly for ten seconds in the microwave) and palm shortening, process until creamy. Add the coconut flour, baking soda, salt, and all the spices. Process for thirty seconds, then scrape down the sides of the processor, and process another minute. Scoop the cake batter over the apples and spread evenly over the apples to the sides of the pan.

*If using a spring form pan, I recommend placing it on a cookie sheet to bake in case of leakage.

Bake in your preheated oven for 45 to 55 minutes, or until a toothpick comes clean when poked in the middle of the cake with just a few crumbs on it.

Remove the coffee cake from the oven, and cool on a wire rack for ten minutes. Remove the sides of the spring form pan and cool completely. If using a cake pan, run a knife around the edges of the cake pan, and invert onto a wire rack to cool. When the cake is cooled, you are ready to make the glaze.

This is super simple and delicious. Soften a half cup of coconut butter in the microwave. Do this in ten second increments just until it is soft. Whisk in two tablespoons of pure maple syrup with a fork. Then, spread the glaze evenly over the coffee cake. Now it is all done and ready to serve.

You can absolutely pour this glaze over the cake when it is still warm and serve it that way too! There is nothing better than a warm coffee cake!

Apple Maple Coffee Cake with Maple Glaze. This cake is moist and perfect for Autumn. Grain, Dairy and Nut Free!

Toasted Coconut and Dark Chocolate Ice Cream

Toasted Coconut and Chocolate Ice Cream.jpg

I have this slight obsession with toasted coconut ice cream with chocolate bits. There is this extraordinary ice cream shop where we vacation every Summer, and they have the Best ice cream……..Toasted Coconut is my favorite. It’s been around for years, but since becoming dairy intolerant, I haven’t chosen to partake. It is their #2 best seller. Of course, the ice cream has dairy (It is gluten free) which totally does not agree with me, and I don’t want to spend my vacay time with a belly ache and bloating because I couldn’t resist.

Toasted Coconut and Dark Chocolate Ice Cream

So, I was thinking “Dang Girl, aren’t you a food blogger and recipe developer?” Me to self, “Well, Ya”…… So, I made my own, getting as close as possible. This is a recipe to replicate my favorite Vacay Ice Cream without the refined sugar and dairy. It’s delicious, it’s got some crunch, and a whole lot of yum factor!

Toasted Coconut and Dark Chocolate Dairy Free Ice Cream Gluten Free

Toasted Coconut and Dark Chocolate Ice Cream

1 Cup of Dang Coconut Chips (this kind, already toasted for you)

1/3 Cup of Dark Chocolate Chips (I used Enjoy Life)

1 Can of Full Fat Coconut Milk, chilled

1/4 Cup of Pure Honey (local tastes best)

1/4 Cup of Coconut Butter, Softened

1 Teaspoon of Pure Vanilla Extract

1 Tablespoon of White Rum (I used Bacardi it’s Gluten Free)

1 Tablespoon of Grass Fed Collagen

1/8 teaspoon of Sea Salt

Directions:

In a mini food processor, process your coconut chips until they are fine in texture. Lay them out in a single layer on a parchment lined sheet. In a small microwave safe bowl, melt the chocolate chips for 30 seconds at a time until smooth and creamy. Stir them with a fork in between 30 second increments until they are completely melted and creamy. Drizzle the melted chips over the coconut. Toss the coconut and chocolate with forks on the sheet to coat about 75 percent of the coconut. Let sit for a couple hours at room temperature until it has solidifying and can be broken into bits with your hands.

chocolate coconut

Once your coconut chocolate bits are ready, you can make your ice cream.

In a blender, blend the coconut milk, honey, coconut butter, vanilla, collagen, salt and white rum. The rum makes the ice cream softer. Add it to an electric ice cream maker and churn. At the end of churning time, add the coconut chocolate bits. This will be the last few minutes. Let the machine incorporate the chocolate coconut bits.

Serve!

Toasted Coconut and Dark Chocolate Ice Cream that is Dairy Free Crunchy Chocolatey Deliciousness!

Banana Crunch Cookies

Banana Crunch Cookies - Grain Free

Make these crunchy cookies reminiscent of banana cream pie and pecan sandies.

They have a wonderful caramel banana flavor and the texture of a pecan sandie.

Banana Crunch Cookies Grain Free AIP Paleo

Using banana chips is they key to the crunch! I crushed the banana chips to resemble chopped nuts, and stirred them into the dough. Then I sprinkled some extra crushed banana chips on top.

You can use honey or maple syrup in this recipe.

plate of banana crunch cookies - AIP Paleo

Banana Crunch Cookies

Ingredients:

1/2 Cup of Banana Chips (I use these. The ingredients are just bananas and coconut oil)

1/2 Cup of Coconut Flour

1/4 Cup of Avocado Oil

3 Tablespoons of Coconut Butter (softened)

2 Tablespoons of Coconut Sugar

2 Tablespoons of Honey or Maple Syrup

1 Tablespoon of Grass Fed Gelatin (I used this kind)

1/4 Teaspoon of Vanilla Powder (Vanilla Extract if not strict AIP)

1/4 Teaspoon of Ground Cinnamon

1/4 Teaspoon of Ground Mace

1/4 Teaspoon of Sea Salt

1/4 Teaspoon of Baking Soda

1/4 Teaspoon of Cream of Tartar

Directions:

Preheat your oven to 350° degrees F.

Lay out a cookie sheet lined with parchment paper.

Crush the banana chips using a small food processor (or you can put them in a ziplock back and pound them with a rolling pin until they resemble small chopped nuts).

In a medium mixing bowl, add the avocado oil. Then, sprinkle the oil with the grass fed gelatin, and beat with an electric hand-held mixer. Add the coconut sugar and honey, beat. Soften the coconut butter in the microwave for a few seconds, then add it to the bowl and beat until creamy and incorporated. Add the coconut flour, vanilla powder, cinnamon, mace, sea salt, baking soda and cream of tartar and mix until combined. Add 3 tablespoons of crushed banana chips to the cookie dough and mix. Reserve the remaining crushed banana for the tops. Using a tablespoon cookie scoop, scoop up the dough, then pack it firmly into the scoop before releasing it onto the prepared cookie sheet. You will have 9 cookies. Flatten each cookie with the palm of your hand. Sprinkle the remaining crushed banana chips evenly onto each cookie. Bake in your preheated oven for 9 minutes.

Cool completely on the cookie sheet.

Makes 9

Banana Crunch Cookies - Nut Free, Egg Free, Dairy Free, AIP Paleo

Carrot Cake Mug Muffin with Blueberries and Coconut

AIP Carrot Cake Mug Muffin - Paleo

Quick and Easy is one of the things I love about mug muffins! Not to mention they are personal sized, can be eaten warm, and are fresh as fresh can be. This yummy Mug Muffin comes together fast and has a half cup of carrots in it.

AIP Carrot Cake Microwave Mug Muffin

It also contains healthy fat, a touch of honey syrup and a gelatin egg. If you have a Ninja Express Food Chopper like this, the carrots shred finely in seconds, and it’s under $20. I use it a lot in the kitchen!

Here’s the recipe. You can make this muffin in about ten minutes start to finish!

Carrot Cake Mug Muffin with Blueberries and Coconut

Ingredients:

1/2 Cup of Finely Shredded Carrot (about 2 medium) It should look like rice in consistency

2 Tablespoons of Coconut Flour

2 Tablespoons of Coconut Oil (melted) or Avocado Oil

1 Tablespoon of Pure Honey

1/4 Teaspoon of Ground Cinnamon

1/8 Teaspoon of Ginger

1/8 Teaspoon of Cloves

1/8 Teaspoon of Mace

1/8 Teaspoon of Baking Soda

A Pinch of Salt

1 Gelatin Egg – Instructions in the directions -(You will need 3 Tablespoons of water and 1 Tablespoon of Gelatin like this)

2 Tablespoons of Dried Blueberries (like these) These do contain less than 1% Sunflower Oil, so if you want to avoid that substitute organic raisins.

1 Tablespoon of Shredded Unsweetened Coconut

Carrot Cake Batter

See the Batter in the photo above ready to microwave.

Directions:

Add the coconut flour, salt, baking soda, and spices to a bowl and sift with a whisk. Stir in the shredded carrot. Add the melted coconut oil or avocado oil and honey and whisk.

To make your gelatin egg, stir together one tablespoons of grass fed gelatin and one tablespoon of cold water in a bowl big enough to whisk in more hot water in a minute. Let it gel. Now, add two tablespoon of boiling or very hot water and whisk until the gelatin melts and is frothy. Put is back in the microwave for ten seconds if necessary. Whisk the gelatin quickly into the batter with a fork before it sets up. Then, fold in one tablespoon of dried blueberries. Put the muffin batter into a microwave safe mug. Sprinkle on the remaining tablespoon of dried blueberries and the shredded coconut. Microwave on high for 3 minutes. Done!

Quick and Easy Microwave Muffin for One. With all the flavor of classic carrot cake, a half cup of carrots are in this muffin along with delicious dried blueberries and shredded coconut!