Home

Sheet Pan Salsa Chicken

Sheet Pan Salsa Chicken

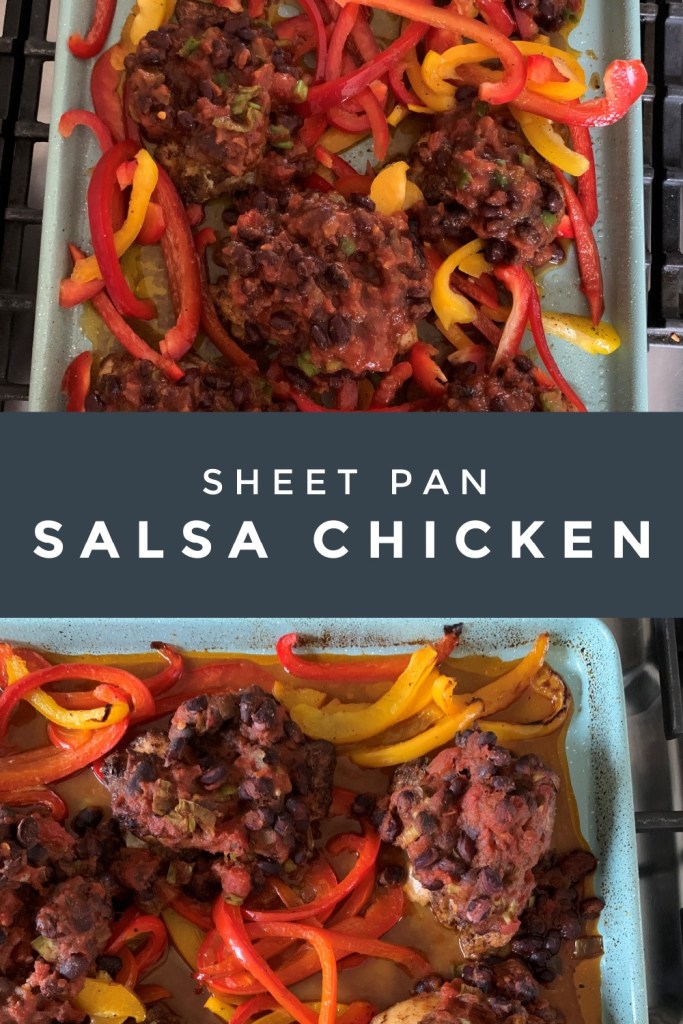
Two words…chicken and salsa! They just go together in a palate pleasing way, and sheet pan meals are some of my favorite weeknight ways to cook for the family!

When I am roasting boneless chicken, thighs are my go to, because they never disappoint! I do love a juicy chicken breast, but honestly you need to be right on top of it to get the chicken out right when it reaches 165 degrees F. and not a minute after to get a really juicy breast, and the best flavor for chicken breasts is bone in. I had seven chicken thighs, but this will vary depending on the size.

Back to this utterly delicious Salsa Chicken recipe! It’s on my rotation menu based on all the Mmmm’s I am getting from the kids and hubby. Choose your favorite salsa for this. I used Fody Foods Low FodMap Salsa in this recipe which was surprisingly delicious since it didn’t have the traditional onion and garlic in it. But use your favorite, and your favorite heat level! The salsa is a vessel for the fresh tangy lime juice and green onion. Another spring favorite addition to meals. Greens onions are lovely sprinkled on savory dishes in general. They are exceptional on salads too. If you are eating Low FodMap, Fody Foods is a great choice. You will also need a can of black beans. My favorite canned beans brand is Eden which is headquartered in my home state of Michigan. They are non-gmo, soaked (very important for digestion), organic, and in BPA free cans. I always rinse my beans under cold running water before using them.

Low FodMap Salsa

I have never in my recent memory been so glad for Spring to be here. The winter seemed longer than usual, and I love the promises of Spring with renewal all around us and new growth! When I saw this blue sheet pan I’m using at my local Marshall’s I had to grab it. The color was so gorgeous! It is so good to go outside for a walk and hear so many birds singing, and best of all, wearing tennis shoes instead of boots. There is a feeling of freedom not being bundled up against the cold. I am not one to stay inside all winter, I need to be outdoors because the fresh air just feels good, and it boosts my mood. I’m just starting to get out into my gardens and do some clean up! I see the deer are out and about too. They are very hungry, even eating out of my bird feeder, so I forgive them for digging up a couple of my tulip bulbs.

Mexican Seasoned Chicken for Sheet Pan Salsa Chicken

In this chicken recipe I have two colors of peppers. Did you know peppers are higher in Vitamin C than oranges? They are a perfect addition to this salsa chicken. Feel free to substitute any colored peppers you have on hand. Green would be good too.

I mixed up a Low FodMap Mexican Spice blend to coat the chicken that is delectable. Cumin gives the chicken a smoky flavor, and it is not hot, so it won’t blow your socks off! If you are into that, you can use a hot salsa and your favorite hot sauce at the table like my son, Jeff. 🙂

I’d like to add that if you are having digestive problems, a gut health and microbiome test can be very helpful, and balancing your gut can be a huge help in overcoming FodMap intolerance. FodMaps are very beneficial to feeding the good bacteria in your gut, which you want. Low FodMap eating can help alleviate symptoms, but it is always good to get to the root cause. I highly recommend this Gut Health Test from Thorne which is surprisingly reasonable, I just took it myself, you can do it at home and the report is extensive and very helpful with recommendations based on your results and a deep dive into your gut.

To make this dish very Low FodMap, omit the black beans which are a moderate fodmap. Beans do have a lot of health benefits, and soaked beans are easier to digest.

Sheet Pan Salsa Chicken

Ingredients:

3 pounds of boneless chicken thighs

1 16 oz. jar of salsa

2 large bell peppers, one yellow one red

1 can of Black Beans, drained and rinsed under water (I always use Eden in my recipes)

3 green onions, sliced (green parts only for Low FodMap)

Juice of 1 Lime (A juicy one. Limes can be finnicky)

Garlic Infused Olive Oil

Mexican Spice Blend:

1 Tablespoon of Cumin

2 Teaspoons of Chili Powder

1/2 Teaspoon of Oregano

1/2 Teaspoon of Salt

1/2 Teaspoon of Black Pepper

Directions: Preheat your oven to 400 degrees F. Lightly grease a large sheet pan. I used Avocado Oil spray. Put your chicken thighs in a medium bowl. Add a tablespoon of garlic olive and toss to coat the chicken.

Mix together the Mexican Spice Blend. Sprinkle it over your chicken, and toss again until the chicken is evenly coated. Place the chicken thighs evenly spaced on your large sheet pan. Put the chicken in the preheated oven and roast for 20 minutes.

While the chicken is roasting. Put your salsa in a bowl. Add the can of drained and rinsed beans, sliced green onion, and the juice of a lime. Stir it together. Mmm. It’s looking good!

Wash, seed and slice your peppers into long strips. In a bowl, toss the peppers with an additional Tablespoon of Garlic Olive Oil and sprinkle with salt and pepper to taste.

When the 20 minutes are up for the chicken roasting in the oven, pull it out and nestle the peppers around the chicken thighs, not on top of them. That’s for the salsa. Now, mound the black bean salsa mixture over each of the thighs evenly. Place the sheet pan back in the oven and continue roasting for 20 more minutes until the peppers are tender and the chicken is cooked through. Your house is going to smell amazing by the way.

It is ready to serve. You can serve this over cauliflower rice or a rice of your choice. It is absolutely delicious. Don’t forget the pan juices. Spoon them up too. If you love Mexican food, you and your family will love this meal. It is a wonderful, healthy and delicious sheet pan chicken meal! Leftovers are not a problem either, unless you don’t have any. Guess what I’m having for lunch today? 😉 Please leave any comments below. I love to hear from you. Are you enjoying Spring? What is blooming in your area, and what is your favorite Spring meal lately? Have a wonderful day!

Tahini Honey Ice Cream, Dairy Free, SCD Low FodMap

Ahhh, ice cream! It is so creamy and delicious. It a delectable treat! The problem is when it doesn’t love us back. This Tahini Honey Ice Cream is gut friendly, dairy free, with healthful ingredients like raw honey (at a low fodmap serving size of under two tablespoons per serving.) It is lovely and sweet with just one tablespoon of clover honey per 1/2 cup. Egg yolks in ice cream give it the classic custardy, creamy mouthfeel, and the tahini and honey go together so well with a little vanilla extract and creamy, dairy free coconut milk.

If you don’t have an ice cream maker, no worries, this is churn free!

I love a good tahini. I can eat it right from the spoon. My current favorite is Soom roasted tahini which I get at Thrive Market and has no sugar added.

Tahini Honey Ice Cream

Ingredients:

1 Can of Full Fat Coconut Milk with no additives 1 1/2 Cups

1/4 Cup of Good Tasting Tahini with no sugar added

1/4 Cup of Clover Honey (clover honey is low fodmap up to a 2 tablespoon serving. See Dr. Siebecker’s SCD, Low FodMap SIBO Specific Food Guide on my homepage. It’s downloadable!)

2 Egg Yolks

1 Teaspoon of Vanilla Extract

a pinch of salt

Directions: Whisk all the ingredients together with a wire whisk in a medium saucepan.

Cook over medium high heat whisking constantly until the mixture reaches 160 degrees F. Do not boil. It should coat the back of a spoon. This takes about 5 minutes or so.

Pour the ice cream mixture into a loaf pan, and place it in the freezer. Stir the ice cream every hour for 4 hours, or until its a nice ice cream consistency. At this point you can eat it, or put it into a freezer safe container for later. When serving from the freezer, let it set on the counter for about ten minutes to soften.

It is a delicious and healthy treat. I hope this helps you enjoy ice cream again in a healthful way. Delicious whether you are following a SCD Low FodMap diet or just looking to eat healthier treats!

*The low fodmap serving size is 1/2 cup.

*Tahini is SCD legal after 3 months of no symptoms. This is also delicious with Almond Butter.

How to Get a Good Night’s Sleep Consistently

Never underestimate the power of consistent sleep for your health, energy and vitality!

Most of us have experienced a night of sleeplessness or two. It’s when you are consistently not sleeping well that you need to really take a look and make some changes. If you are getting less than eight hours of sleep more than one or two nights a week, its’ time to strategize. Here are some tips and practices to implement to help you get a consistent 8 hours of solid, restorative, quality sleep.

Sleep is so important to your health as a whole. While you are sleeping your brain sweeps itself clean removing waste and toxins that can contribute to Alzheimer’s and dementia. Our blood sugar is better regulated with good sleep habits, we have less cravings, are sharper, store less belly fat, our immune system is stronger, and it is good for your heart, mood and stress levels. Who doesn’t want that?

How to get a great night’s sleep

Here are some strategies you can use to help you get enough glorious sleep. I have implemented these myself. At around age 40, I was very sleep deprived and could just not get enough sleep. These tips have helped me, and many people I know, get great, consistent sleep.

  1. Get morning sun. Whether you are outside, sitting by a sunny window, driving, going for a walk or out and about, getting sun during the daytime, especially in the morning, will set your circadian rhythms and help you sleep better.
  2. Exercise can help you sleep better. It tires the body and helps reduce stress and anxiety. It is best to get in your rigorous exercise at least three hours before bed to give your body time to unwind. I will be giving you unwinding tips below.
  3. Caffeine can be a culprit for lack of sleep. I don’t drink coffee after noon that isn’t decaf. If you are a slow metabolizer, like I am, drink caffeinated drinks before noon. It is recommended that you stop drinking caffeine six hours before your bedtime. So, if you go to bed at 10 pm, 4 pm would be your cutoff.
  4. Take a Bath. A warm bath relaxes your muscles, calms your nervous system, and relieves tension throughout your body. Add in Epsom salts and a few drops of lavender oil. I also like Perfectly Posh bath bombs. Play some calming music and close your eyes or read a book. You can reap the benefits of a bath in just 15 to 20 minutes.
  5. Magnesium Body Lotion is wonderful for sleep! It reduces stress, relaxes muscles, and helps you sleep longer. My favorites are Give It a Rest and Mo Magnesium
  6. Sip sleep tea. There are teas that can help you get better sleep too, and the warmth of the herbal tea is also down regulating. Chamomile is a well known go to tea for sleep. Another great tea for sleep is Beauty Sleep Herbal Tea. It’s delicious. Just make sure you make a small cup of tea so you don’t have to get up during the night because of a full bladder.
  7. Do bedtime yoga or have a good stretch. Bedtime yoga can really help you wind down at the end of the day. This is not the high intensity power yoga or yoga flow, but you are still moving and stretching. It is fabulous for winding down and keeping you flexible and relaxed. Here is one to try that I really like, Yoga for Restful Sleep with Jason Crandall.
  8. Go to bed at the same time every night. Setting a bedtime and sticking to it helps your circadian rhythms. Your body gets used to going to bed and expects to sleep at the same time every evening.
  9. Write down your worries and to do list. If you wake up in the night and start thinking and worrying about problems and what you have to do the next day, then writing everything down the night before can help decrease distractions, overthinking and worry.
  10. A melatonin supplement can help you get solid, deep sleep. Melatonin is a natural hormone our brain produces to help us sleep. Your melatonin levels start to rise when it gets dark and then drop in the morning. Shorter days in the winter and also age can decrease your melatonin production. I like this chewable melatonin gummy that is gluten free.
  11. Your bedroom atmosphere is also important to optimize good sleep. Make sure your room is dark and you don’t have any electronic devises that emit light in your room. Ideally your bedroom should be at a cooler temperature, about 65 degrees is recommended give or take.
  12. Aromatherapy. Research has shown that smell affects sleep and inhaling specific essential oils can help you sleep better. Specifically lavender, clary sage, chamomile, bergamot and cedarwood. A diffuser in your bedroom with some of these essential oils can help you drift off to sweet dreams. DoTerra has a blend of these I have been using for years called Serenity. It smells so good! Also Perfectly Posh has a whole line of lavender pampering products. I like Very Sleep Skin Stick which you can rub on your wrists and behind your ears at bedtime and Very Sleepy Bath Bar which is full of lavender essential oil. They also have an overnight face mask that will leave your skin soft and pretty in the morning called Very Sleepy with lavender essential oil and melatonin.
  13. A white noise machine is very helpful if you are a light sleeper and wake up easily from noise in the night.
  14. Darken your screens at night or wear blue light blocking glasses. The light from bright computer screens and cell phones can disrupt your circadian rhythms. I highly recommend that you darken your screens at least 3 hours before bedtime or get a pair of blue light blocking glasses. This 5 pack is incredibly inexpensive and cute!
  15. Calm App sleep stories. If you just cannot shut off your mind, or calm down, or have had a hard day, the sleep stories on the Calm App can help significantly. It has so many wonderful stories and themes to choose from with the most soothing voices, it will comfort you and take your mind off everything else, so you can drift off to good dreams. Whether you like travel, fiction or non-fiction, there are many wonderful choices. My current favorite sleep stories are Into the Library, The Ancient Way of Tea and The City of Seven Hills.
  16. A weighted blanket may help sleep. Weighted blankets use deep pressure stimulation that is thought to stimulate the release of mood boosting seratonin, release the stress reducing hormone coritsol, and increase melatonin levels to help improve sleep.
  17. Use a therapeutic rice bag. It heats quickly in your microwave and you can use it over and over. These are the best natural heating pads! The patterns to choose from are adorable and beautiful too! You can also choose to add a peppermint or lavender essential oil or lavender/peppermint to your bag. These pads are anti-stress, healing, pain relieving, sleep inducing, great for earaches, muscle pain, tummy aches, menstrual cramps, heachaches, and more! These are wonderful to have on hand. I make these in my Etsy shop at Porcupine Craft Studio.

If you haven’t been sleeping well, it is time to take action. Try these strategies to get the best sleep you have in years. I can attest to the difference sleep strategies make in lives. When you sleep well you will think clearer, be healthier, happier, look better and have more vibrancy and energy.

Sandra Shields, Health Coach

*I receive a very small commission when you click some of the links in this article. I am also a Perfectly Posh Consultant for natural skincare and pampering because I love the natural products and believe in the power of pampering. Thank you for you support, and I hope these tips help you get regular, deep sleep which is a foundational piece to optimize metabolism, brain function and overall health! 🙂

Delicious Healthy Peanut Butter Cups

First of all, this is an absolutely delicious recipe for peanut butter cups that uses honey to sweeten them and is healthier for you. If you prefer not to use peanut butter, choose another nut butter. They will still be delicious!

Also, I have to get something off my chest, because lately I am seeing people unfollow on social media because someone posts a treat, or a funny food quote that isn’t “healthy”. I am here to tell you, Don’t let perfection be the enemy of the good! Life is about balance. When one area is out of balance, all the other areas can be affected. A sense of humor when approaching life, health and food are just as important as what you are eating.

We had a little exercise in nutrition school called The Circle of Life, and you looked at all the areas of wellness and balance on a color wheel. It helps see what is out of sync. The categories are:

~Joy

~Social Life

~Relationships

~Home Environment

~Home Cooking

~Physical Activity

~Health

~Education

~Career

~Finances

~Creativity

You can go take the quiz yourself right here: https://www.integrativenutrition.com/circle-of-life

I encourage you to take the quiz every three to four months to help you be aware of your life balance so you can make changes.

Now, for a absolutely delicious Peanut Butter Cup Recipe! There are some amazing benefits to eating chocolate! Like enhancing brain function, mood and it’s loaded with flavanols!

Delicious Healthy Peanut Butter Cups

Directions:

Line a mini muffin cup pan with twenty mini liners

Bottom Layer:

1/3 Cup of No Sugar Added Creamy Peanut Butter

2 Tablespoons of Runny Honey

2 Tablespoons of Coconut Oil (Melted)

2 Tablespoons of Cocoa Powder

1 Teaspoon of Vanilla Extract

1/8 Teaspoon of Sea Salt

Whisk together all the ingredients with a fork until combined.

Spoon the mixture evenly into the bottom of your muffin liners.

Top Layer:

1/3 Cup of No Sugar Added Creamy Peanut Butter

2 Tablespoons of Runny Honey

2 Tablespoons of Melted Coconut Oil

1/2 Teaspoon of Vanilla Extract

1/8 Teaspoon of Sea Salt

Whisk together the ingredients until thoroughly combined and spoon over the bottom layer, dividing evenly. Rap the filled muffin tin onto the counter several times to flatten the peanut butter cups. Optional, sprinkle a little flaky sea salt on top like Fleur de Sel.

Place the peanut butter cups into the freezer to firm for 30 minutes. Store these in either the freezer or refrigerator in a sealed container depending on how firm you like them.

As always, I love to hear from you. Did you go take the Circle of Life quiz?

Gluten Free Zucchini Bread

Even though summer is notorious for an overabundance of zucchini, and baking bread is a great way to use up the extra, I have to say I love zucchini season AND zucchini bread. Also zucchini fritters, stuffed zucchini, you get it, right?

It’s cheap and cheerful, but it’s also genius the way zucchini can be transformed into a delicious loaf! It’s a veggie after all and a typically water filled one.

Well, in this recipe, there is no squeezing out of the excess water. No need for that. The loaf has a beautiful texture, is lightly sweetened with maple sugar (you can absolutely substitute pure cane sugar in equal measure), and is wonderful for snacking. I just love the maple sugar color and flavor in this loaf, and it’s a favorite sugar alternative of mine to bake with.

Gluten Free Zucchini Bread

Preheat your oven to 350 degrees F. Grease a medium loaf pan, and line it with parchment paper. I keep the ends of the pan free and have the parchment hanging over the long edges for easy bread removal. Make sure the ends are greased.

Ingredients:

3 Cups of Shredded Zucchini

2 Cups of Brown Rice Flour (I like this sprouted brand)

3 Eggs

1/2 Cup of Maple Sugar

1/2 Cup of Olive Oil

2 Teaspoons of Baking Soda

1 Teaspoon of Vanilla Extract

1/2 Teaspoon of Salt

Directions:

Add your shredded zucchini to a large mixing bowl.

In a separate medium bowl, whisk together the eggs, olive oil, maple sugar and vanilla extract.

Pour the egg mixture over the shredded zucchini and whisk together with a large fork. I shredded my zucchini in the food processor with the smaller shredding choice. It had fairly large shreds that worked beautifully. Shred how you like.

In a small mixing bowl, whisk together the brown rice flour, baking soda and salt.

Add the dry mixture to the wet mixture, and whisk it together with a fork.

Pour it into your prepared bread pan. Smooth the top with a spatula.

Bake in your preheated oven for 1 hour and 15 minutes until it is firm and golden brown on the top and cooked through. I used a convection oven, and all ovens are slightly different.

Remove from the oven and place the loaf in the pan on a cooling rack for five minutes. Then, using your parchment paper, lift the loaf out of the pan and take off the parchment paper. Cool completely on a wire rack.

This loaf keeps at room temperature tightly wrapped for 3 days. You can keep it in the refrigerator as well for a couple days longer shelf life.

Mint Chocolate Chunk Cookies – Gluten Free and Dairy Free

Mint Chocolate Chunk Cookies – Gluten and Dairy Free

Mint Chocolate Chip Cookies are so good! In this recipe I used brown rice flour and maple sugar, and the flavor is so delicious with a lovely crumbly cookie texture.

Spring is here, although in Northern Michigan it is a bit sketchy at times, we have had some beautiful warm days, and I do find that the spring flowers blooms like daffodils and hyacinths last a very long time in the cooler climate. This is my first spring in many years up north, and having moved from Maryland last May, in my adult experience the spring flowers faded fast in the heat. That’s a big plus here, but my favorite time in spring is when the lilacs start blooming the end of May! Can’t wait for that!

This month is the anniversary of my 7th year writing this blog, and I hope the recipes and healthy living tips have been an inspiration to you! Leave me comments. I love to hear from you!

If you are with me on your digestive healing journey, you will see that my recipes have evolved from being completely grain free to including some gluten free grains and flours in my baking and recipes. I have healed so much and am enjoying a much larger variety of healthy food, including some aged cheese and healthy grains. Don’t worry if you aren’t eating them, I still have plenty of recipes that don’t include them and will continue to blog those as well and more healthy living tips. Inspiring you with veggies is a passion of mine, and baking is my guilty pleasure, so I try to make versions of cookies and treats that are healthier and also delicious!

Here’s my newest cookie recipe that I think you will love! If you have never baked Mint Chocolate Chip Chunk Cookies, you are in for a lovely surprise!

Mint Chocolate Chunk Cookies – Gluten and Dairy Free

Preheat your oven to 350 degrees F.

Ingredients:

1 Cup of Brown Rice Flour

1/4 Cup of Organic Shortening

1/4 Cup of Olive Oil

1/4 Cup of Maple Sugar

1 Egg

1/2 Teaspoon of Vanilla Extract

1/4 Teaspoon of Baking Soda

1/4 Teaspoon of Salt

1/3 Cup of Chopped Mint Dark Chocolate Bar (I used Endangered Species Forest Mint & Dark)

Directions:

In a medium mixing bowl, beat together the shortening, olive oil and maple sugar until creamy, about 1 minute. Add the egg and vanilla and beat. In a separate small bowl, mix together the brown rice flour, baking soda and salt. Add it to your egg mixture and beat it in with an electric hand held mixer. Fold in the chopped mint chocolate bar until evenly distributed reserving a bit to press into the tops.

On two parchment lined cookie sheets, drop the cookies two inches apart with a tablespoon cookie scoop or equivalent. With damp fingertips, flatten each cookie.

Bake in your preheated oven for 12 minutes until lightly browned. Cool.

Happy healthy baking!

Makes approximately 15 cookies.

Crostini with Sundried Tomatoes and Bacon, Gluten & Dairy Free

This Crostini is restaurant quality and a feast for the mouth and eyes!

There is a wonderful combination of savory flavors that go so well together, and the dairy free chive cream cheese is perfect and delicious, and holds all the toppings on.

I used a gluten free bread from my favorite gluten free bakery in Traverse City, Michigan. BTW, they do ship. But, you can use any bread of your choice. Pick one you really love.

Here’s my recipe for delicious, beautiful, and mouth watering Crostini. It makes a wonderful appetizer, or serve it with your meal, a salad, or as a snack. If you are having a party, this is a winner!

This recipe serves two, but you can easily double or triple the recipe.

Crostini with Sundried Tomatoes and Bacon

Ingredients:

2 Slices of your favorite bread (I used Third Coast Bakery G/F Heavenly Bread)

Kite Hill Chive Cream Cheese (it’s dairy free)

Ghee or Olive Oil for dairy free (the ghee adds wonderful flavor)

Oil Packed Sundried Tomatoes (2 chopped)

Fresh Basil (Chopped. Use the amount you want. I used a couple tablespoons)

Dried Dill (a pinch)

2 Slices of cooked bacon (crumbled)

1 or 2 Sliced Scallions

Directions:

Set your oven to broil.

Spread two bread slices with ghee or olive oil, then broil in your oven until golden brown.

Remove your bread from the oven and let sit while you chop your sundried tomatoes, bacon, basil and scallions. This will allow it to cool a bit.

Cut each piece of broiled bread in half on a diagonal. Spread the Kite Hill cream cheese onto your broiled bread generously. Place the four triangles of crostini onto a serving plate and top each with equal amounts of sundried tomato, dill, bacon, basil and scallions.

Serve immediately.

Serves 2

Gluten Free Cinnamon Honey Cookies

These cakey cookies have warming cinnamon and honey in them with a drizzle of dark chocolate on top! The cookies are just sweet enough and made healthier with less sugar in the form of honey. Half the fat used is olive oil.

These are made with gluten free brown rice flour only which gives the cookie a cakey texture.

This recipe will make a batch of 14 cookies. Let’s bake healthier cookies!

Gluten Free Cinnamon Honey Cookies

Preheat the oven to 350 degrees F.

Ingredients:

1/3 Cup of Honey

2 Tablespoons of Ghee

2 Tablespoons of Good Olive Oil

1 Egg

1 Cup of Brown Rice Flour

1 Teaspoon of Ground Cinnamon

1/2 Teaspoon of Vanilla Extract

1/4 Teaspoon of Salt

1/4 Teaspoon of Baking Soda

——————————————————————-

1/4 Cup of Dark Chocolate Chips for drizzling on top

Directions:

In a medium bowl with an electric hand mixer, mix together the honey, ghee and olive oil until creamy. Add the egg and vanilla extract. Mix again until incorporated.

Sift together the brown rice flour, cinnamon, salt and baking soda, then add it to the honey mixture. Blend with the mixer on medium speed until thoroughly blended, about one minute.

With a tablespoon cookie scoop, scoop the cookies onto two parchment lined cookie sheets spaced two inches apart. Flatten the cookies slightly with the tips of your fingers.

Bake for ten minutes in your preheated oven. Remove the cookies from the oven and cool on the cookie sheet for a half an hour. In a double boiler, melt 1/4 cup of dark chocolate. Alternately, you can use a microwave by microwaving on high, stirring every ten seconds until just melted. If you take it too far, the chocolate will seize and not drizzle.

When the chocolate is melted, using a fork, scoop up some of the chocolate and drizzle it evenly over all the cookies. Let set until the chocolate dries. Store the cookies covered up to 3 days at room temperature. They also freeze very well.

Turkey and Vegetable Stuffed Spaghetti Squash

Stuffing vegetables is very tasty and healthy! This Turkey Stuffed Spaghetti Squash does not disappoint!

I used Butcher Box ground turkey and lots of delicious and flavorful vegetables and herbs in this recipe. To meld it all together, you will stir in some good mayonnaise and top it with aged real shredded parmesan cheese. To make it dairy free and Whole 30, just omit the cheese.

Since I’m all about efficiency in the kitchen, and although I love to cook, time matters, (Seems I’m often pinched for time) so, I split and bake the spaghetti squash the day before and then refrigerate it until the next day when I’m ready to make the dish. That way you are spending under an hour in the kitchen to make dinner. Here’s how to make it:

Turkey and Vegetable Stuffed Spaghetti Squash

Ingredients:

1 Spaghetti Squash

2 lbs. of ground turkey (I used Butcher Box) You can get $15. off here.

2 Medium Zucchini (diced)

1 Large Fennel Bulb (diced)

1 Red Bell Pepper ( seeded and diced)

1 Bunch of Scallions (sliced)

1 Cup of real Parmesan Cheese, grated (optional)

3 Tablespoons of Garlic Infused Olive Oil (divided)

1 Tablespoon of Dried Chives

2 Teaspoons of Black Pepper

1 1/2 Teaspoons of Smoked Paprika

1 1/2 Teaspoons of Dried Parsley

1 1/2 Teaspoons of Ground Cumin

3/4 Teaspoon of Dried Oregano

1 1/2 Teaspoons of Salt, or to taste

1 Tablespoon of Fresh Lemon Juice

1/2 Cup of Avocado Oil Mayonnaise (I use this brand)

Directions:

Preheat your oven to 400 degrees F. Split the spaghetti squash stem to stem and remove the seeds. Place the squash halves cut side down on a baking sheet, and bake for one hour. Remove the squash from the oven when tender and flip to cool. At this point, you can store in the refrigerator until the next day if desired.

On the day you make the dish, preheat your oven to 400 degrees F. Put the Spaghetti Squash back into the oven to rewarm for ten minutes cut side down, and prepare it for stuffing. To make the Turkey and Vegetable Stuffed Spaghetti Squash, in a large skillet, add two tablespoons of garlic infused olive oil, and cook the diced zucchini, fennel, red bell pepper and scallions for two minutes on medium high heat. Add 1 teaspoon of salt, 1 teaspoon of black pepper, the chives, smoked paprika, parsley, cumin and oregano. Continue cooking and stirring occasionally until the vegetables are tender. Remove the vegetable mixture to a bowl, and in the same pan, add the last tablespoon of garlic infused olive oil, the ground turkey, a teaspoon of salt and a teaspoon of pepper and cook, breaking the turkey up with a spatula into small crumbles as it browns.

Add the vegetable mixture back into the cooked turkey. Then, stir in the mayonnaise and lemon juice. Brush the inside of the spaghetti squash with a little extra olive oil and sprinkle with salt and pepper. Mound the filling equally between the two halves of spaghetti squash. (You may have extra filling depending on the size of your squash. It’s wonderful just as is.) Then, sprinkle the tops with the grated parmesan. Bake in the preheated oven for 1/2 hour. To serve, scoop out portion sizes with a large serving spoon right down to the bottom of the squash.

This is a delicious recipe and a wonderful way to get a variety of vegetables into your dinner.

I recently signed up for monthly deliver of Butcher Box meats, and I absolutely love the quality and convenience. The ground turkey is the best I have ever tasted. You can choose your box each month and switch things out depending on what you’d like. You get to build your own box, plus they have specials each month. The link here gives you a special code for 15% off. I highly recommend it for quality meat!

Enjoy!

Gluten Free Pumpkin Spice Loaf with Turkish Figs

Fall is almost here ready or not! About this time of year I start thinking about warm spices, pumpkin and comforting quick breads. I can’t imagine many things better than a mini spice loaf with pumpkin and Turkish figs made with healthy, delicious whole grains for that hearty texture. It is a perfect mix of late Summer and Fall.

A slice of this loaf is perfect with a cup of coffee or tea.

Quinoa is a complete protein and a whole grain that is gluten free. Quinoa flakes are a great substitute for oats too.

Dried Turkish Figs are bigger than Mission Figs and lighter in color. Their flavor is absolutely delicious, and they are naturally sweet and jammy in texture. They make a great snack straight up, but are so good in baking. I actually prefer these to Mission Figs.

Figs are rich in minerals and fiber, and dried Turkish Figs are a convenient way to enjoy them year round.

This mini loaf will give you about 6 thick slices! It is moist and keeps very well wrapped tightly in the refrigerator for several days. Let’s bake!

Gluten Free Spice Loaf with Turkish Figs

Preheat your oven to 350 degrees F.

Grease a mini loaf pan.

Ingredients:

1 Egg

1/3 Cup of Quinoa Flakes (I love these g/f ones from Nuts.com)

1/4 Cup of Canned Pumpkin

2 Tablespoons of Quinoa Flour

2 Tablespoons of plain Greek yogurt

2 Tablespoons of olive oil

2 Tablespoons of maple syrup

1/2 Cup of Turkish figs (I get these delicious organic ones from Nuts.com)

1 Teaspoon of ground flax

1/2 Teaspoon of ground cinnamon

1/4 Teaspoon of ground allspice

1/4 Teaspoon of vanilla extract

1/4 Teaspoon of baking soda

1/8 Teaspoon of salt

Directions:

Coarsely chop your figs and remove the stems. Whisk together your egg, maple syrup, pumpkin, yogurt, vanilla and olive oil. Add the flax, cinnamon and allspice and whisk. In a separate small bowl, stir together the quinoa flour, salt and baking soda. Whisk this into the batter. Then, stir in the quinoa flakes. Fold in approximately 2/3rds of the chopped turkish figs, reserving the rest for the top.

Spoon the batter into your prepared pan. Arrange the remaining chopped figs on top of the loaf. Bake the loaf in your preheated oven for 25 to 30 minutes until the middle of the loaf springs back when pressed. Cool on a wire rack for 30 minutes. Then, run a knife around the pan before turning out to cool completely.

1 3 4 5 39